

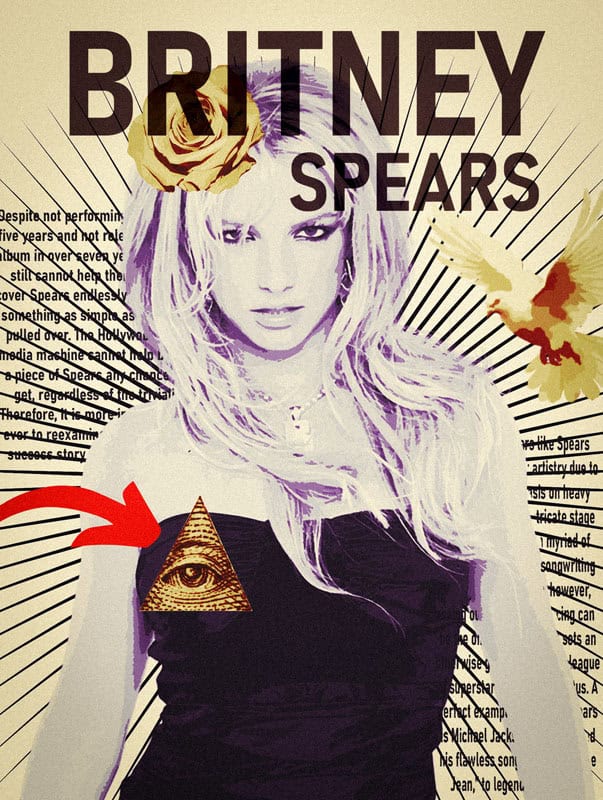
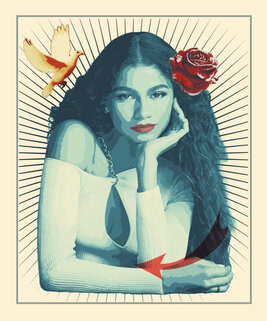
Shephard Fairey
We the People Inspired Poster
_________________________________________________________________________________________
“Art is not always meant to be decorative or soothing, in fact it can create uncomfortable conversations and emotions”. – Shephard Fairey
________________________________________________________________________________________
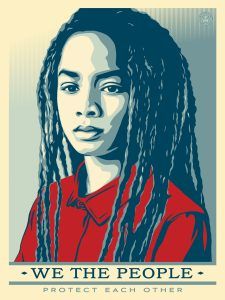
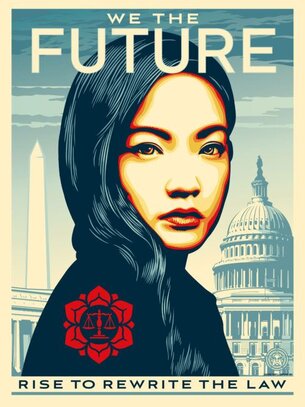
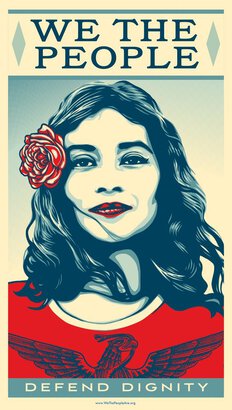


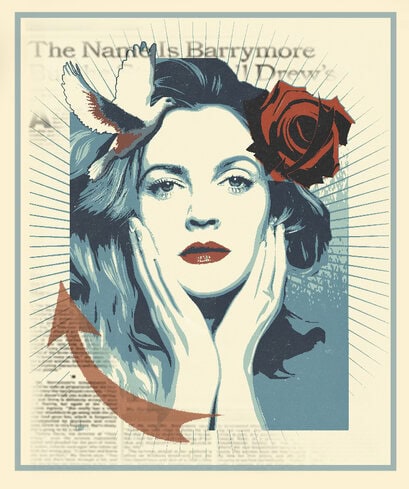
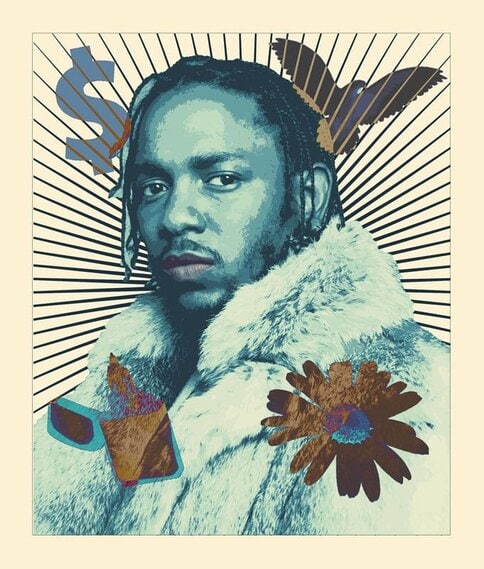
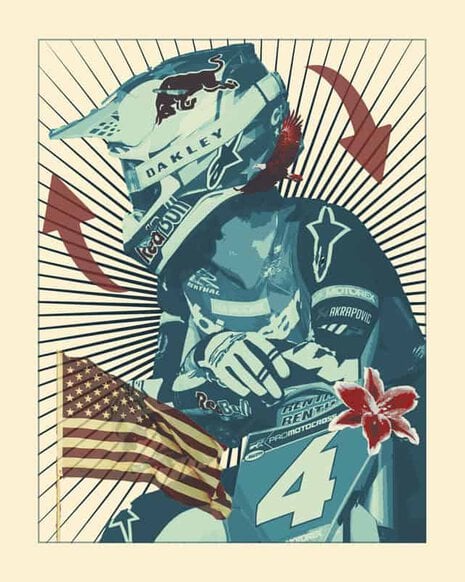
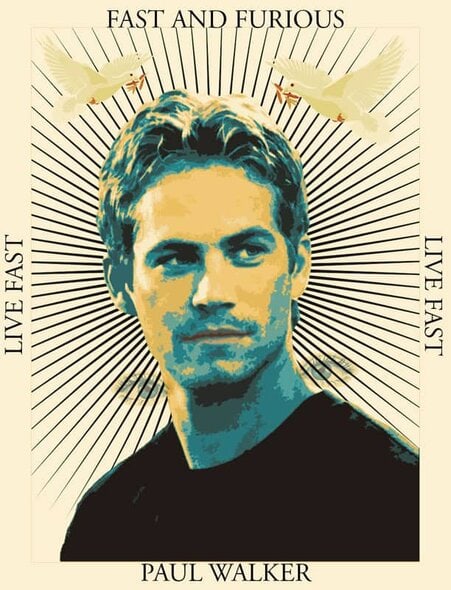
Example Projects


_____________________________________________________________________
Section 1
Picking & Saving Images
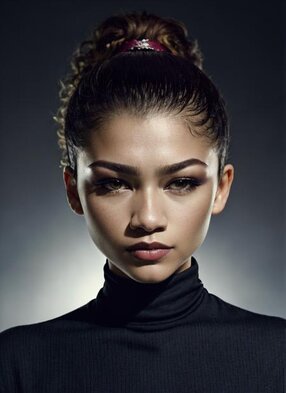
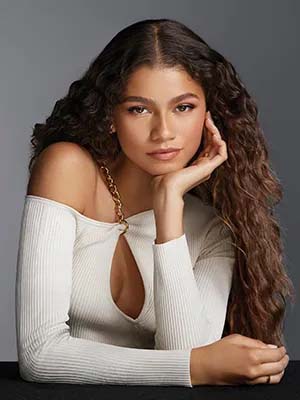
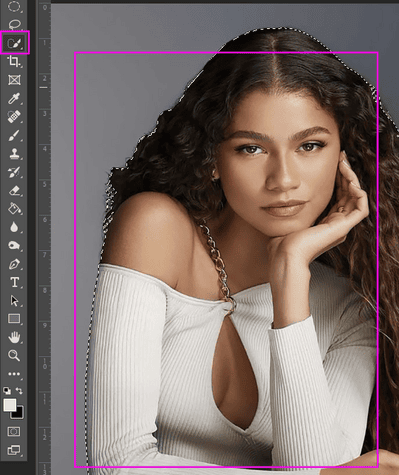
Step 1a:
- Pick an Image that shows a clear and close up portrait
- No FULL body images
- The image must be high resolution (1000pixels or more)
- This project will NOT work with low resolution photos
- The photo has to have LOTS of light on the face
- Hard dark shadows will NOT work on this project
- The photo has to have LOTS of light on the face
- This project will NOT work with low resolution photos
NO
YES Photos


Step 1b:
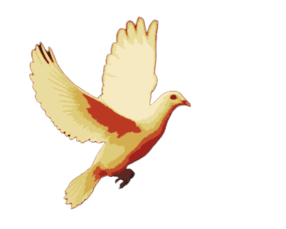
- Refer to the symbols Shepard Fairey uses in his art work
- Stars
- Simple shapes such as arrows
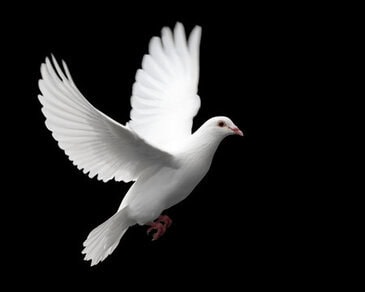
- Doves
- Peace signs
- Flags of countries
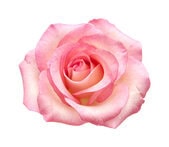
- Roses
- Money
- Torch
- Mandalas
- Ect.
- Download 3-5 images that Shephard Fairy would use in his artwork
- You MUST do at least 3 but using more always looks great
- Search online for images or
- Use my files on canvas
- Search online for images or
- You MUST do at least 3 but using more always looks great
Examples of Images/Symbols

![]()

____________________________________________________________________
Section 2
Downloading Editing Files
Step 1: If not in my class g0 to the website to download a file Gradiant Presets
- If you are in my class you will be downloading 2 files from Canvas
- Canvas- Files
- FX Gradient
- Texture Lab 40/60 Vectortones
- Texturelabs_Vector_125
- FX Gradient
- Canvas- Files
_________________________________________________________________
Section 3
Editing the Symbols
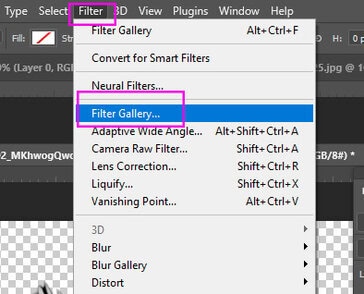
Step 1:
- Open one of the symbols you saved in Photoshop
- Go to Filter
- Filter Gallery
- Go to Filter
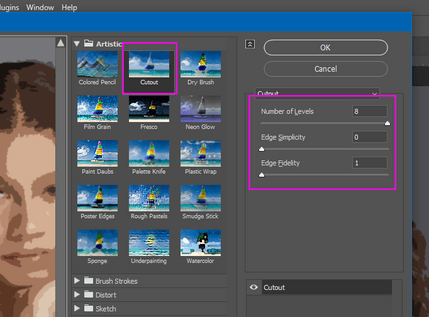
Step 2:
- Pick Cutout (below are suggested adjustments but you can change them according to your photo)
- Number of Levels: 8
- Edge Simplicity: 0
- Edge Fidility: 1
- Ok
- Edge Fidility: 1
- Edge Simplicity: 0
- Number of Levels: 8

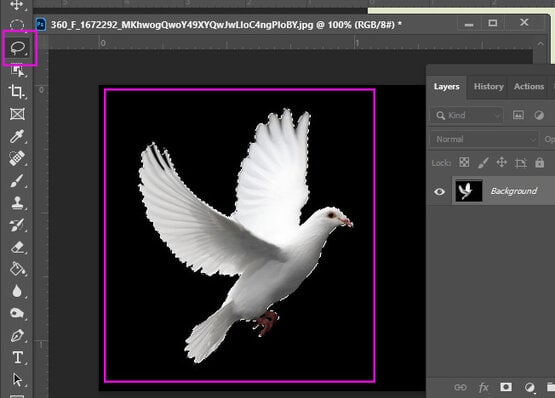
Step 3:
- Pick the Quick Selection Tool
- Select your object
Step 4:
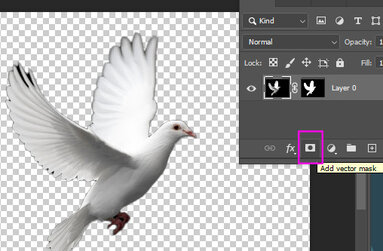
- Click the Mask Box at bottom of layers pallet
- It will delete the background
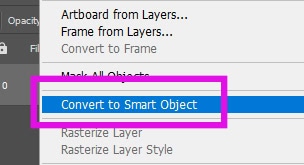
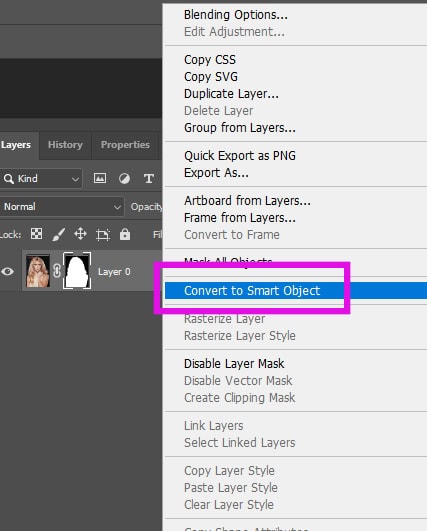
- Right Click
- Convert to Smart Object
- Right Click
- It will delete the background
Step 5a:
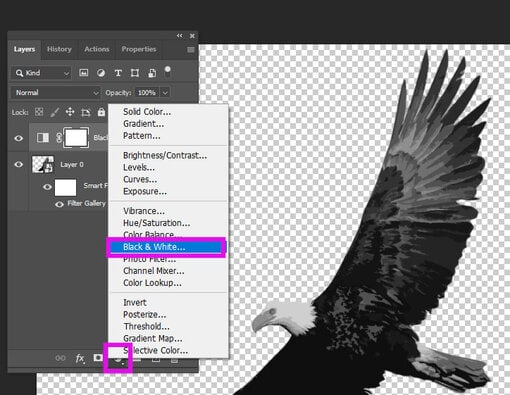
- Click the adjustments (black/white circle) at bottom of Layers Pallet
- Pick Black and White
Step 6:
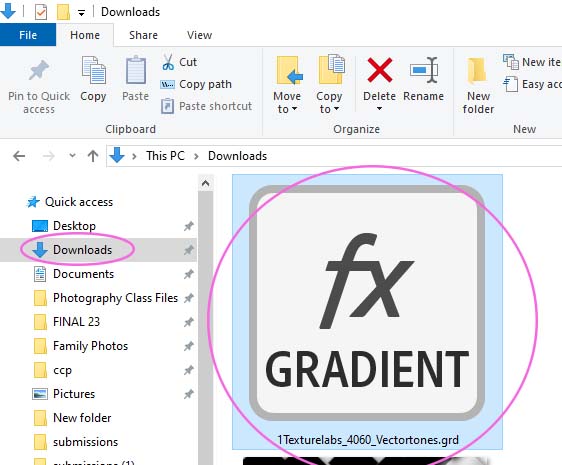
On the computer, go to the Downloads Folder
- Locate the file you downloaded in Section 2
- fx Gradient 1Texture Labs_4060
- Douple click on the file
- Nothing will happen that you can see but it will be loaded into Photoshop
- Douple click on the file
- fx Gradient 1Texture Labs_4060
- Locate the file you downloaded in Section 2
Step 7a:
- Click the adjustments (black/white circle) at bottom of Layers Pallet
- Pick Gradient Map
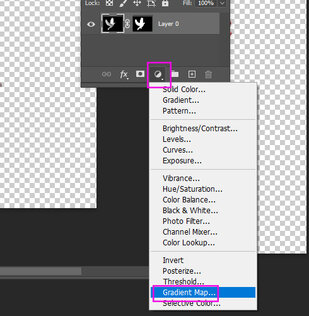
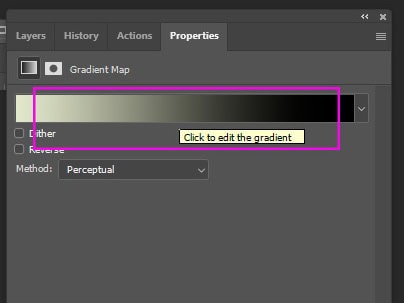
Step 7b:
- When the Gradient Map bar opens
- Double Click anywhere on the bar
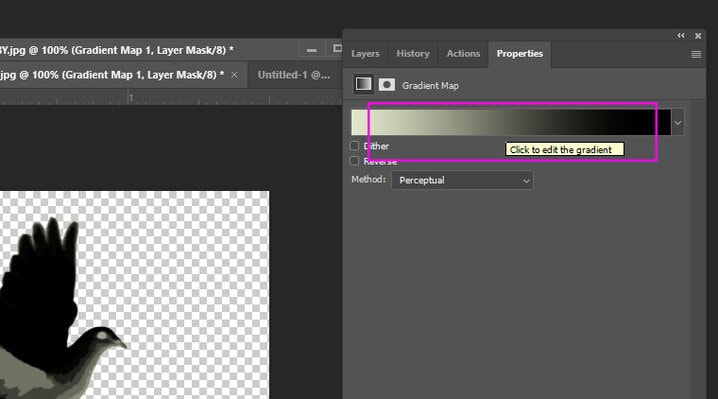
Step 7c:
- Scroll to the bottom of the Gradient Editor
- When you get to Texturelabs_4060_vectortones
- Open the folder
- When you get to Texturelabs_4060_vectortones

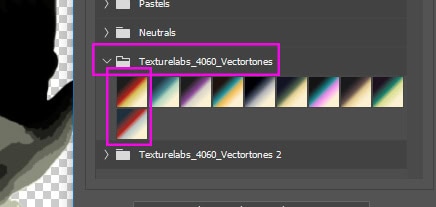
Step 7d:
- When you’ve opened the Texturelabs_4060_Vectortones folder
- Pick one of the colored boxes
- I recommend using the first box (red/yellow) or the box right below it but you are free to pick any of the other boxes.
- Pick one of the colored boxes
Step 8:
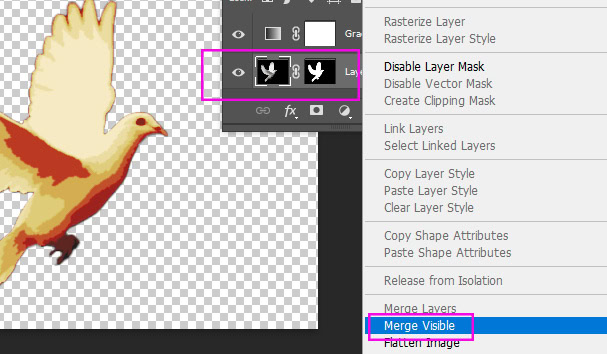
- Right Click on your bottom layer
- Merge Visable
- (DO NOT FLATTEN)
- Merge Visable
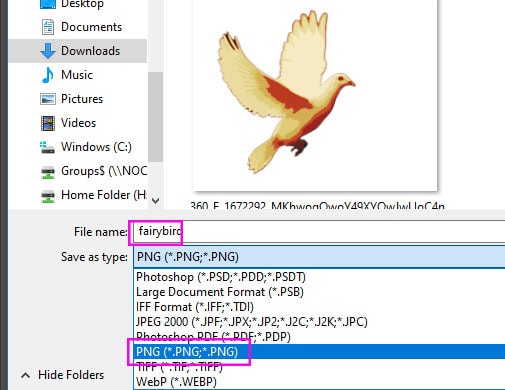
Step 9:
- You will be saving the image as a PNG
- Save the file into downloads
- Name it something you can find easily
- Save as PNG
- Name it something you can find easily
- Save the file into downloads
Step 10:
- Repeat steps 1-9 for all of your symbols/images
- Skip Step 6. You have already loaded the file and it does not need to be repeated
- Pick different colors Texturelabs_4060_Vectortones folder or keep them all the same. It’s up to you
- Skip Step 6. You have already loaded the file and it does not need to be repeated
![]()
![]()

_______________________________________________________________________
Section 4
Putting the project together
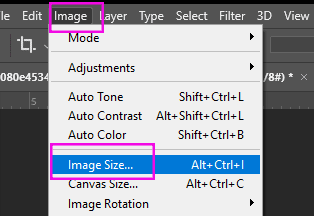
Step 1:
- Open the image of the person you picked
- Go to
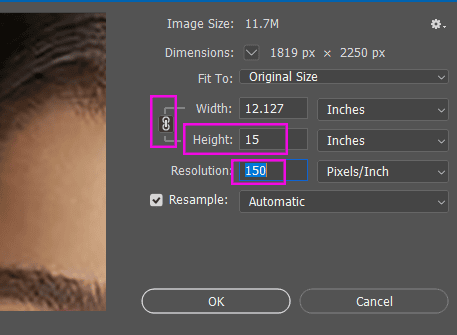
- Image – Image Size
- Change Height: 15
- Width size does not matter. It will change automatically.
- Resolution: 150
- Width size does not matter. It will change automatically.
- Change Height: 15
- Image – Image Size
- Go to
Step 2:
- Pick the Quick Selections Tool
- Select around the person
Step 3:
- Click the Mask at the bottom of the Layers Pallet (box with circle in it)
- Your background will now be gone

Step 4:
- Right Click on the person layer
- Convert to Smart Object
Step 5:
- Go to Filter
- Filter Gallery
- Cut Out
- Levels 8
- Edge Simplicy 0
- Edge Fidely 1
- Edge Simplicy 0
- Levels 8
- Cut Out
- Filter Gallery

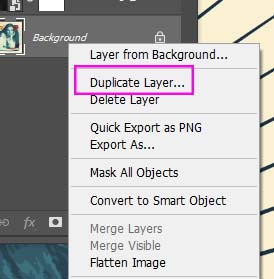
Step 6:
- Right click on Layer 0
- Duplicate Layer

Step 7:
- (If you are in my class you can download this file from Canvas)
- If not in my class
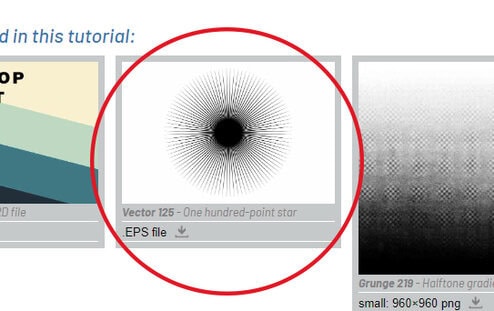
- Go to website and download file Vector 125
- Download
- TextureLabs_vector_125
- Download
- Go to website and download file Vector 125
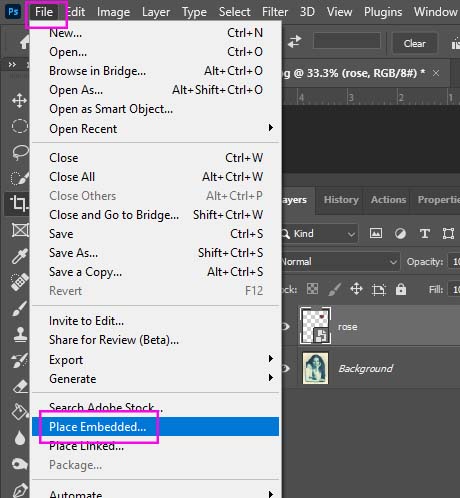
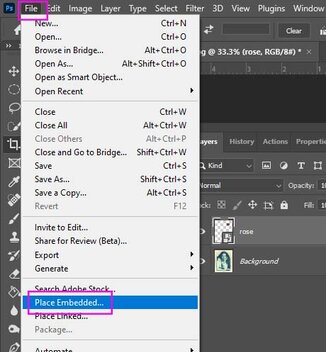
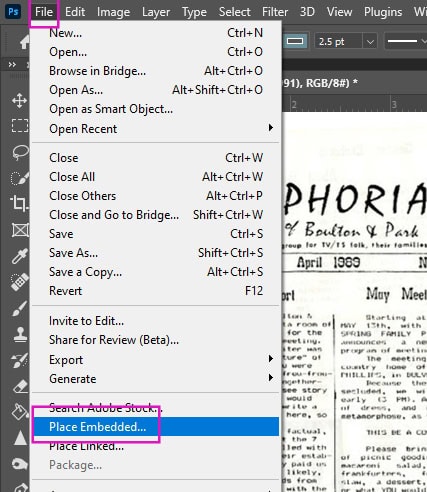
Step 8a:
- Make sure you are on the Bottom Layer
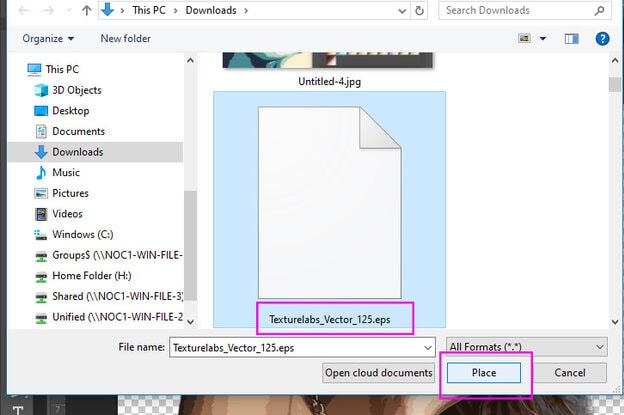
- Go to File
- Place Embedded
- Go to File
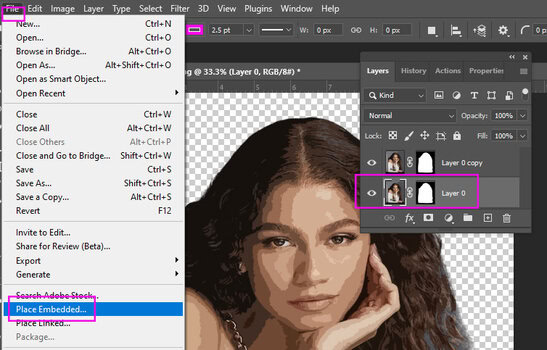
Step 8b:
- Pick the file
- Texturelabs_Vectir_125.eps
- Click Place
- Texturelabs_Vectir_125.eps
Step 9:
- The file will now be between the layers
- Click Control T
- Move the file until the lines go off the page
- Change the Opacity to 75%
- Click Control T

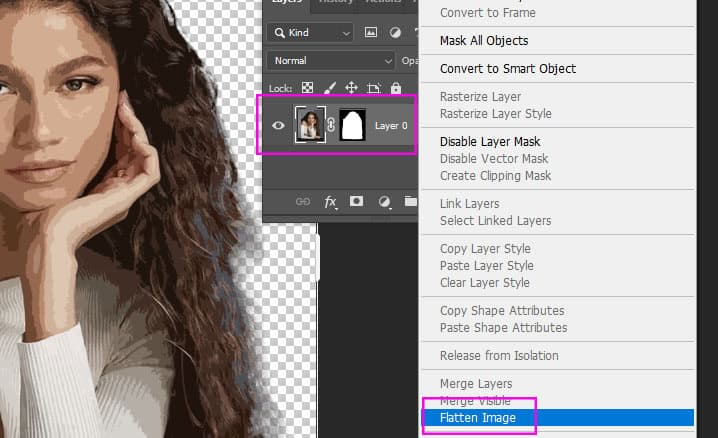
Step 10:
- Right Click on Layer
- Flatten Image
Step 11:
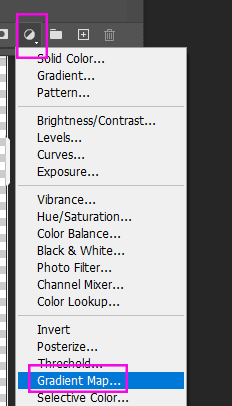
- Click on the Adjustments circle (bottom layers pallet)
- Gradient Map
Step 12:
- When the Gradient Map Graph opens up
- Click anywhere in the middle of the graph. It doesn’t matter what color it is
Step 13:
- Open Texturelabs_4060_Vectortones (Bottom Folder)
- Pick the second box (blue/yellow)
- (If you do not like the blue/yellow you can try another one of the colors except the reds)
- Click ok
- (If you do not like the blue/yellow you can try another one of the colors except the reds)
- Pick the second box (blue/yellow)

Step 14:
- Right click on Background Layer
- Flatten Image

Step 15a:
- Go to File– Place Embedded
- Choice one of the objects you edited for the poster.
- The object will open on your project
- (I will be picking the Arrow)
- The object will open on your project
- Choice one of the objects you edited for the poster.
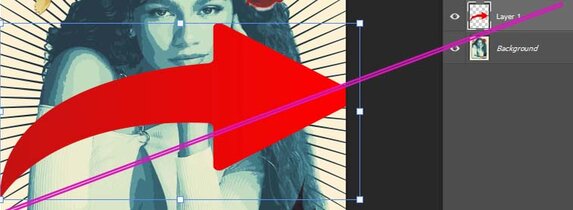
Step 15b:
- Select the Move Tool
- Move the object anywhere on the photo
- Click Control T to change the size
- Do NOT make the object to small or to big!!!!!!!!!!!
- Click Control T to change the size
- Move the object anywhere on the photo
No
Yes
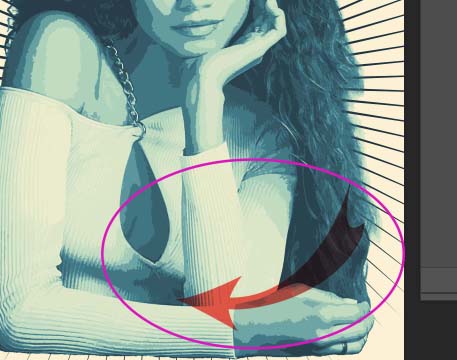
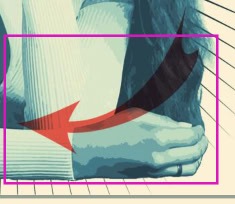
Step 15c:
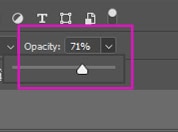
- If you want to make the image transparent (see arrow below)
- Change the Opacity to 60%-80%
- Each symbol will be different
- You do not have to do this to every symbol
- Each symbol will be different
- Change the Opacity to 60%-80%

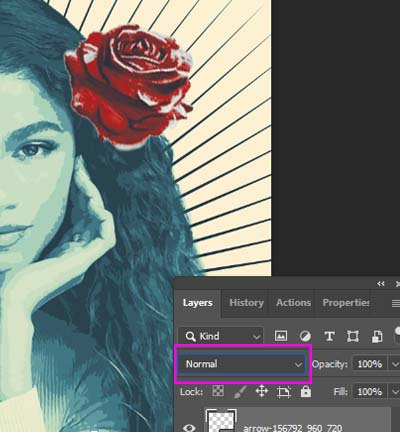
Step 15d:
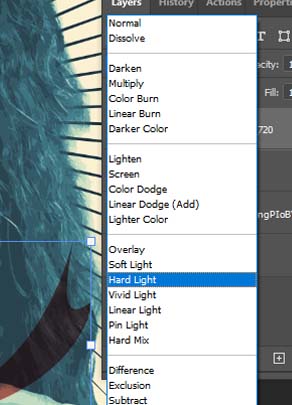
- You can also change the overlays on the symbol
- Go to normal on layers pallet
- Change the overlay to your choice
- You may change overlays on this symbol or all.
- It is up to you how to design this step
- Change the overlay to your choice
- Go to normal on layers pallet
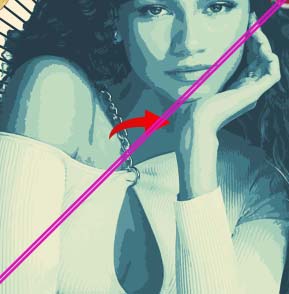
Step 16:
- Go to File- Place Embedded
- Choice another objects you edited for the poster. (I will be picking the rose)
- Move the object where you’d like it on the photo.
- Click Control T to make bigger or smaller
- Decide if you want to change the overlay
- Click Control T to make bigger or smaller
- Move the object where you’d like it on the photo.
- Choice another objects you edited for the poster. (I will be picking the rose)
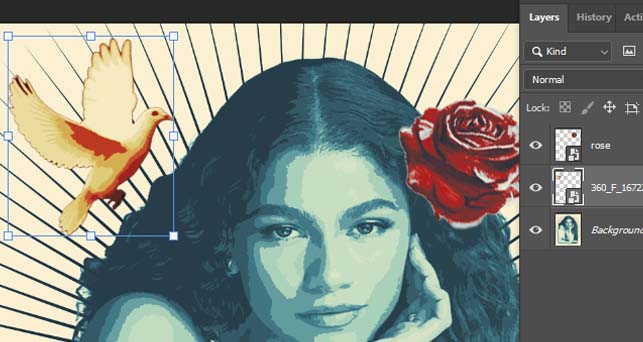
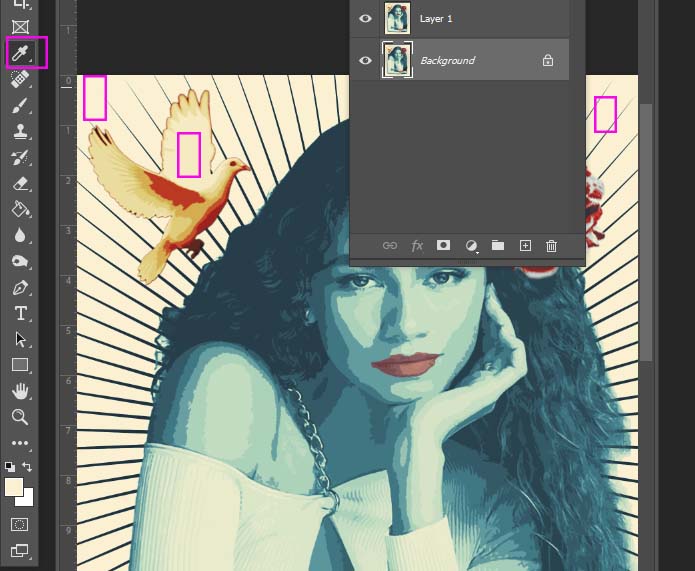
Step 17:
- Continue until you have at least 3 objects on your image. You may do more if you’d like
- Flatten your image when you are done with this section
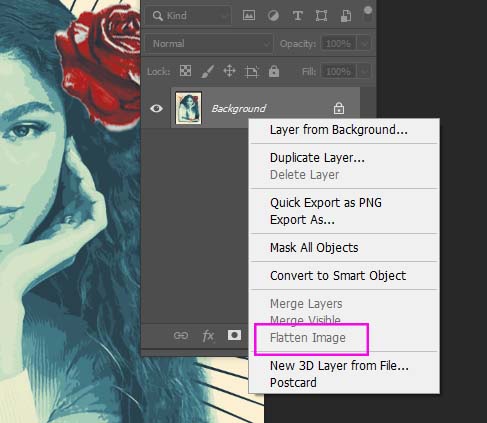
Step 18:
- Right Click on Background Layer
- Duplicate Layer
________________________________________________________________________________________
Step 19:
- Make sure you are on the duplicated layer
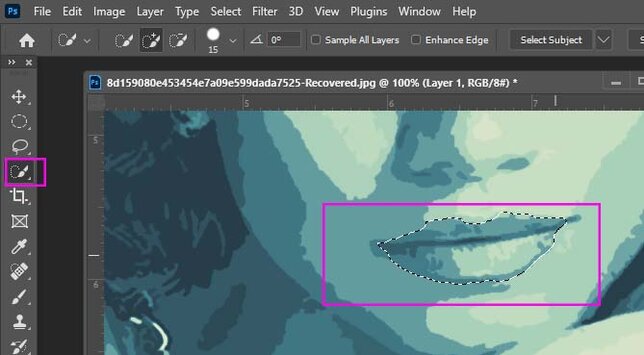
- Quick Select the lips (or other small area you will be turning red
- This does NOT have to be the lips
- ****If you do NOT want the person to have colored lips you may quick select another small section of your image*****
- This does NOT have to be the lips
- Quick Select the lips (or other small area you will be turning red
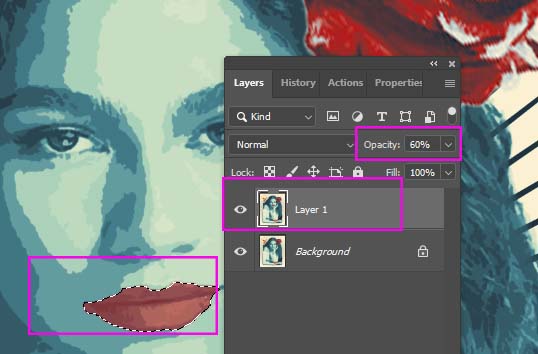
Step 20:
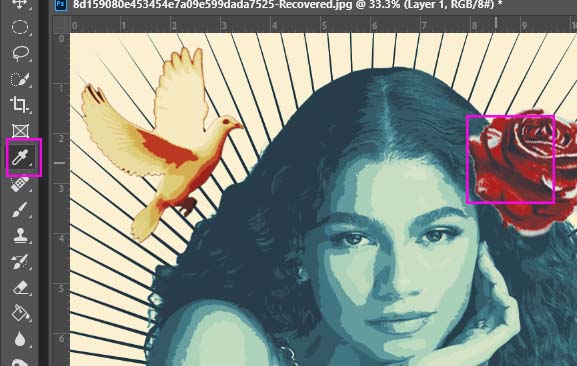
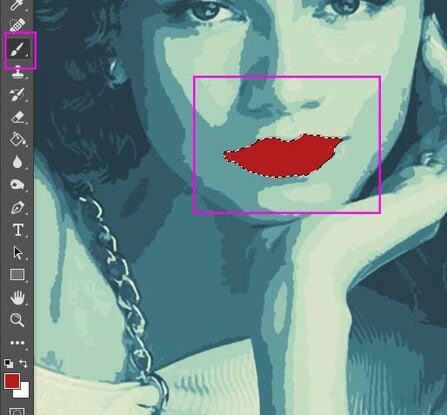
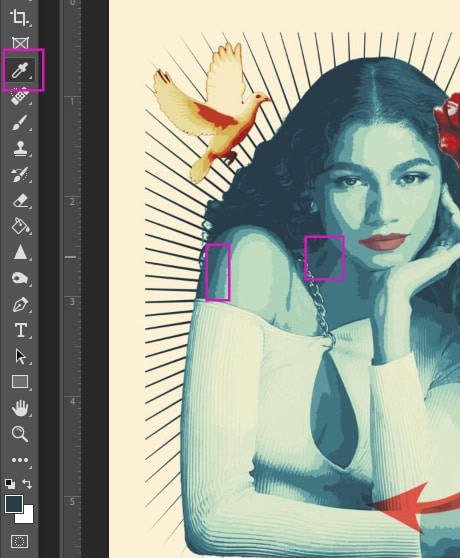
- Select the Eye Dropper Tool
- Click over any red area on you image
Step 21:
- Select the Brush Tool
- Paint over the area you quick selected
Step 22a:
- Change the Opacity to 10% – 50%
- The lower the opacity the less red it will be
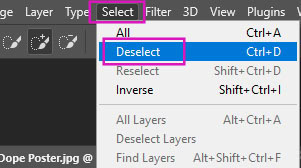
Step 22b:
- Click Select at the top
- Deselect to remove lines around object
- Right click on Layers Pallet
- Merge Visible when done
- Right click on Layers Pallet
- Deselect to remove lines around object
Step 23:
- Select the Eye Dropper Tool
- Click anywhere in the light yellow area
- This will select this color
- Click anywhere in the light yellow area
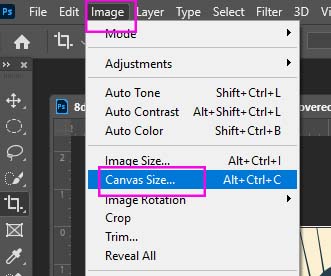
Step 24:
- Go to Image
- Canvas Size
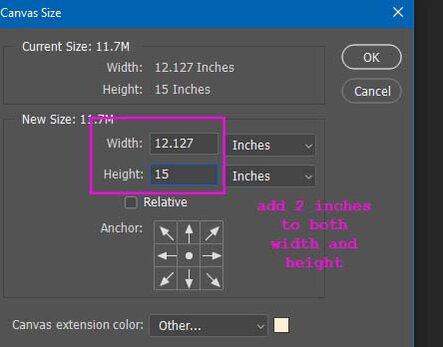
Step 25:
- You will be adding 2 inches to both the height and the width
- It will start at 15 inches
- Change it to 17 inches
- It will start at 15 inches
- Everyones Width will start at a different size
- Add 2 inches to your width
- DONT click OK yet!
Step 26:
- Click on Canvans extension color: Other
- A box of colors will open
- Click on the Yellow colored box at the bottom of the tools panel
- Click Ok
- Click on the Yellow colored box at the bottom of the tools panel
- A box of colors will open

Step 27:
- You will now have a 2 inch yellow boarder around your image
- NOTE……You want to make sure the added yellow area is the SAME color yellow as the rest of your project.
- Right Click on Layers Pallet
- Flatten image
- Right Click on Layers Pallet
- NOTE……You want to make sure the added yellow area is the SAME color yellow as the rest of your project.

Step 28:
- Pick the Eye Dropper Tool
- Click on a dark blue area from your project
Step 29a:
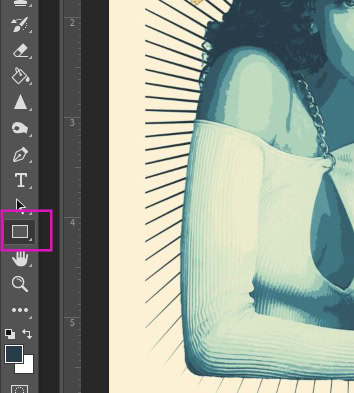
- Select the Rectangle Tool
Step 29b:
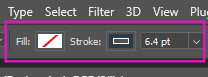
- Fill: White box with red line through it
- Stroke: The blue color you just picked
- 6.4 pt
- Stroke: The blue color you just picked
Step 30:
- With the Rectangel Tool
- Draw a box around the project
- Should just touch the tips of the lines
- Draw a box around the project

Step 31:
- Go to Layers Pallet
- Rectangle 1 Layer
- Change Opacity between 50-60%
- Rectangle 1 Layer
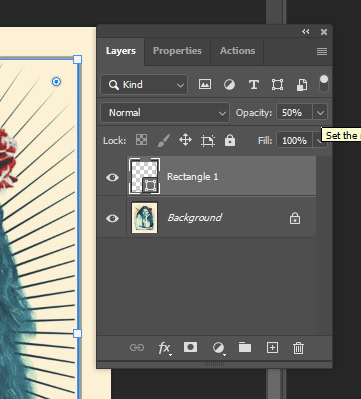
Step 32:
- Flatten Image
Section 5
Extra Credit Step (Optional)
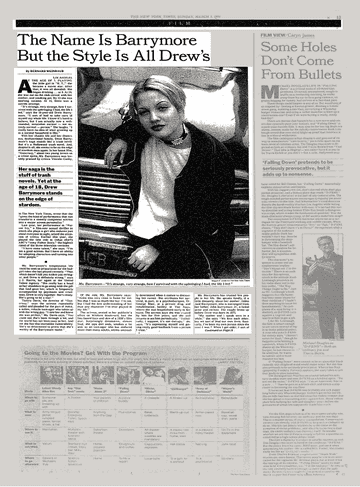
Step 1:
- Go to Google Images
- Name of your person + Black and White Article
- Ex: Drew Barrymore black and white article
- Name of your person + Black and White Article
- Find an article about the person and save it
- You are looking for images with lots of Text

Step 2:
- Return to your project on Photoshop
- Go to
- File
- Place Embedded
- Pick the article you saved
- Place Embedded
- File
- Go to
Step 3:
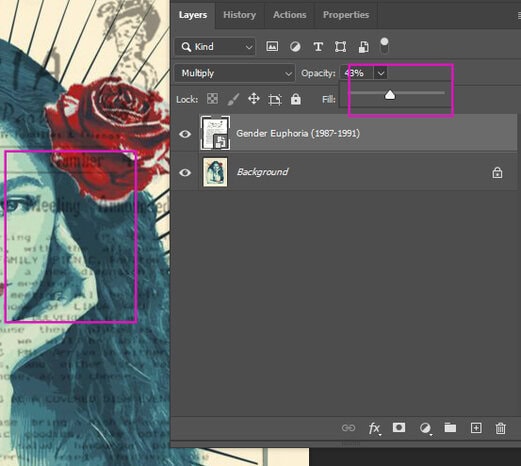
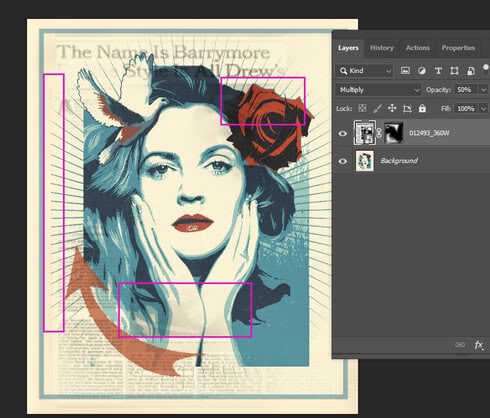
- Go to Layers Pallet
- Change Normal to Multiply
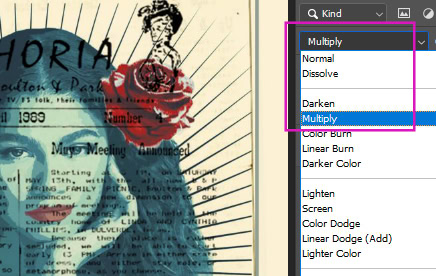
Step 4:
- Lower the Opacity so the article becomes more transparent:
- 25% – 50%.
- Every image will be different
- 25% – 50%.
Step 5:
- Add a Mask to the Article Layer
- Select a Black Paint Brush

Step 6:
- Paint off words and images you do not want
- Removing text on the Person’s face is important

Step 7:
- Flatten Image and Save
