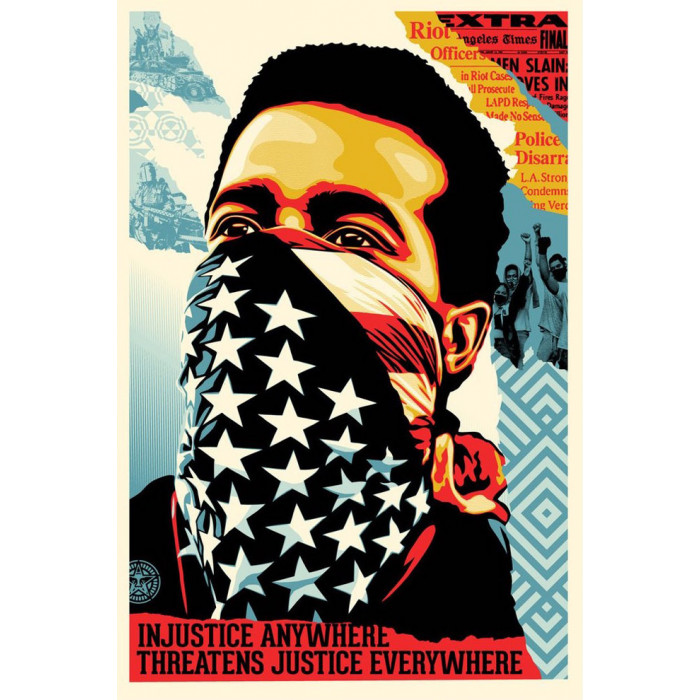
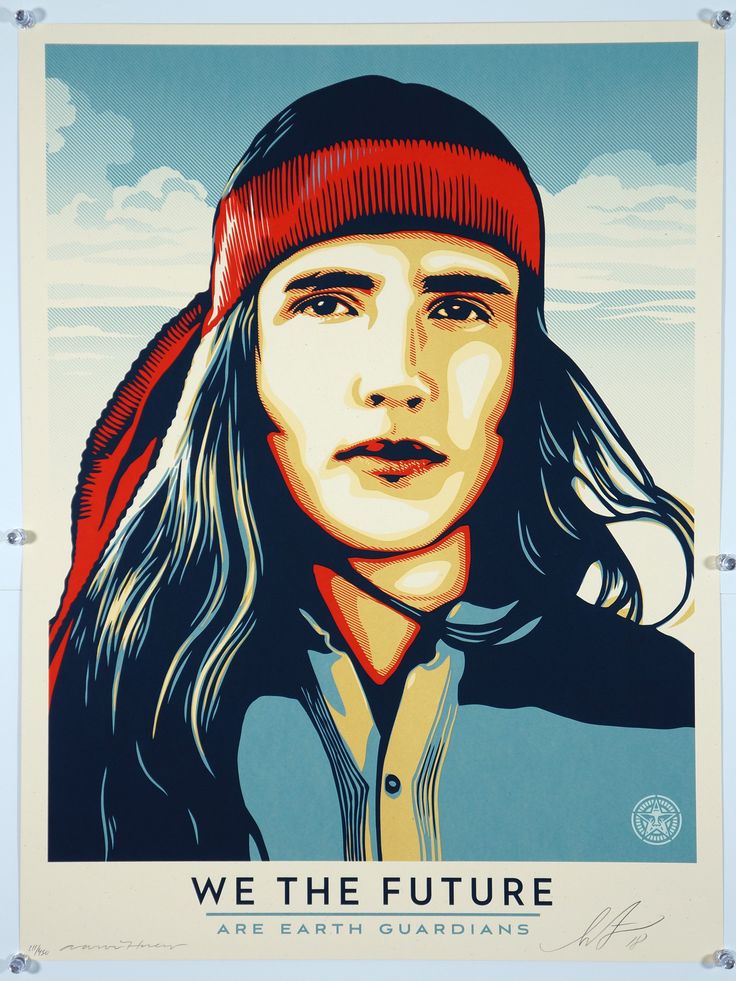
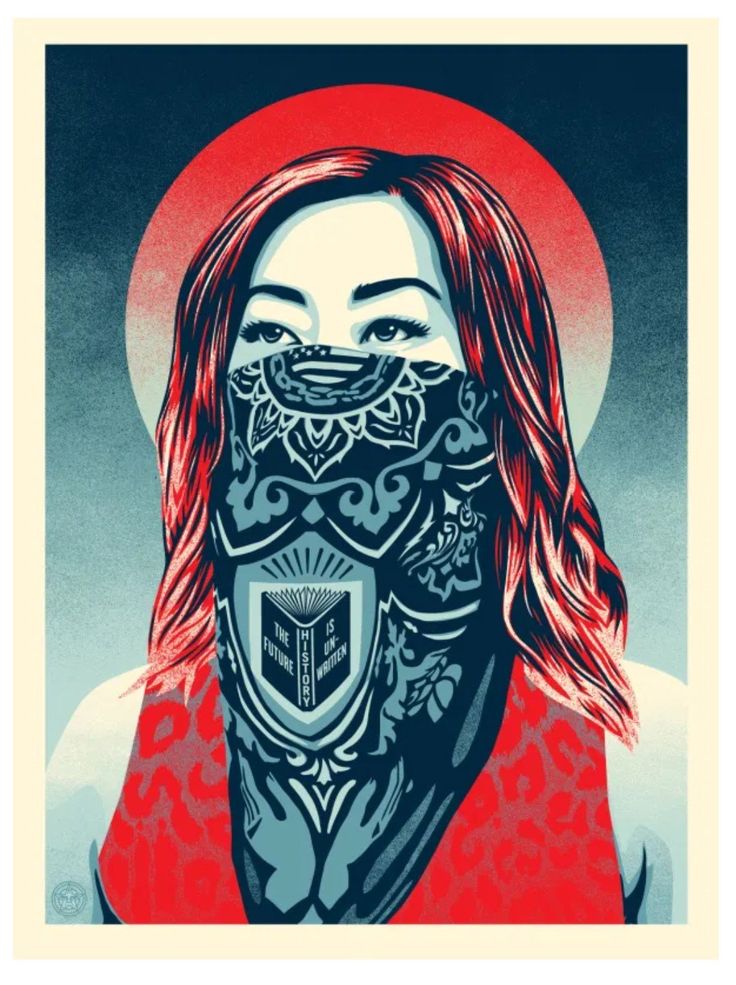
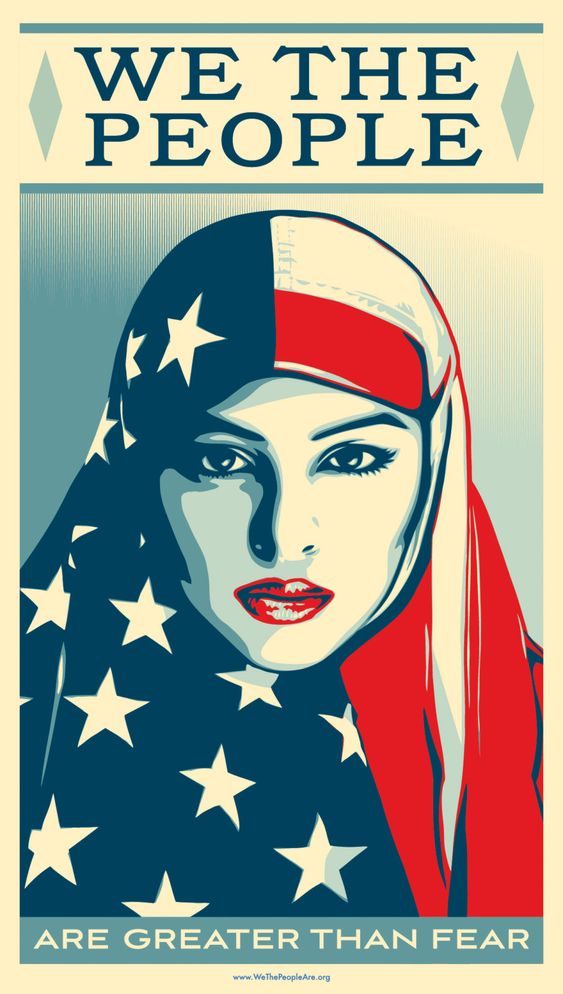
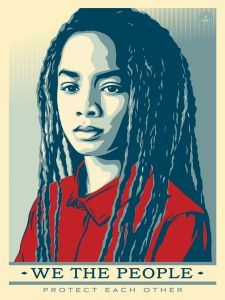
Shephard Fairey Poster Art
“Art is not always meant to be decorative or soothing, in fact it can create uncomfortable conversations and emotions”.

Project Inspired by Texture Labs

Step 1:
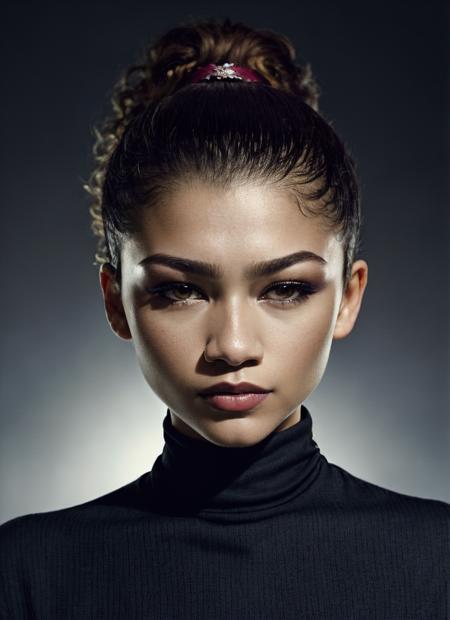
- Pick an Image that shows a clear and close up portrait
- This can be a photo you have taken yourself or one you find online
- The image must be high resolution
- This project will NOT work with low resolution photos
- The photo has to have LOTS of light on the face.
- Hard dark shadows will NOT work on this project
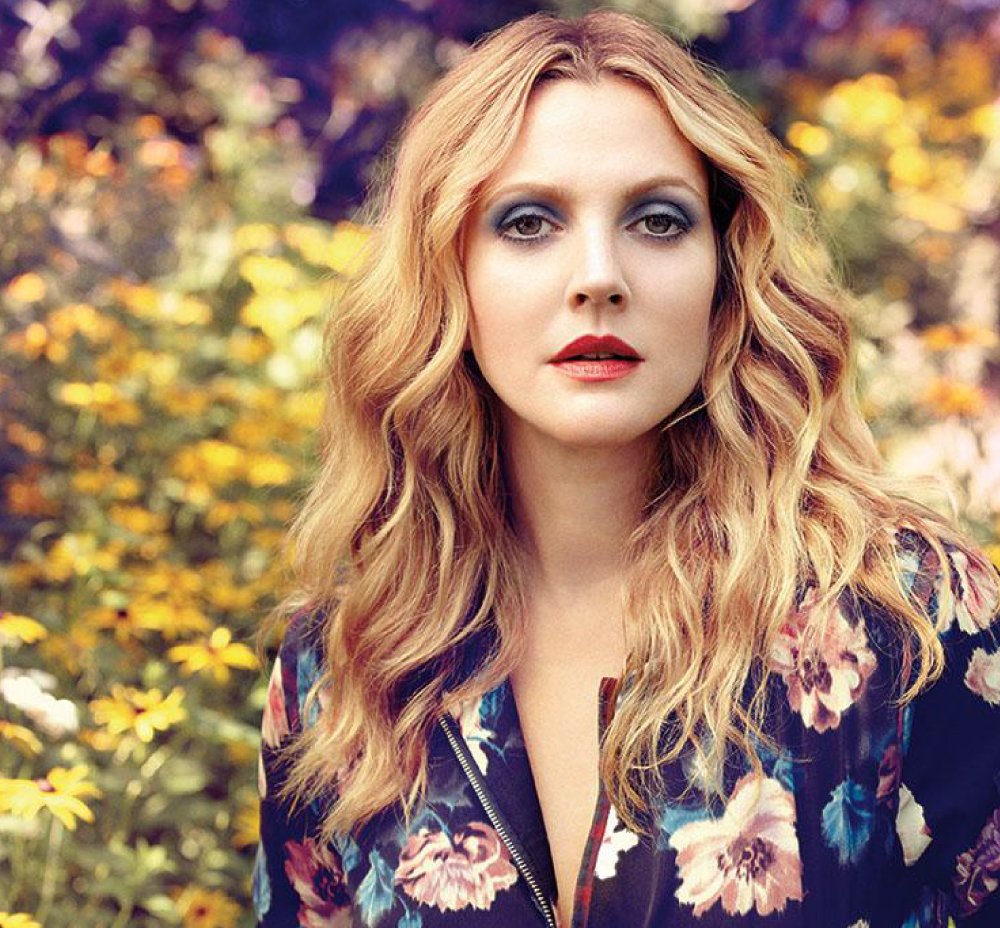
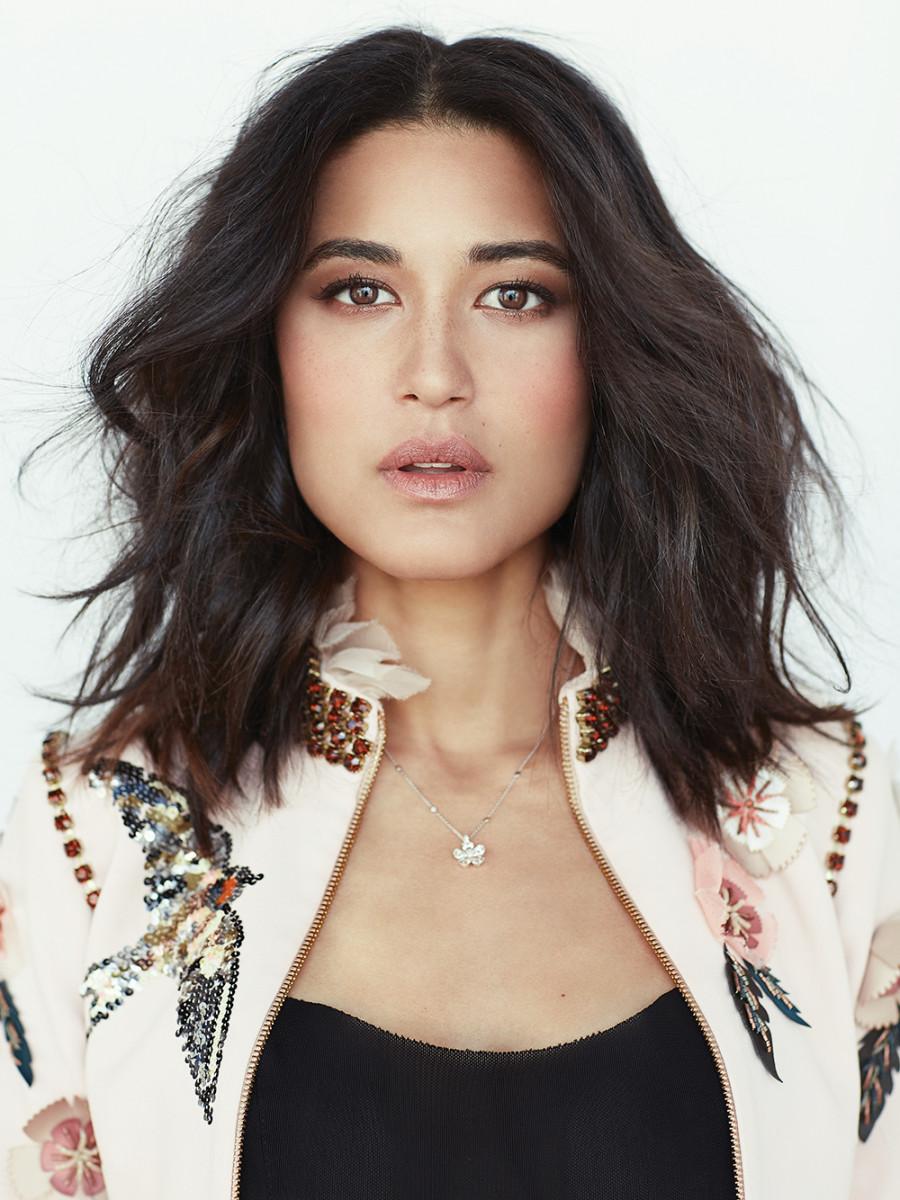
NO YES
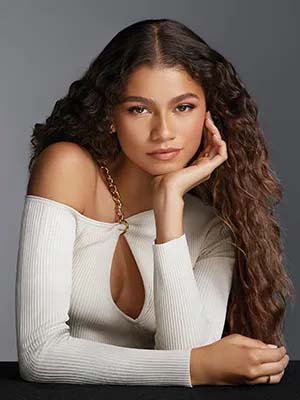
YES Photos
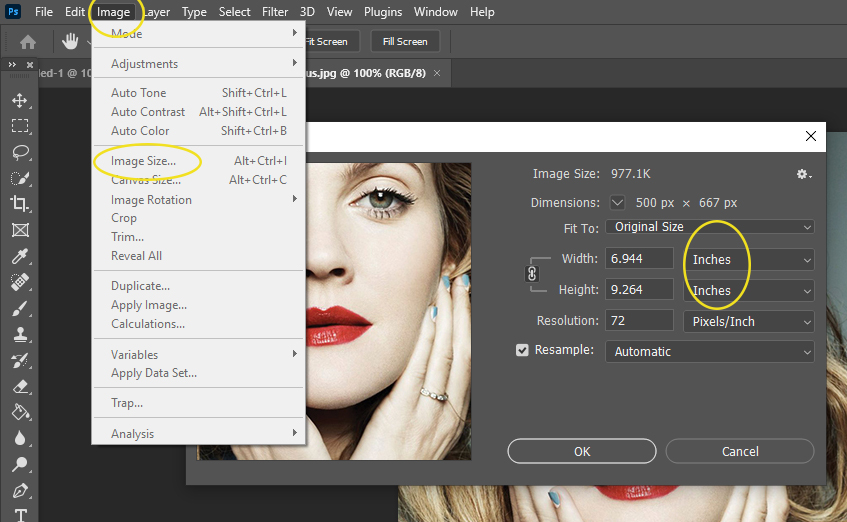
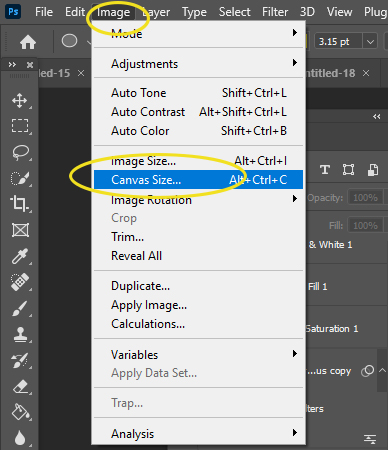
Step 2:
- Open the image in photoshop
- Go to
- Image
- Image Size
- Change to Inches
- Write down the hight-width-resolution
- Change to Inches
- Image Size
- Image
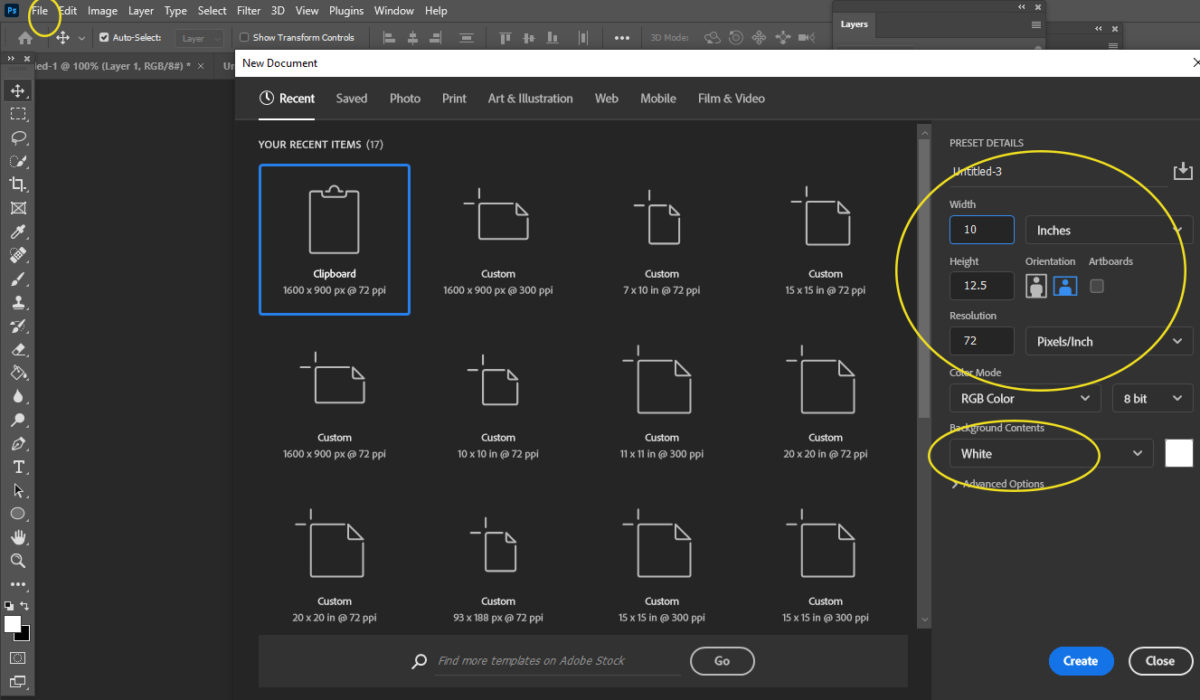
Step 3:
- Make a new blank canvas
- File-New
- Make sure you are on Inches and Background is White
- For the height and width
- Refer to the inches you just wrote down from you photo
- Keep the resolution the same
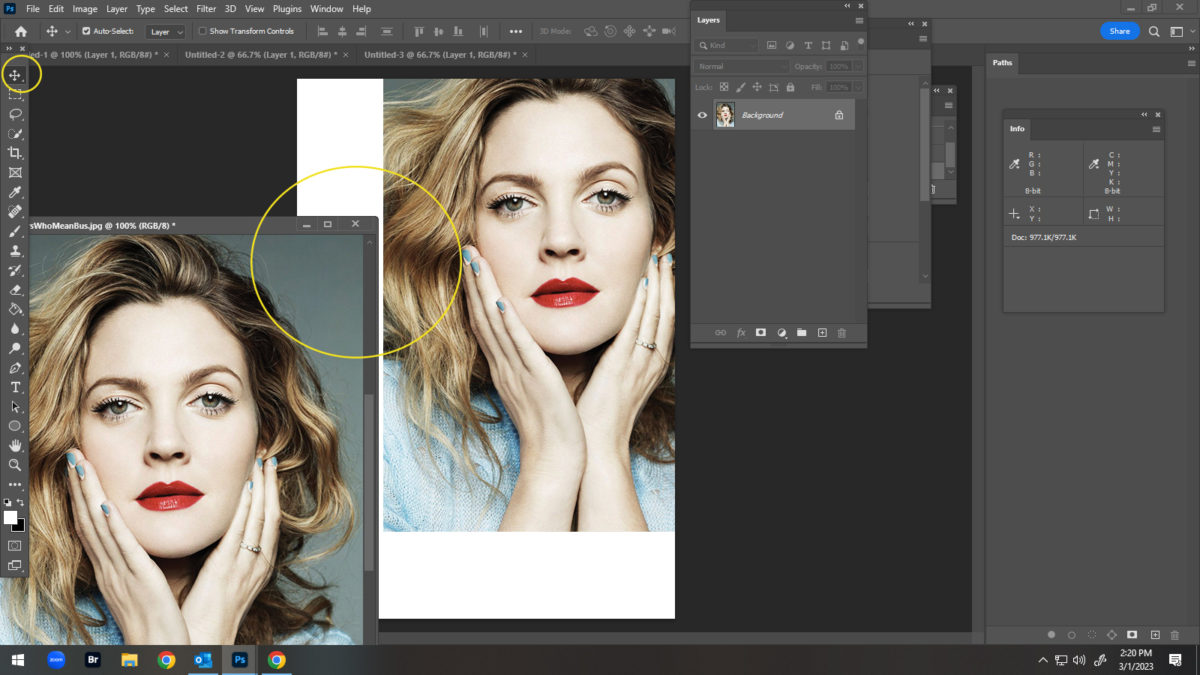
Step 4:
- Drag the photo onto the blank canvas
Step 5:
- Using the Quick Selections Tool
- Select around the person
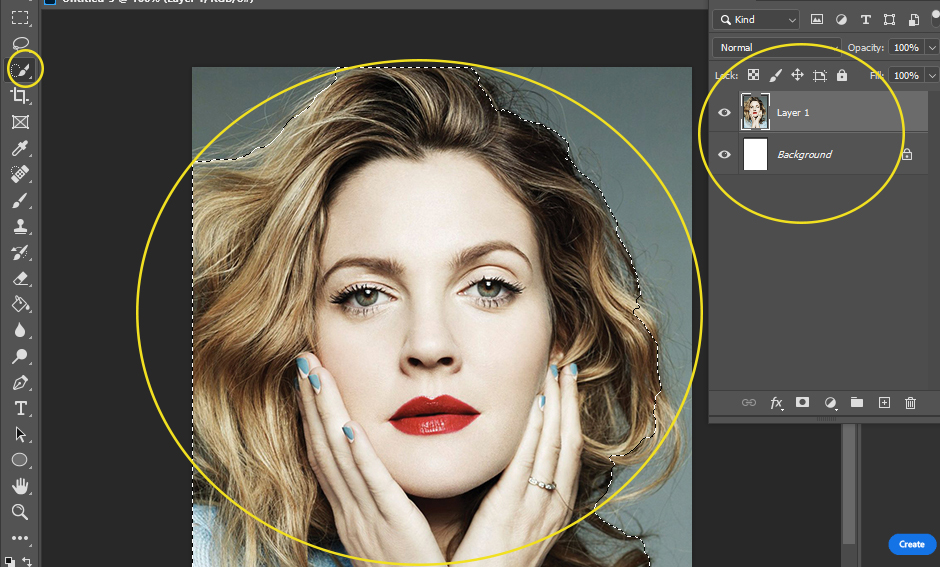
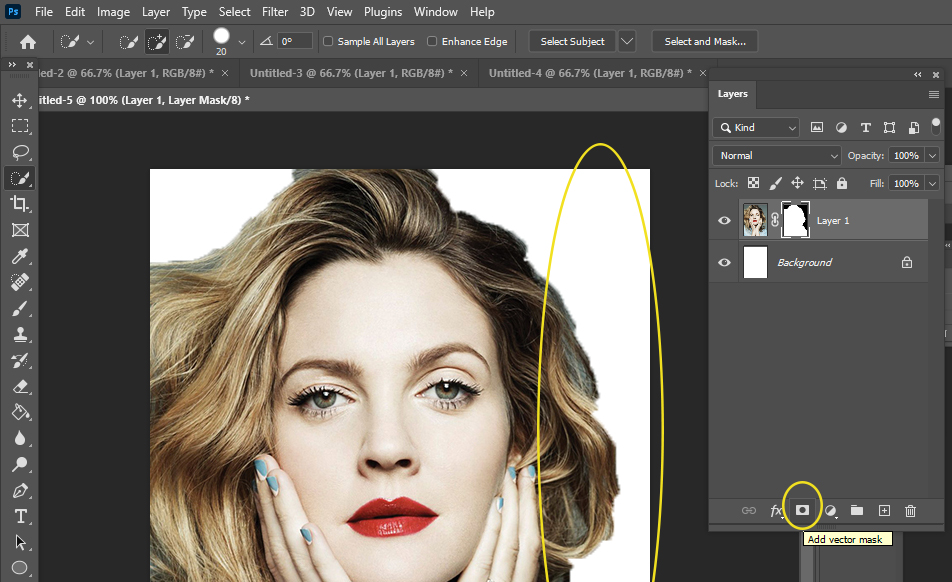
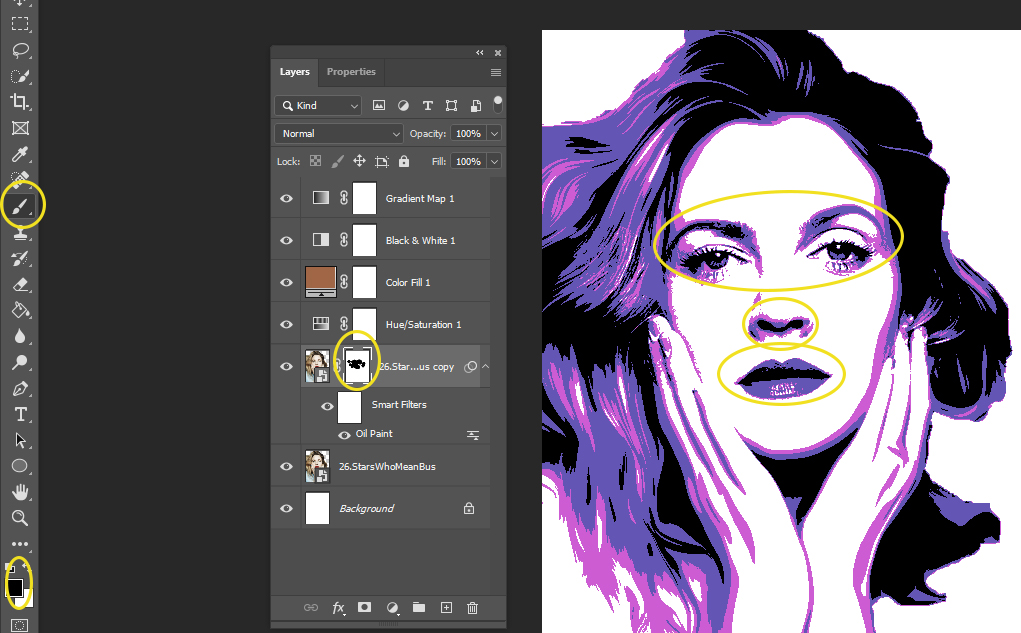
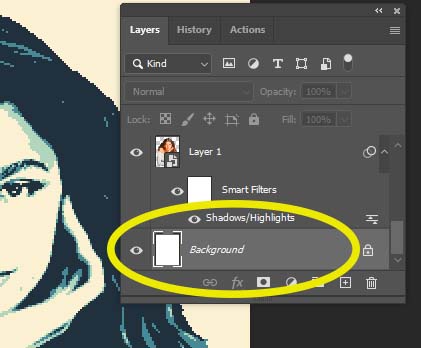
Step 6:
- Click the Mask at the bottom of the Layers Pallet (box with circle in it)
- Your background will now be gone
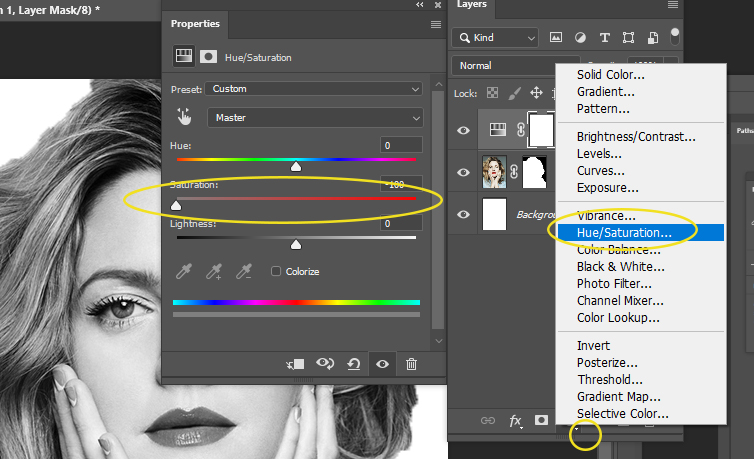
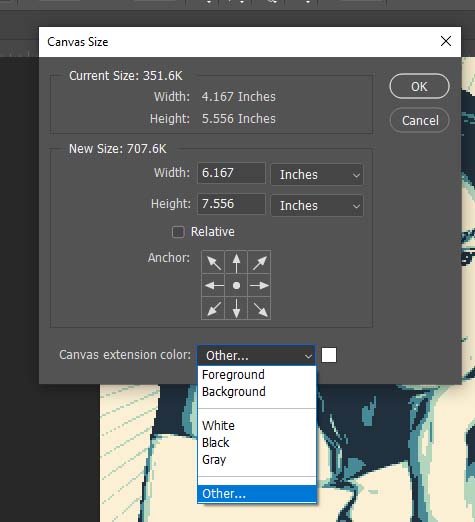
Step 7:
- Click on the Adjustments at the bottom of layers (black and white circle)
- Choose Hue/Saturation
- Move saturation to -100
- Choose Hue/Saturation
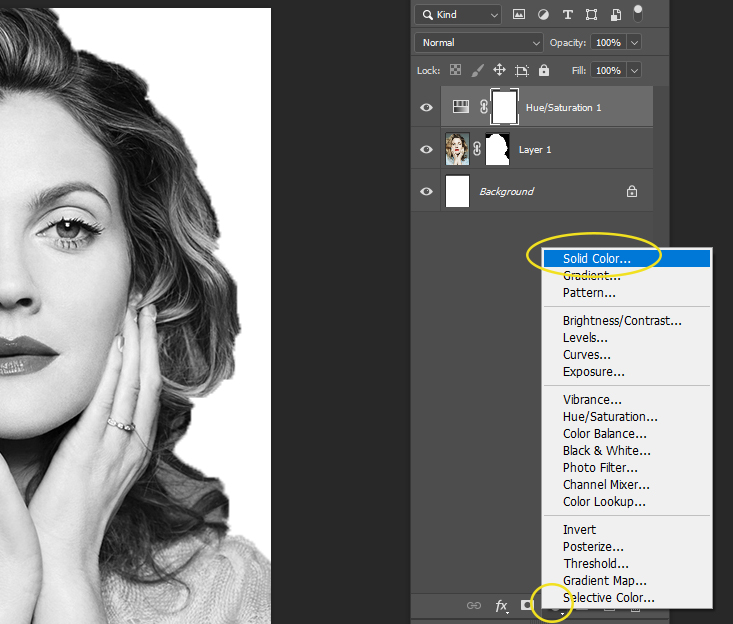
Step 8:
- Click on the Adjustments again (bottom of layers black and white circle)
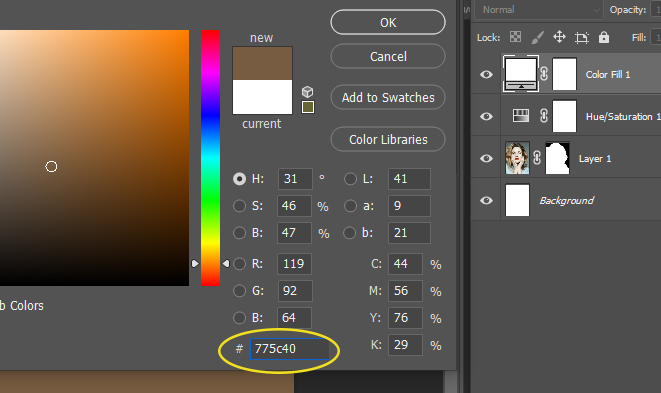
- Pick Solid Color
- Click anywhere in the colored box area
- At the bottom of the box you will find numbers
- Change to 775c40
- Click OK
- Change to 775c40
- At the bottom of the box you will find numbers
- Click anywhere in the colored box area
- Pick Solid Color
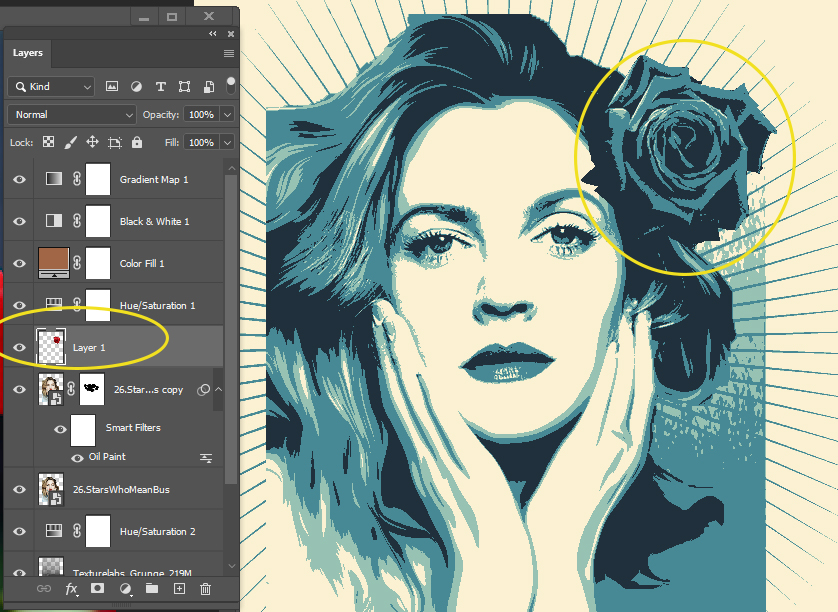
- You will now have 4 layers
Step 9:
- Make sure you are on the Color Fill 1 Layer
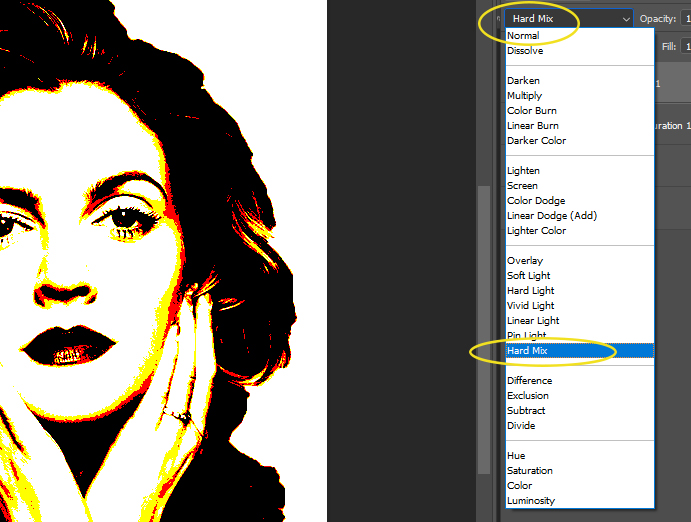
- Click where it says Normal at the top left of the Layers Pallet
- Change it to Hard Mix
- Click where it says Normal at the top left of the Layers Pallet
Step 10:
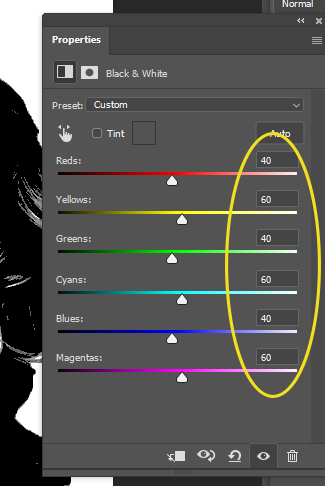
- Click on the Adjustments again (bottom of layers black and white circle)
-
- Choose Black and White adjustment
-
- When the Properties box opens, change the numbers to
- 40 Reds
- 60 Yellows
- 40 Greens
- 60 Cyans
- 40 Blues
- 60 Magentas

______________________________________________________________________
****Stop NOW! You do not want to LOOSE your work, so we will quickly save it************
- Go to File
- Save AS
- Save to computer
- Name your project Obey Poster
- Pick to saave as a PSD file and not a JPEG.
- This will allow you to return to your project and not lose your work and layers
______________________________________________________________________
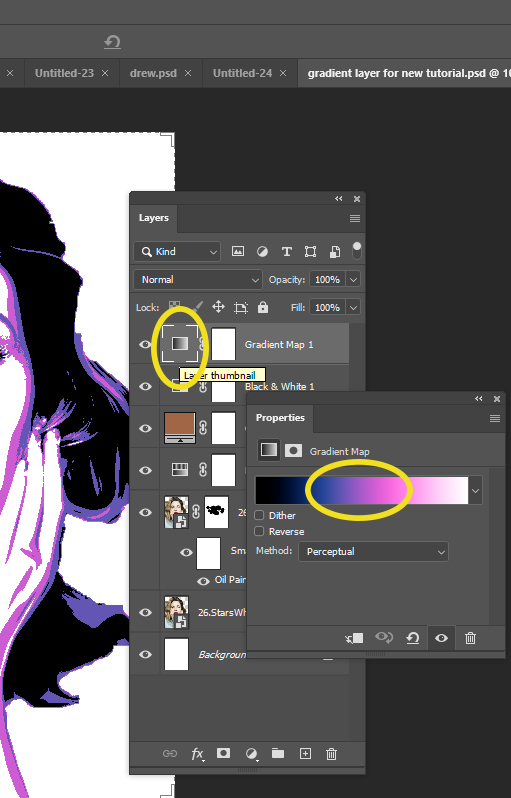
Step 11:
- Click on the Adjustments again (bottom of layers black and white circle)
- Pick Gradient Map
- The Properties box will open
- Click on the black/white graph area
- The Properties box will open
- Pick Gradient Map
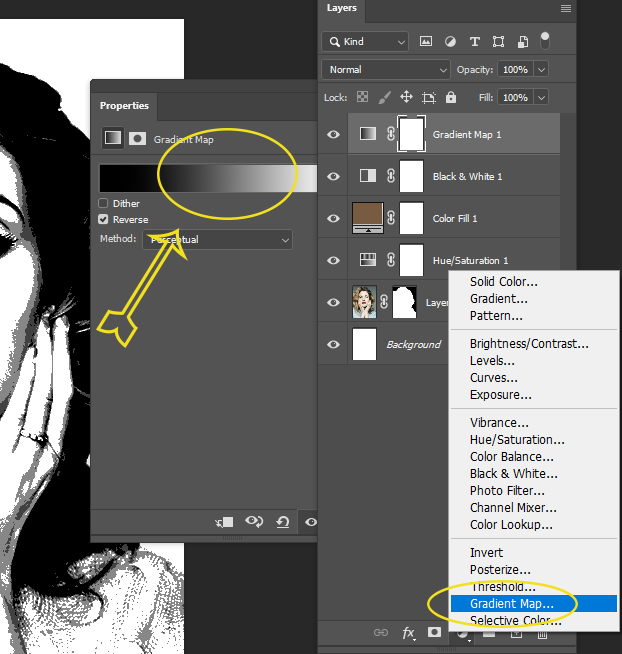
Step 11a.
- Another box will open called Gradient Editor
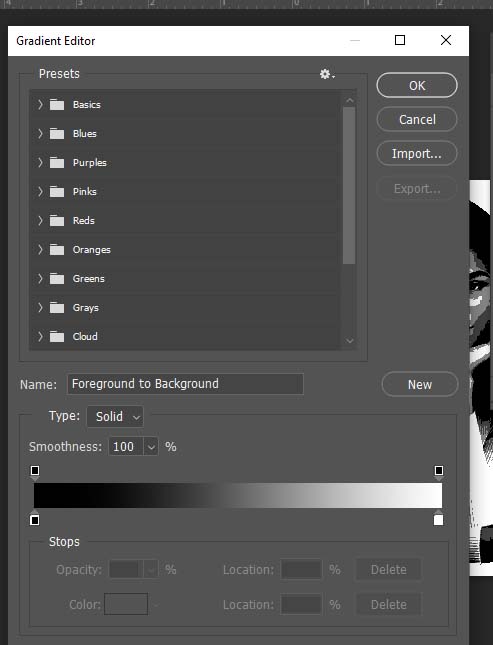
Step 12:
- On the Gradient Editor Box
- Click on the little black box at lower left
- Nothing will happen when you click it but you must do this before the next step
- Click on the little black box at lower left
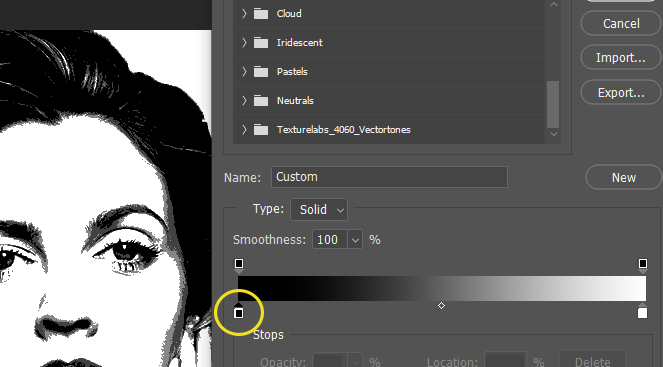
Step 13:
- Click near the little black box below the graph.
- Do NOT click on the black/white graph. Click underneath the graph
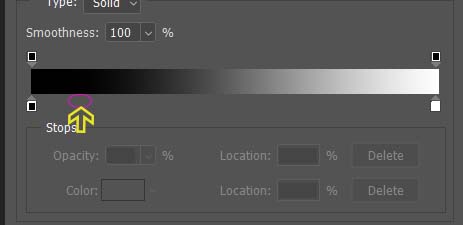
Step 13a:
- Another little box will pop up
- Change Location
- 31
- Change Location
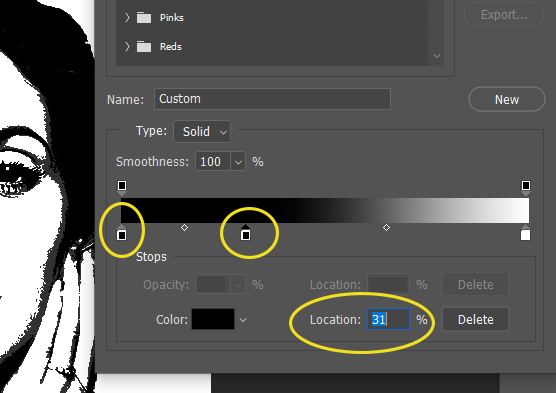
Step 14:
- Click on the box the says Color.
- It will be black
- The Color Picker box will open
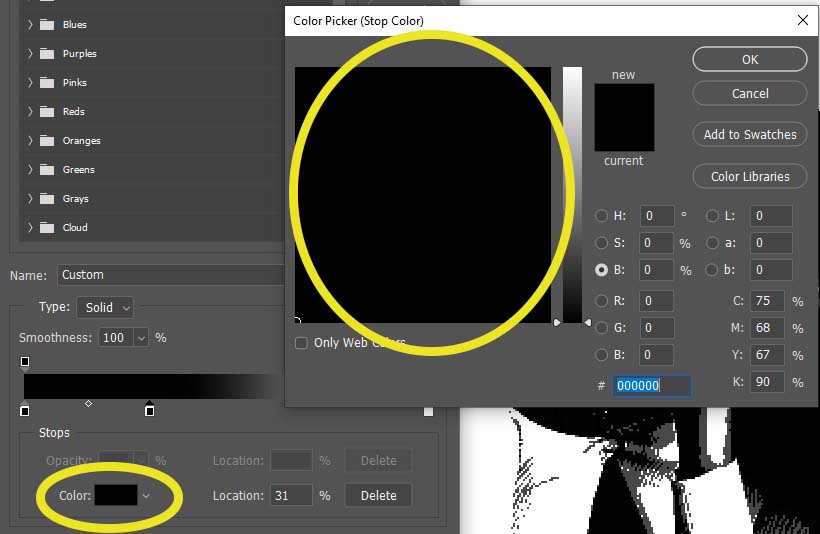
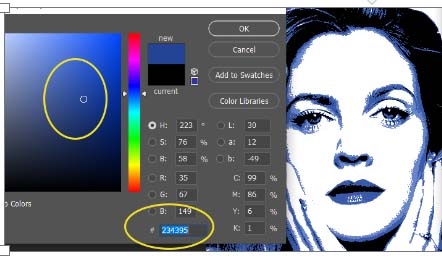
Step 14a:
- At the bottom of the Color Picker box type in
- 234395
- Click Ok
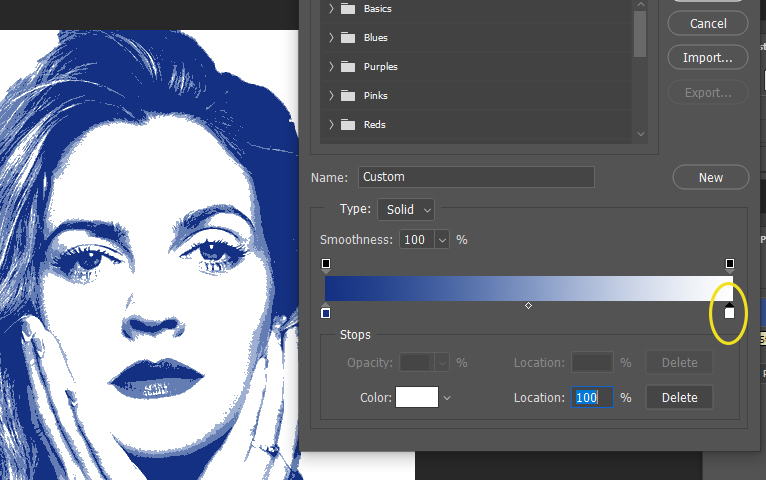
Step 15:
- You will still be on the Gradient Editor box
- It will be blue
- At the Lower right of the blue/white graph
- Click on the small white box
- Nothing will happen but you must do this before the next step
- Click on the small white box
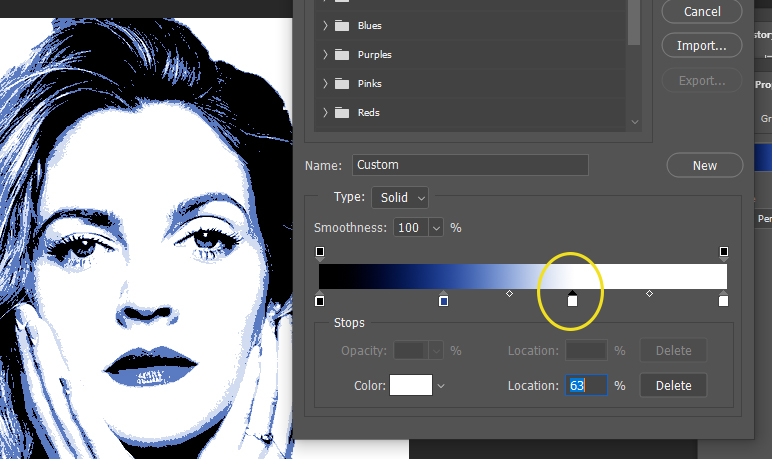
Step 16:
- Click anywhere near the little White Box
- Click underneath the graph. Do NOT click on the blue/white graph.
- You will now have two little white boxes
- Make location 63
- Click underneath the graph. Do NOT click on the blue/white graph.
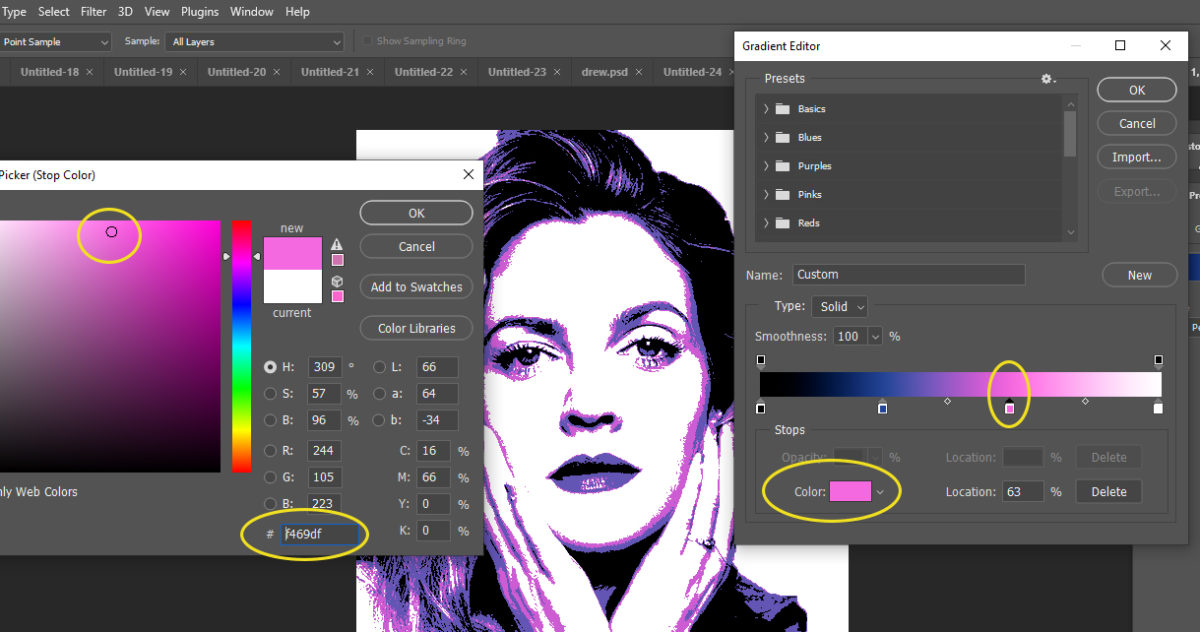
Step 17:
- Click where it says Color at the bottom. It will be white at first.
- The Color Pickers box will open
- Click anywhere in the color picker color area
- At the bottom type in
- f469df
- Click Ok
- f469df
- At the bottom type in
- Click anywhere in the color picker color area
______________________________________________________________________
****Stop NOW! Save your work again
- Go to File
- Save
- Make sure you are still saving as a PSD file and not a JPEG.
- Save
- Strech and take a break before going on
______________________________________________________________________
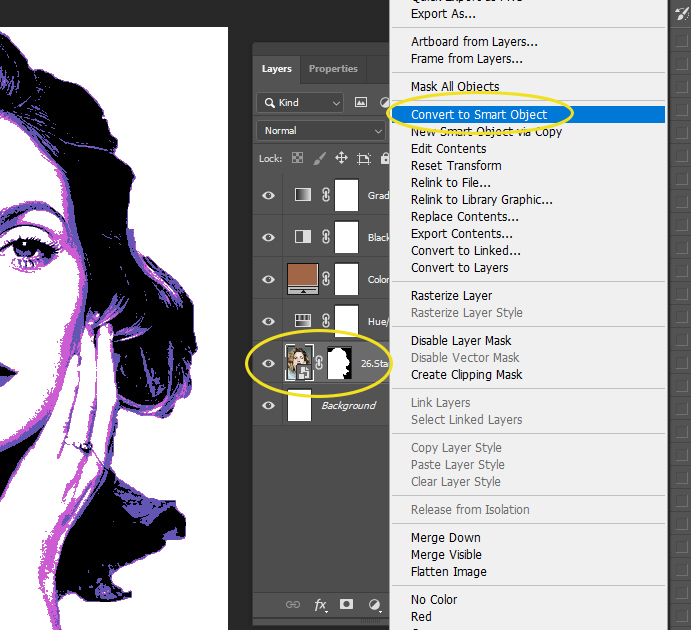
Step 18:
- Go to the Layers Pallet
- Click on Layer 1 (Layer with the person photo)
- Make sure you are clicked on the person and not the mask
- Right Click on the layer
- Convert to Smart Object
- Right Click on the layer
- Make sure you are clicked on the person and not the mask
- Click on Layer 1 (Layer with the person photo)
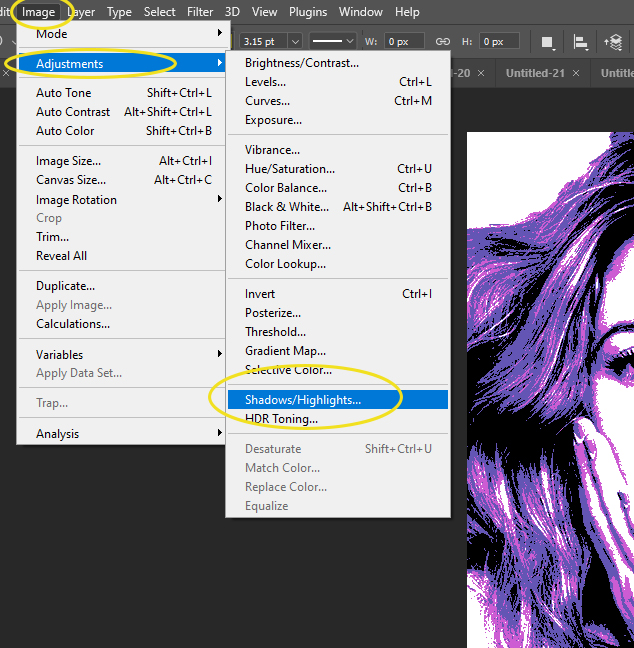
Step 19:
- Stay on the Person Layer (Layer 1)
- Go to
- Image
- Adjustments
- Shadows/Highlights
- Adjustments
- Image
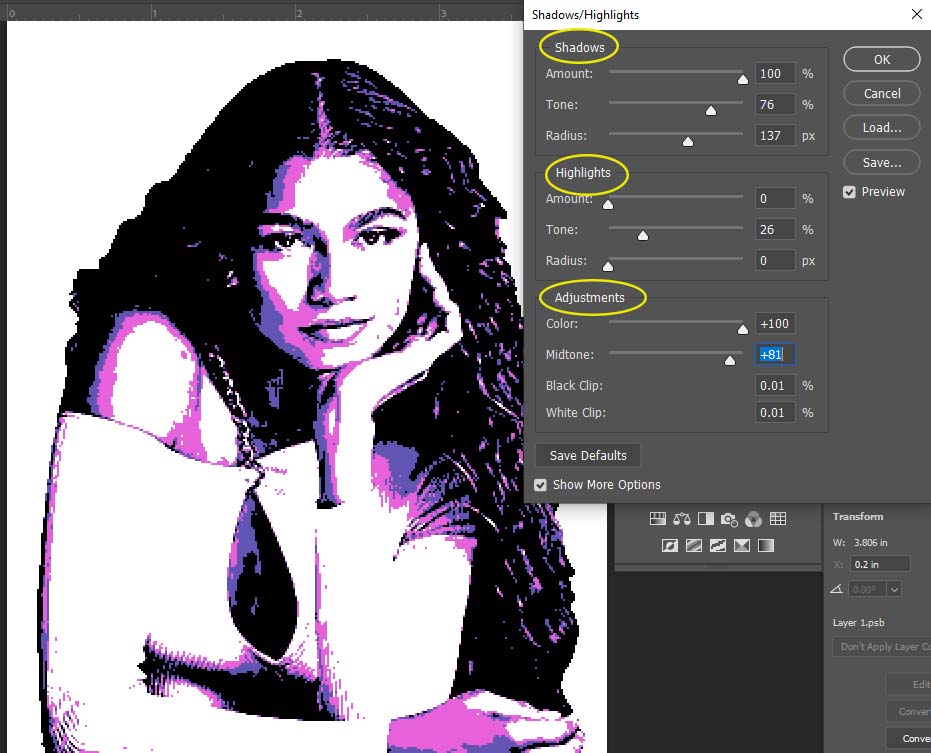
Step 19a:
- Move the sliders around so there is a big different between the light and dark areas.
- Do not look at the slider numbers on my example. Everyone’s slider numbers will be different
- DO NOT make it to dark!!!!
- Do not look at the slider numbers on my example. Everyone’s slider numbers will be different
Step 20:
- Stay on the Layer (Person Layer)
- Right Click
- Duplicate Layer
- Right Click
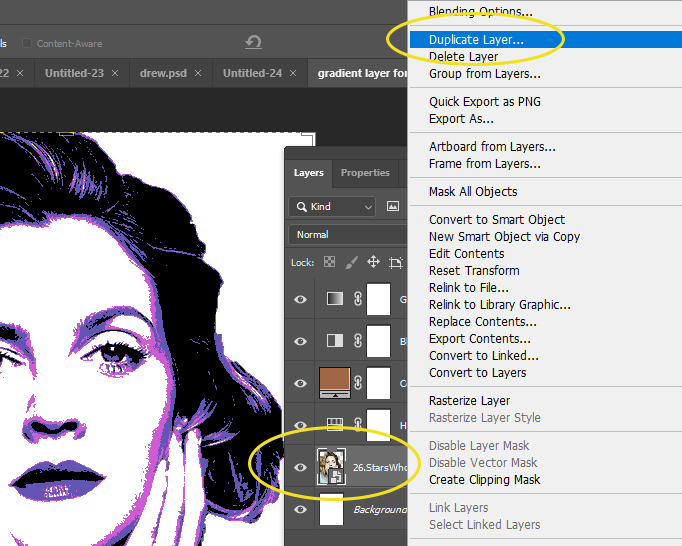
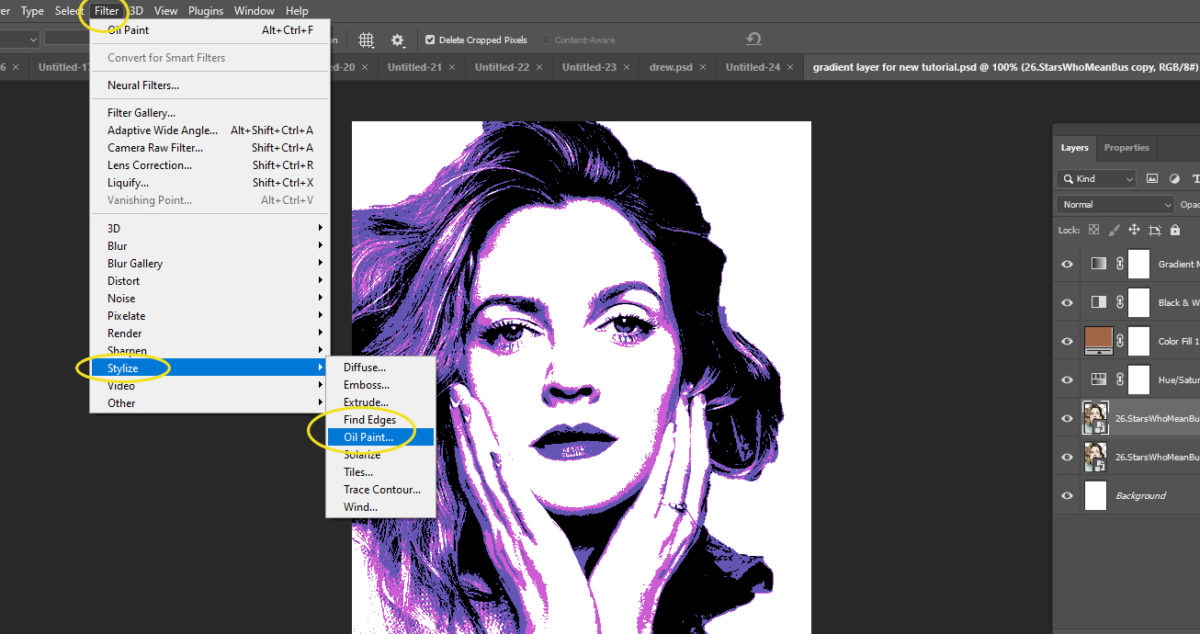
Step 21:
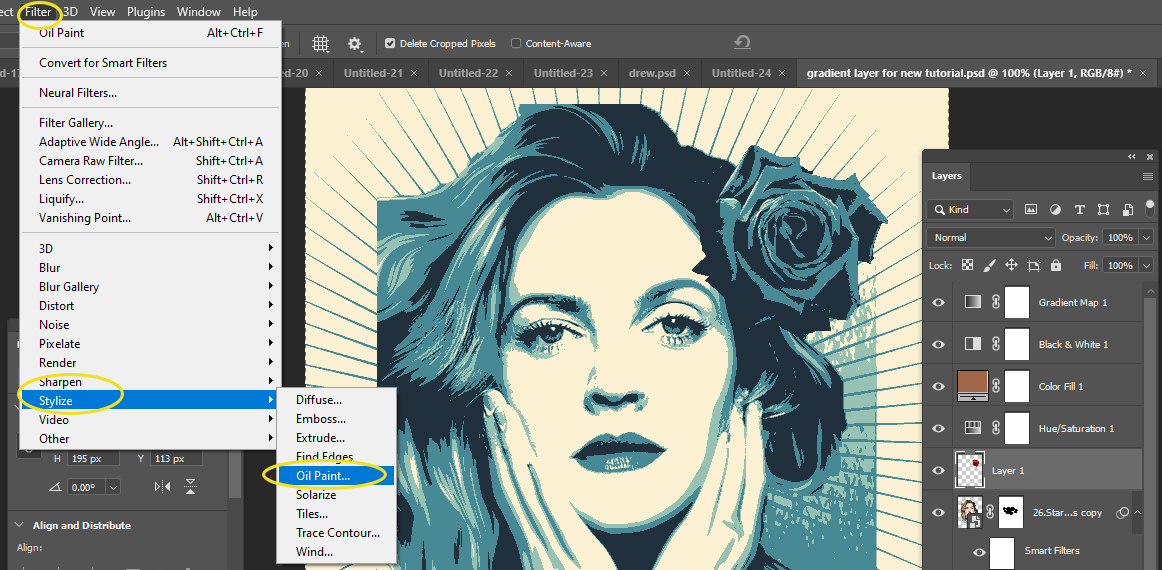
- Make sure you are on the Duplicated Layer you just made
- Go to
- Filter
- Stylize
- Oil Paint
- Stylize
- Filter
- Go to
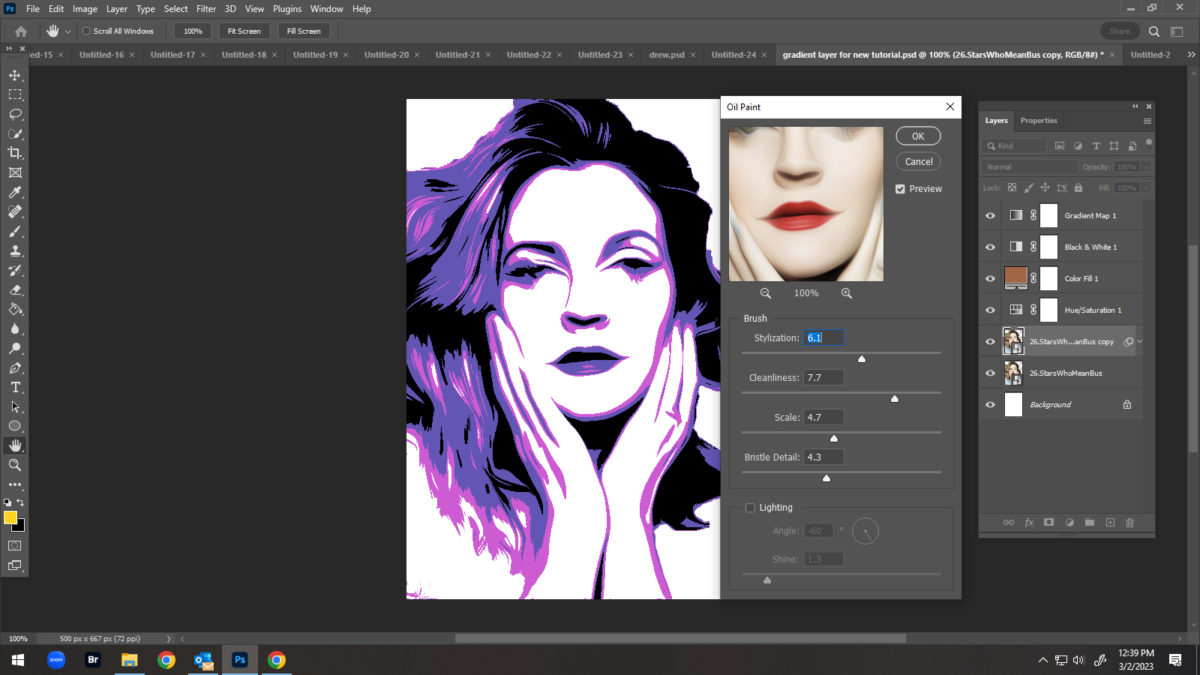
Step 22:
- Make sure the Lighting box is unchecked
- Move your sliders:
- Stylization 3.5
- Cleanliness 1
- Scale 3
- Brittle Detail 3
- Move your sliders:
Step 23:
- Add a Layer Mask on the Duplicated Layer
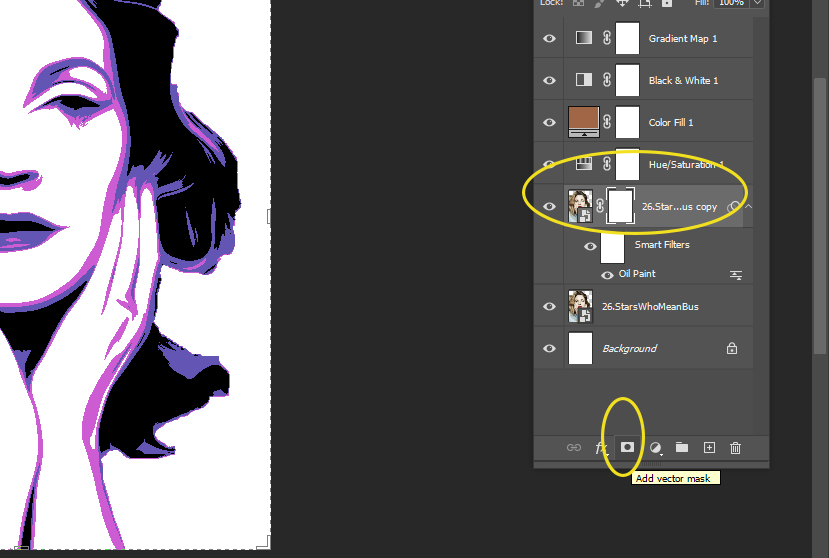
Step 24:
- Pick a Black Paint Brush
- Make sure you are clicked on the mask (white box)
- With the black brush, paint back in the details of the
- eyes
- nose
- mouth
- With the black brush, paint back in the details of the
- Make sure you are clicked on the mask (white box)
Step 25:
- G0 to the below website to download a file
- Gradiant Presets
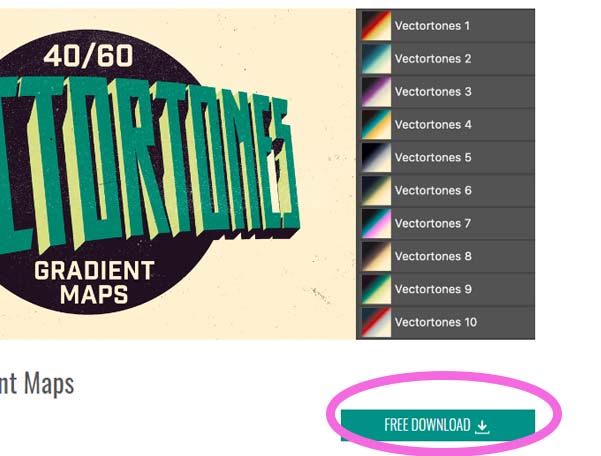
- Download the Vectortonew Gradient Maps 40/60
- Gradiant Presets
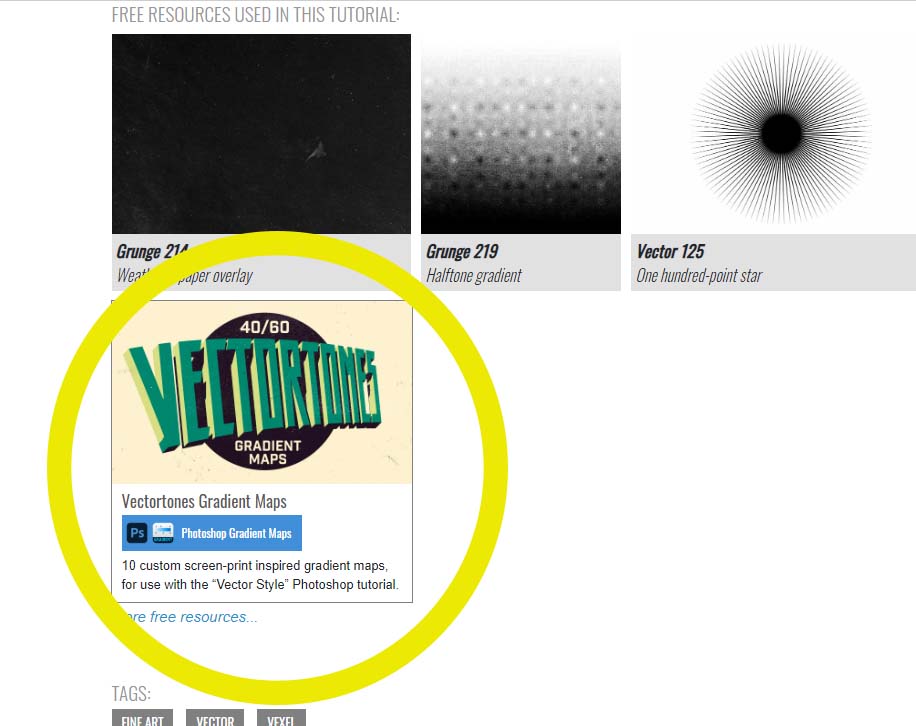
Step 25a:
- Click the Free Download tab
Step 25b:
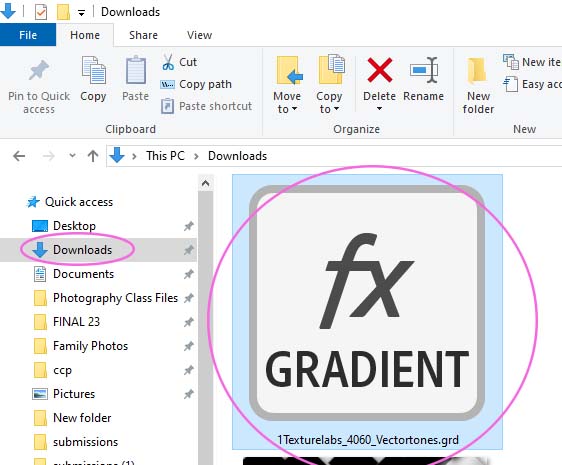
- Go to the Downloads folder on your computer
- Locate the file that says
- fx Gradient
- Douple click on the file to load it
- It will load into Photoshop but you will not see it
- Douple click on the file to load it
- fx Gradient
- Locate the file that says
Step 26:
- Return to Photoshop
- On the Layers Pallet
- Click on Gradient Map Layer (top layer)
- Click on the left black/white box (not the white mask box)
- When the blue/pink bar opens, click anywhere
- Click on the left black/white box (not the white mask box)
- Click on Gradient Map Layer (top layer)
- On the Layers Pallet
Step 27:
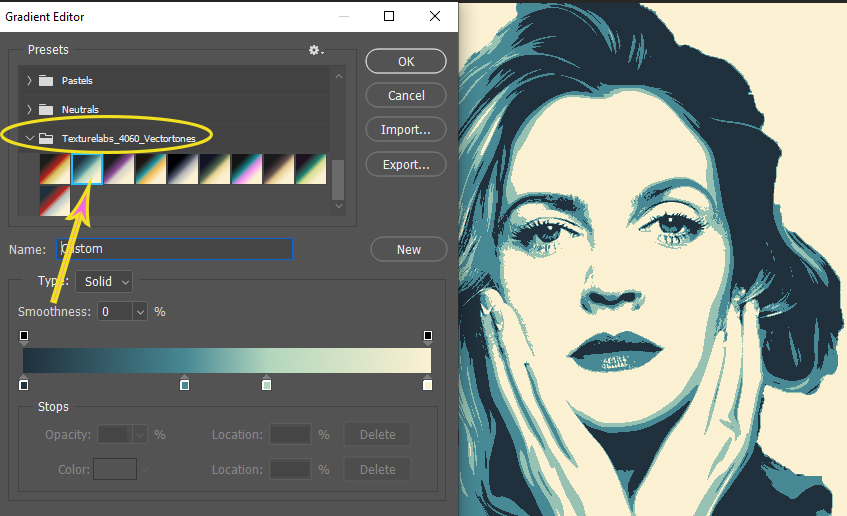
- The Gradient Editor box will open
- Locate the Texturelabs_4060
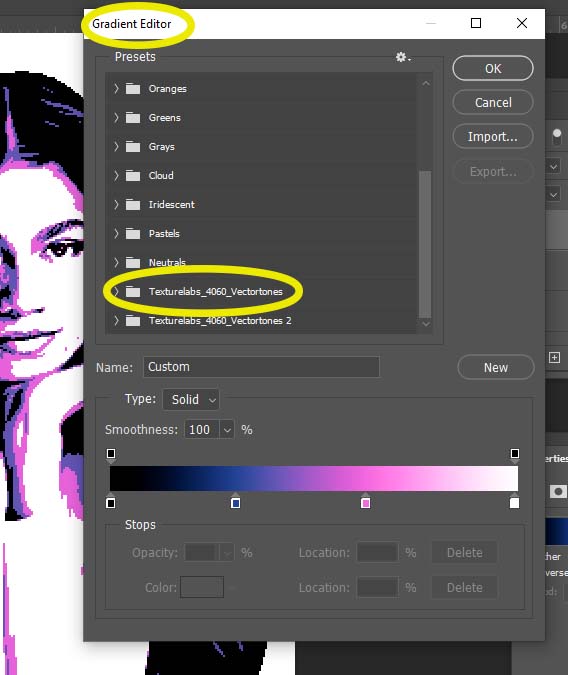
Step 27a:
- Open folder Texturelabs_4060
- Click the second colored box
- Click OK
- Your photo will now be blue and yellow
- Click OK
- Click the second colored box
Step 28:
- You will be returning to the website and downloading another file Vector 125
- Download
- TextureLabs_vector_125
- Download
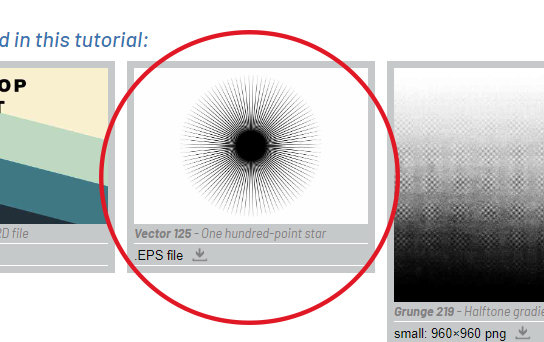
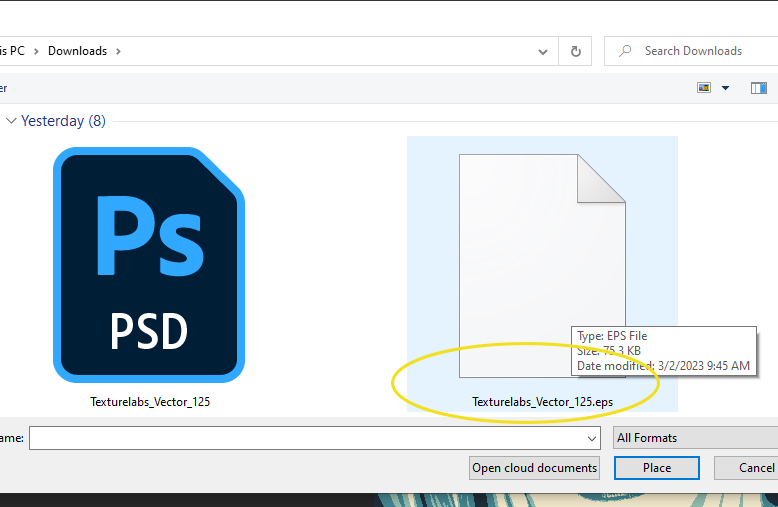
Step 29:
- Return to photoshop
- Click on the Background Layer (this will be the bottom layer)
Step 30:
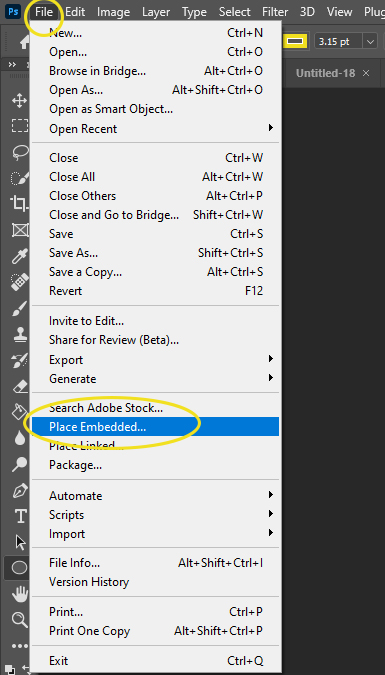
- Go to File
- Place Embedded
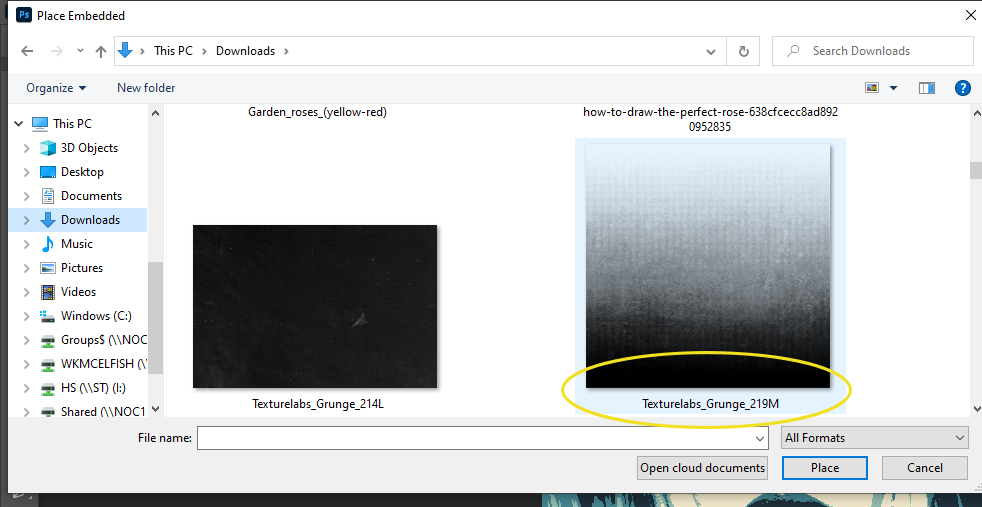
- Locate the downloads folder
- Choose TextureLabs_vector_125
- Locate the downloads folder
- Place Embedded

Step 31:
- Click Control T
- Hold the Shift key
- Move the lines so that they are touching and going off the edge of the canvas
- You will want lines going to the edge of the page
- Hold the Shift key
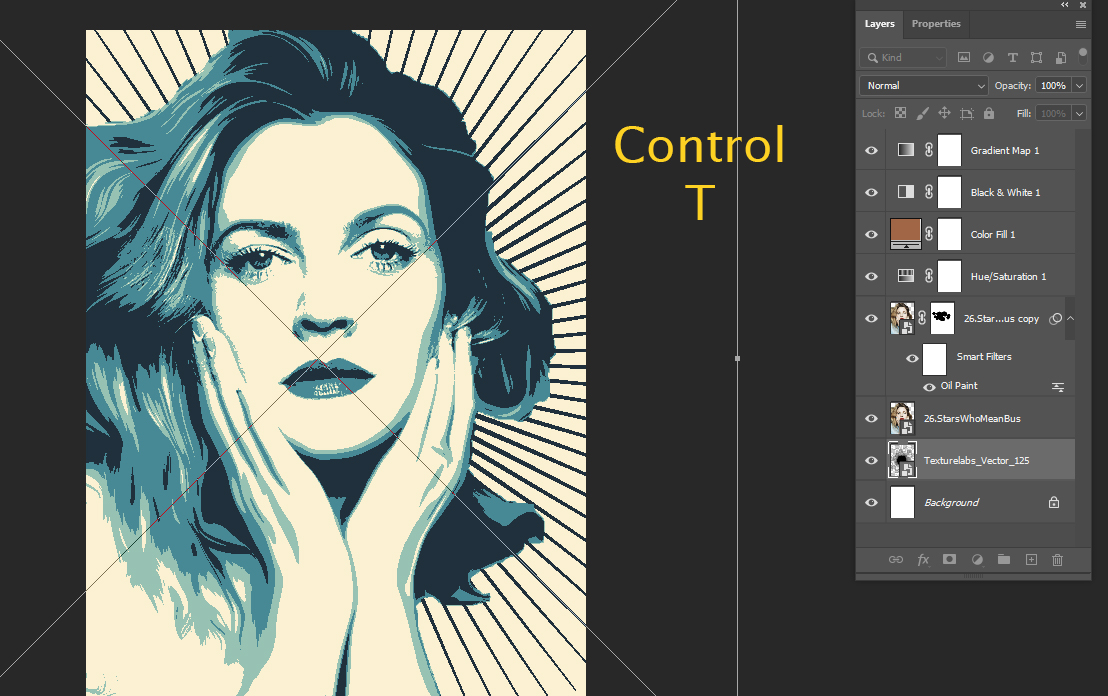
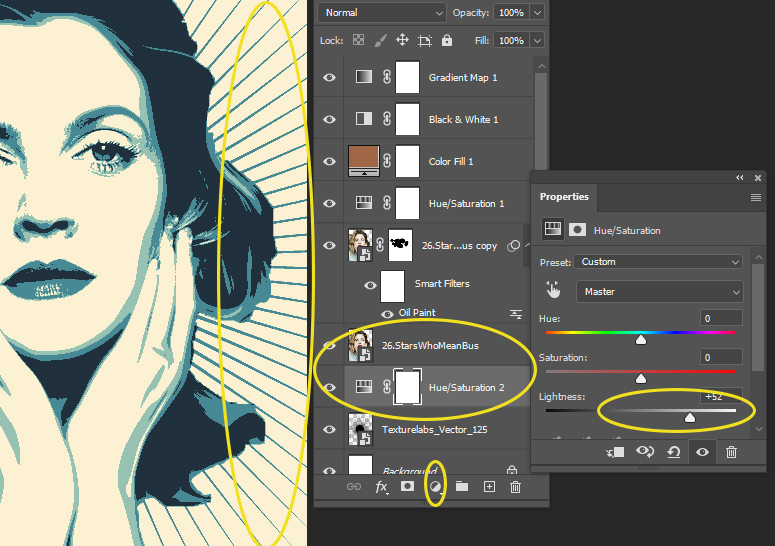
Step 32:
- Make sure you are still on Layer TextureLabs_vector_125
- Click the Black/White Circle at bottom of layers pallet
- Pick Hue/Saturation
- Move Lightness to the right until between +50 and +60
- Pick Hue/Saturation
- Click the Black/White Circle at bottom of layers pallet
Step 33:
- Return to the website https://texturelabs.org/tutorials/vector-style-treatment-photoshop-tutorial/
- Download Grunge_219M
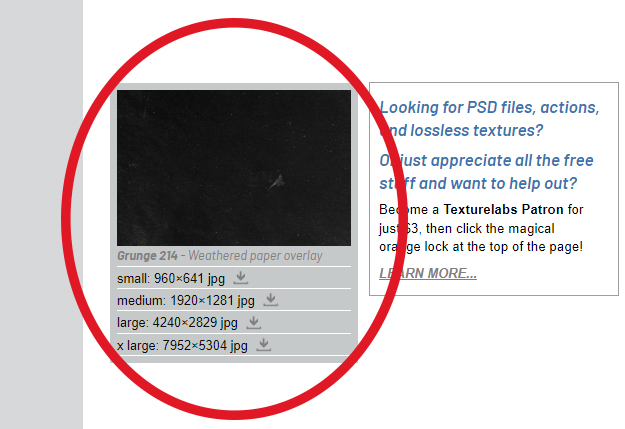
Step 34:
- Return to photoshop
- Click on the Background Layer (this will be the bottom layer)
Step 35:
- Go to
- File
- Place Embedded
- File
- In the Downloads
- Pick thw file you downloaded called TextureLabs Grunge_219M
Step 36:
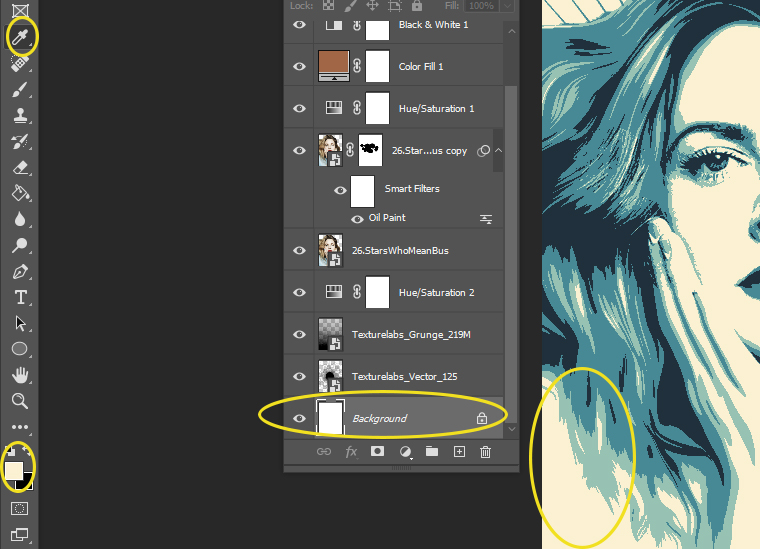
- Click on the Background Layer
- Select the Eye Dropper Tool
- Click the Eye Dropper on the yellow background
- The yellow will now be selected
- Click the Eye Dropper on the yellow background
- Select the Eye Dropper Tool
Step 37:
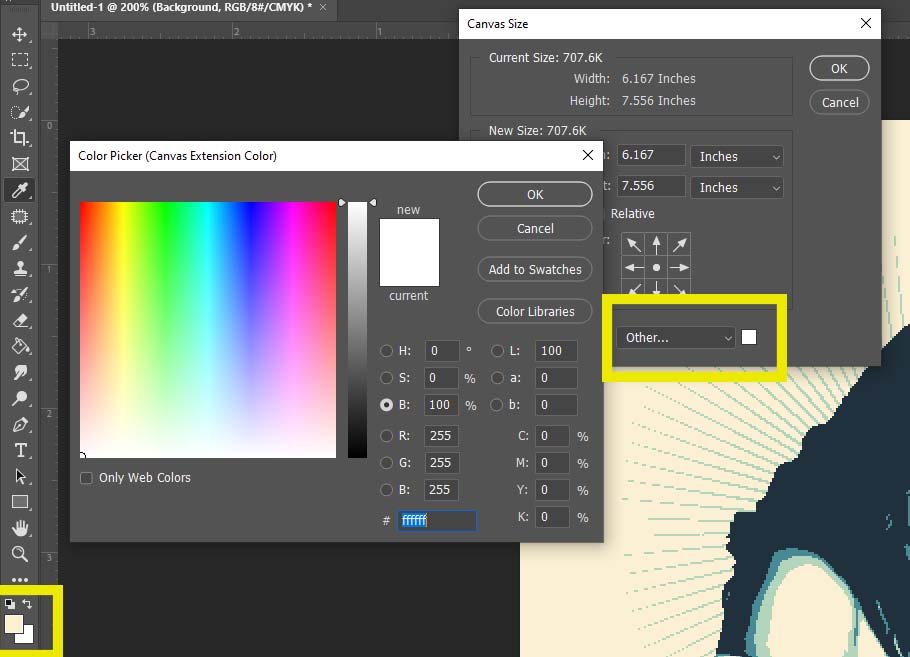
- Make sure you are still on the Background Layer
- Go to Image
- Canvas Size
Step 38a:
- Add 1 inches to the
- Width
- Add 1 inches to the
- Height
- Canvas Extension Color
- Other
Step 38b:
- The Color Picker will open
- Look at the bottom left color boxes
- Click on the top box which will be the yellow color you selected in step 36
Step 38:
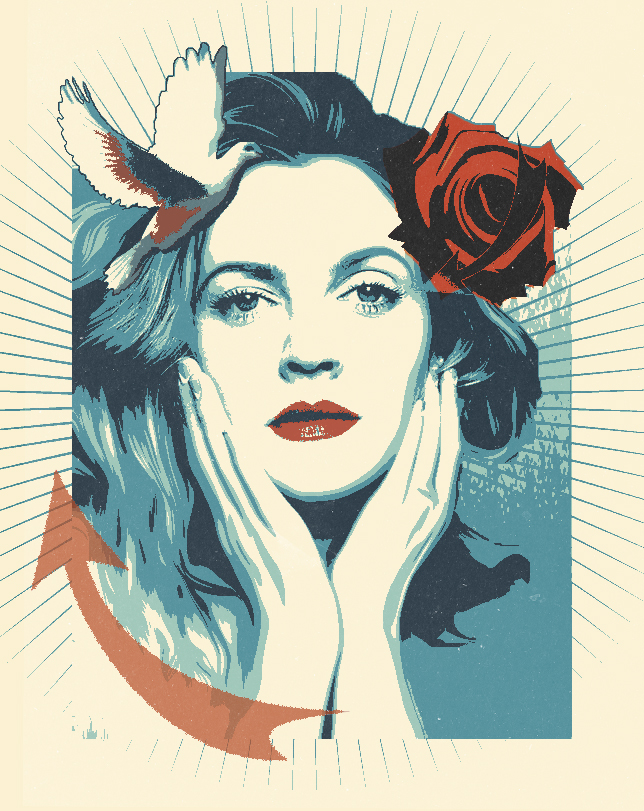
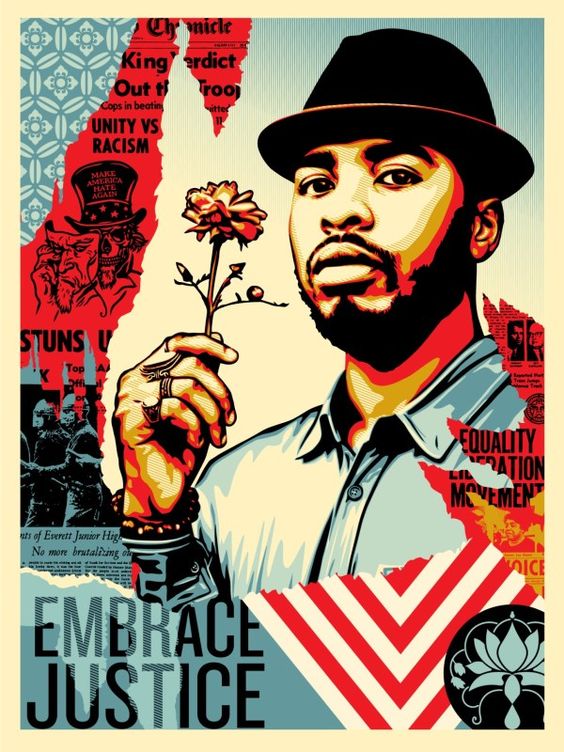
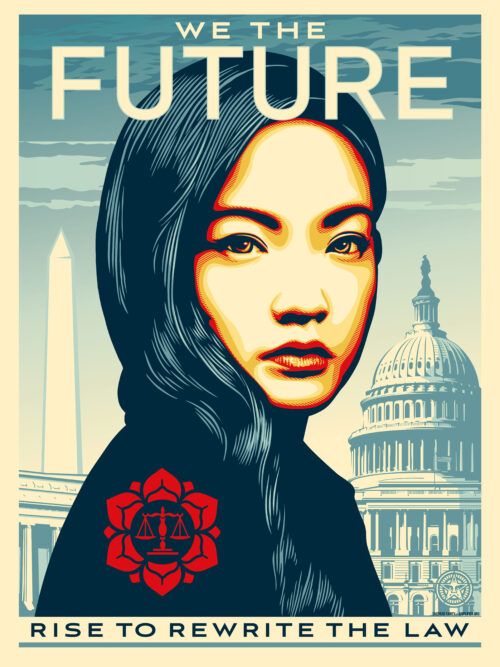
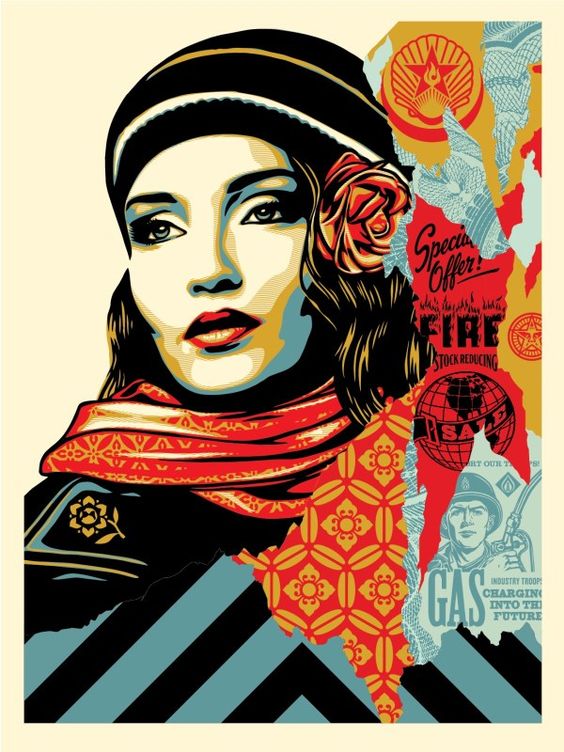
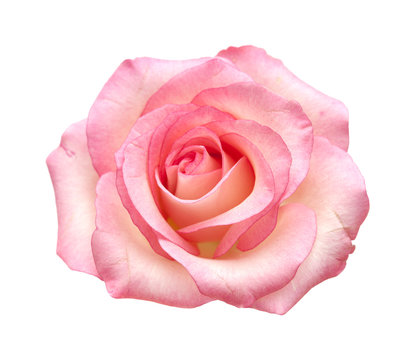
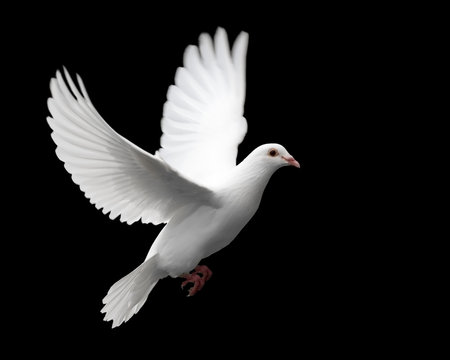
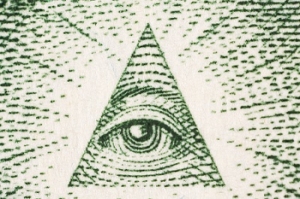
- Refere to the symbols Shepard Fairey uses in his art work (examples at the top of tutorial)
-
- doves
- peace signs
- flags of countries or
- religious symbols
- Roses
- Simple shapes such as arrows
-
- Choose 3 images that are PNG’s (transparent backgrounds)
- This can be found in files on canvas
- If you do not like my files you may pick your own but make sure they are pngs
- If not pngs you must cut out your files before you move them onto your main photo
- If you do not like my files you may pick your own but make sure they are pngs
- This can be found in files on canvas
![]()
Step 39:
-
-
-
- I have picked a Rose as my object to add to the project
-
-
- Click on the Layer 1 Copy
- (layer 6)
- Go to
- File-Place Embedded
- Choice the Rose file (or any other image you saved)
- Move the PNG file around until you like where it is (I moved the Rose to be in her hair)
Step 40:
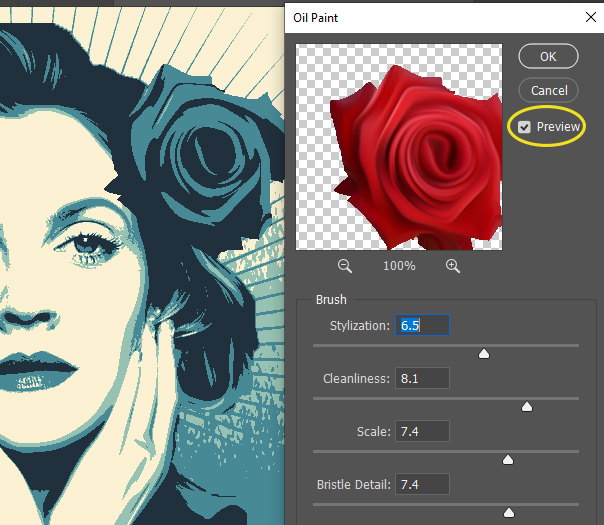
- Make sure you are on the object layer
- Go to
- Filter- Stylize-Oil Paint
………………Add new layer below the rose/object
Step 41:
- Move the sliders until the object start to look soft and blurred
- You do not want any hard edges
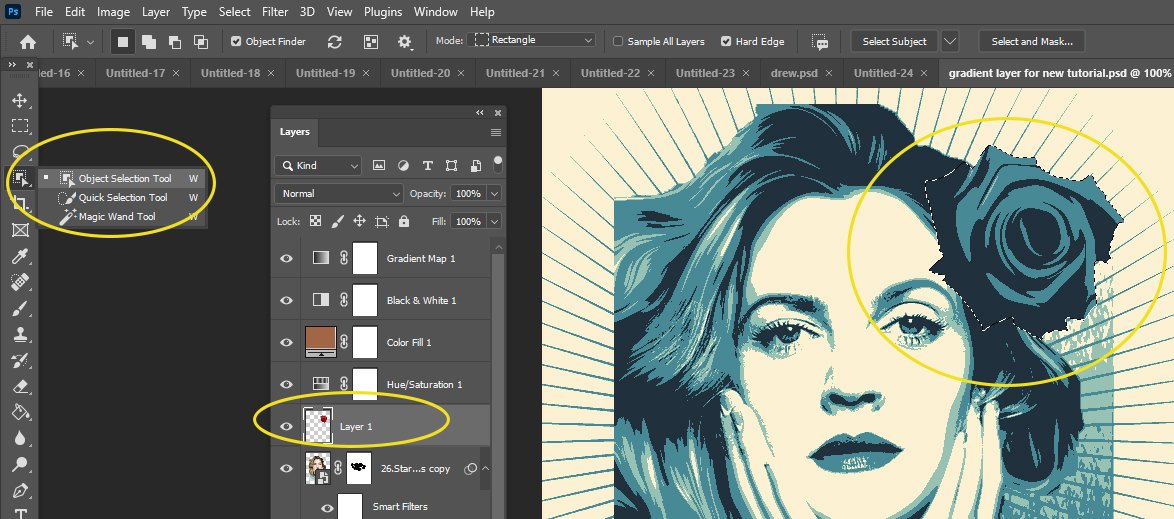
Step 42:
- Make sure you are still on the object layer
- On the Tool Bar pick
- Object Selection Tool
- It is by the Quick Selection Tool
- Click on the object file
- This should select just the object and nothing else
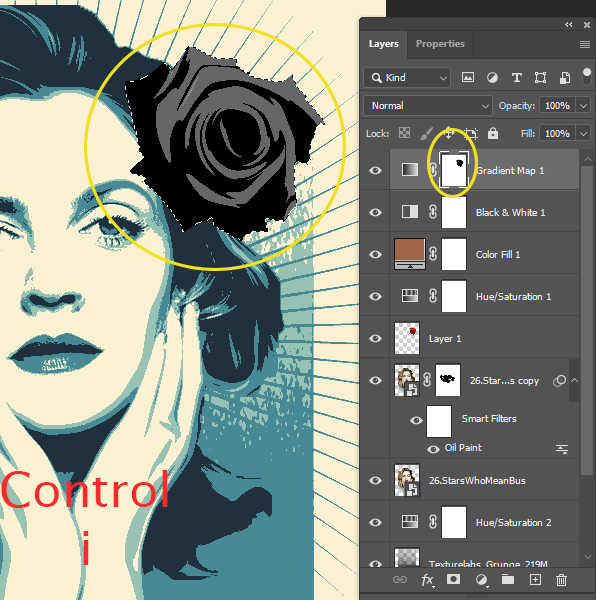
Step 43:
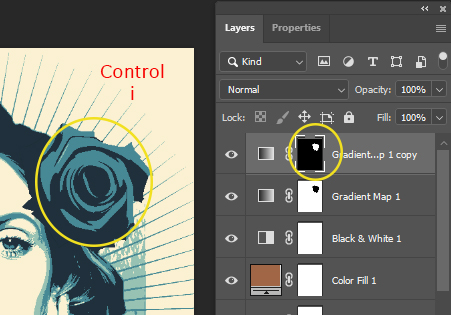
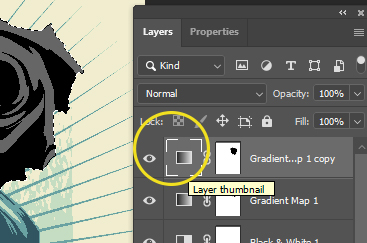
- Go to the top Layer (Gradient Map Layer)
- Make sure you are clicked on the white box
- Click Control i
- This will turn your object black and white
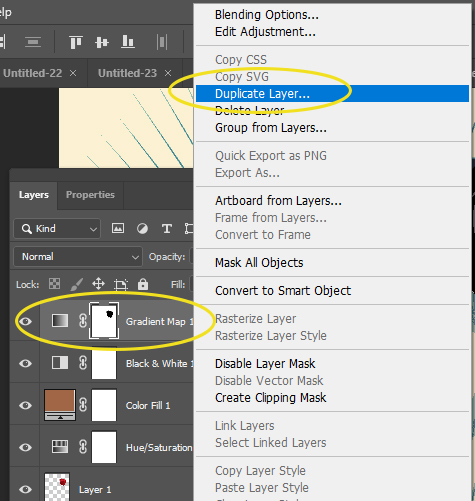
Step 44:
- Make sure you are still on the Gradient Map Layer
- Right click
- Duplicate Layer
Step 45:
- Click on the duplicated Gradient Layer
- Click on the white mask
- Click Control i
Step 46:
- Stay on the duplicated Gradient Layer
- Click on the box next to the mask
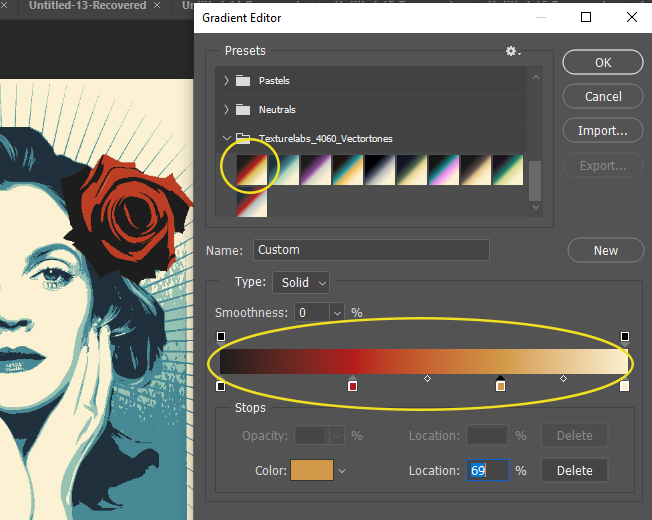
Step 47:
- Pick the Texturelabs -4060_vectortones
- Pick the red/orange box
- Make Location 69
- Move the red and orange slightly to make the object look like you want
***If you would like to add more objects to your image, Repeat steps 39-47****
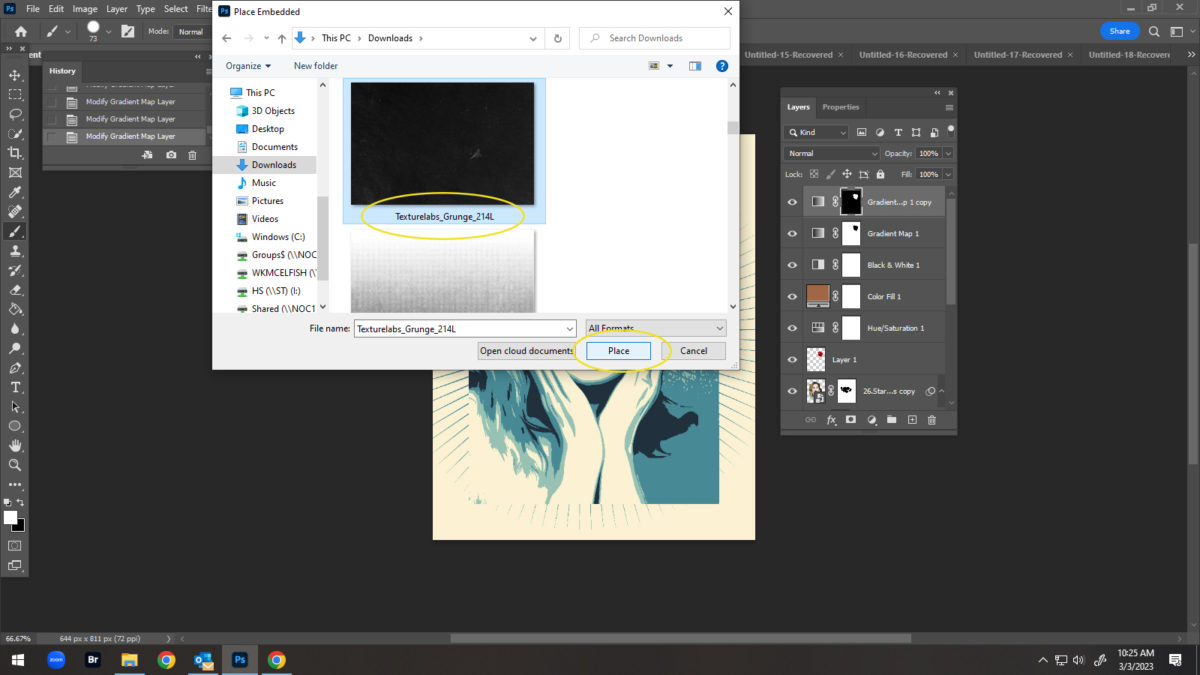
Step 48:
- Download Grunge_214L
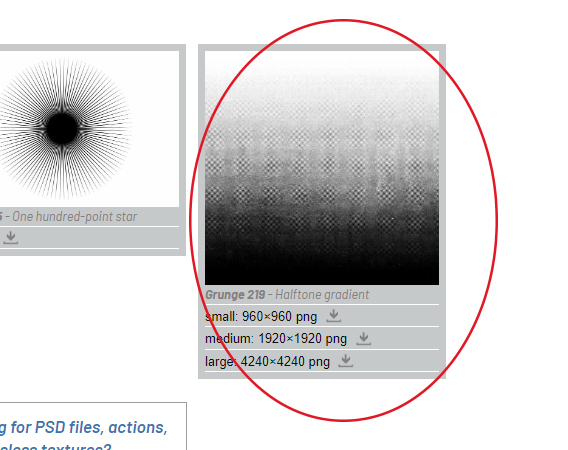
- On the Layers pallet make sure you are on
- Gradient Map Cop Layer (top layer)
- Go to
- File-Place Embedded
- Pick TextureLabs Grunge_214L
- If the Texture does not fit
- click Control T
- Hold Shift Key
- Make the Texture fit over the whole canvas
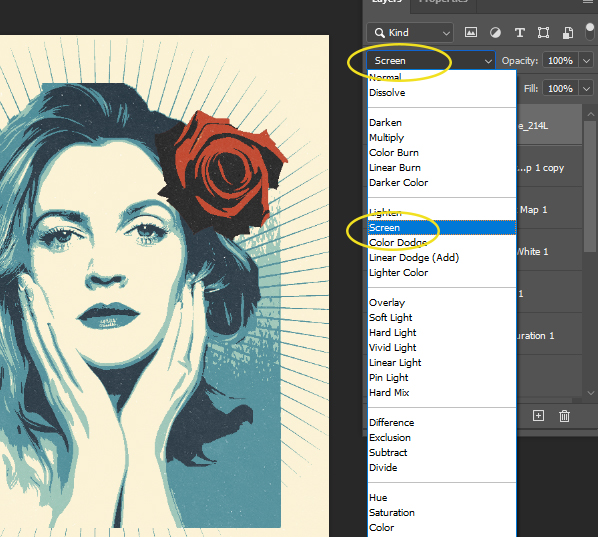
Step 49:
- At the top of the Layers pallet
- Change Normal to Screen
- Flatten your layers
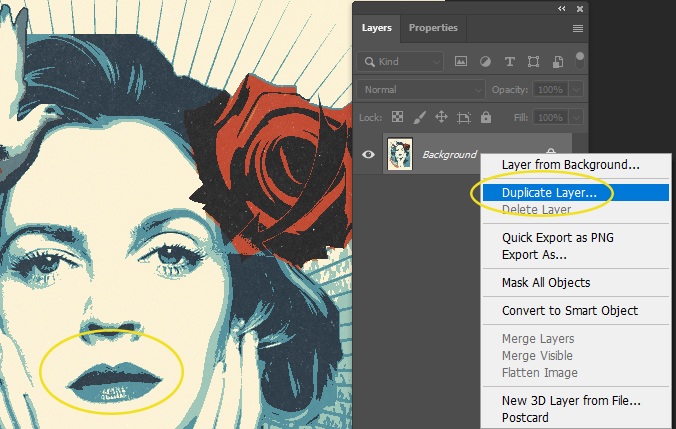
Step 49:
- Right click on the Background Layer
- Duplicate Layer
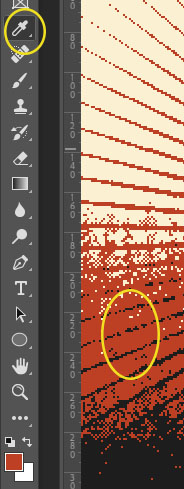
Step 50:
- Go to the Eye Dropper Tool
- Click on the Redish area
- This will select that color
Step 51:
- Click on the Paint Bucket Tool
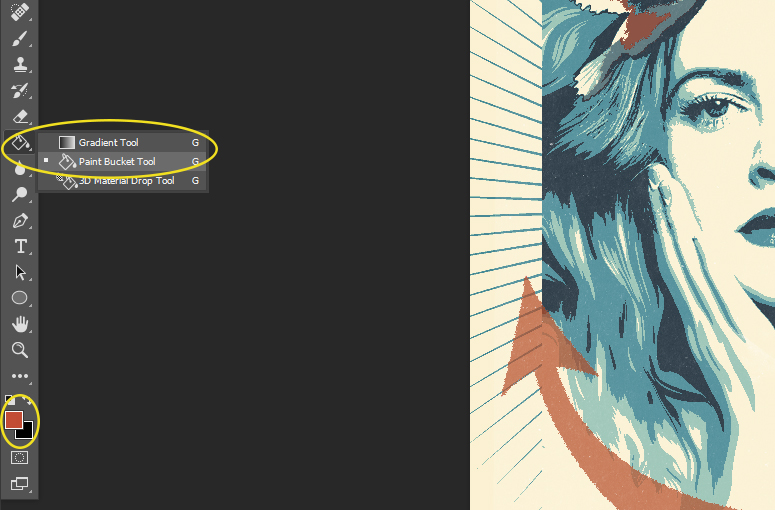
Step 52:
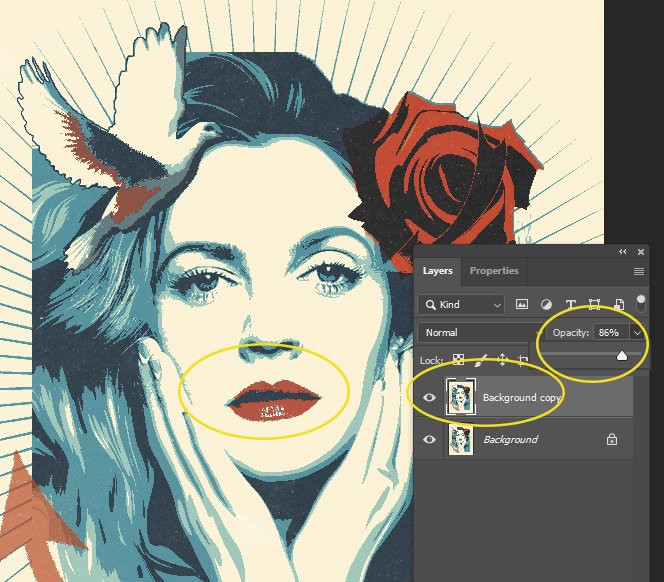
- Click on the Lips with the Paint Bucket
- Pull the Opacity Down
- You may also add red in other areas of your image (see Dove)
- When you are done Flatten Image