


Step 1:
- Pick a song or poem that you like
- Since we are doing a self portrait project it should be a song/poem that speaks to you
- Google to find the lyrics of the song or poem you picked
- Keep this page open or save to computer

You will be using one of the self portrait of yourself!
You must do the self portrait assignment before starting the project
Step 2:
- Open your EDITED self portrait
- If it is not edited you MUST edit it before continuing this assignment

Step 3:
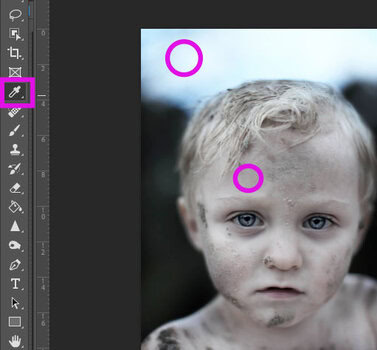
- Pick the Eye Dropper tool
- Click in any light color area of your photo
- This can be the background or skin areas
- Click in any light color area of your photo
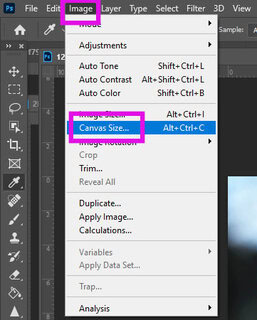
Step 4:
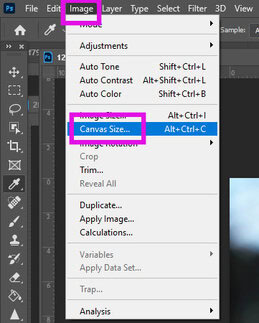
- Image
- Canvas Size
Step 5:
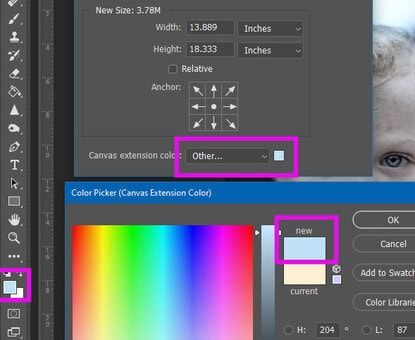
- Canvas Extension Color: Other
- Click the New Color that was selected in step 3
Step 6:
- Click the TOP MIDDLE arrow
- Click the LEFT MIDDLE arrow

Step 7:
- You will be changing your canvas size now
- Add 1 inch to Width
- Add 2 inches to Height
- Add 1 inch to Width
- Click OK


Step 8:
- Again go to Image- Canvas Size
Step 9:
- Click the BOTTOM MIDDLE arrow
- Click the RIGHT MIDDLE arrow

Step 10:
- You will be changing your canvas size again
- Add 3 inch to Width
- Add 6 inches to Height
- Add 3 inch to Width
- Click OK


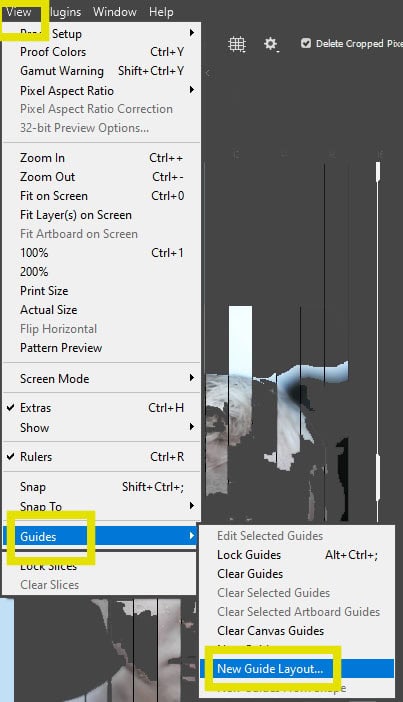
Step 11:
- Go to View
- Guides
- New Guide layout
- Guides
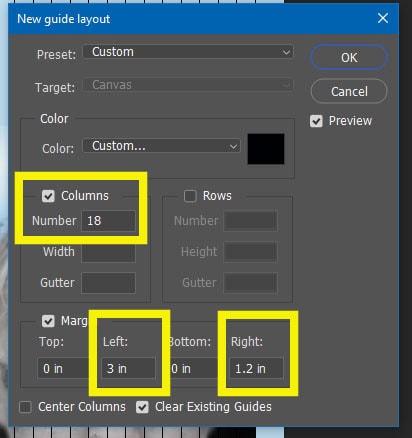
Step 12:
- Columns: 18
- Row: 0
- Top: 0
- Left: 3
- Bottom: 0
- Right: 1.2

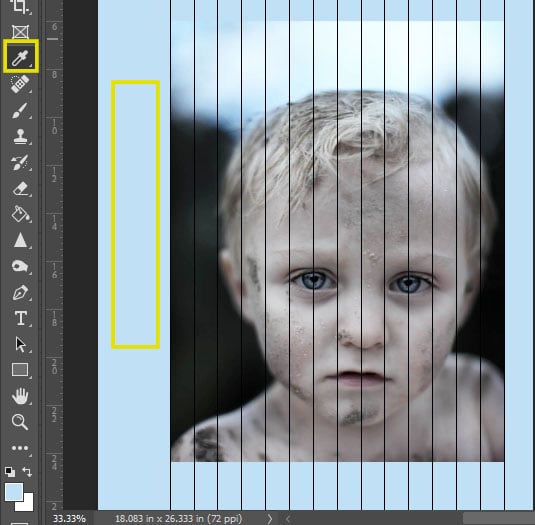
Step 13:
- Pick the Eye Dropper tool
- Click on the background around the photo
Step 14:
- Pick the Rectangle Tool
- Fill: The color of the background
- Stroke: white with red line through it
- Fill: The color of the background

Step 15:
- You will be drawing a box
- Start from the top of the photograph
- Stay in the first set of lines
- Make the box as long as you would like
- It does not matter if it is short or long
- Make the box as long as you would like
- Stay in the first set of lines
- Start from the top of the photograph

Step 16:
- Click Control J
- Click the Move tool
- Move the box to the right
- Stay in the Second set of lines
- Move the box to the right
- Click the Move tool

Step 17:
- Click Control T
- Hold the SHIFT key
- Move the box to be longer or shorter than the first box
- It can NOT be the same lenght as the first box
- Move the box to be longer or shorter than the first box
- Hold the SHIFT key

Step 18:
- Click Control J again
- Click the Move tool
- Move the box to the right
- Stay in the third set of lines
- Move the box to the right
- Click the Move tool

Step 19:
- Hold the SHIFT key
- Move the box to be longer or shorter than the second box
- It can NOT be the same lenght as the other two boxs
- Move the box to be longer or shorter than the second box

Step 20:
- Continue to duplicate the box and move it over
- Each box should be a different length from the other boxes
- You may cover or not cover as much of the eye area as you would like
- You MUST leave the nose and mouth area
- You may cover or not cover as much of the eye area as you would like
- Each box should be a different length from the other boxes


Step 21:
- View
- Extras (Click the check mark off)
- The lines will disappear
- Extras (Click the check mark off)

*******If you have spaces between the colored areas you will need to fill those in. If you don’t you can skip Step 22*******

Step 22:
- Select the Rectangle Tool
- Draw boxes over the areas that need covering
- You may need to do a couple of these to cover all the extra little spaces
- Draw boxes over the areas that need covering
- Flatten Image

Step 23:
- Pick the Eye Dropper Tool
- Select a dark area of the face or background of the photo (this color will become the text color)

Step 24:
- Pick the Text Box
- Draw a box at the bottom of the canvas
- It should only be as long as the actual photo
- Draw a box at the bottom of the canvas

Step 25:
- Pick any font you would like
- Font size should be 48 (if it is to big you can change the size to a lower number)
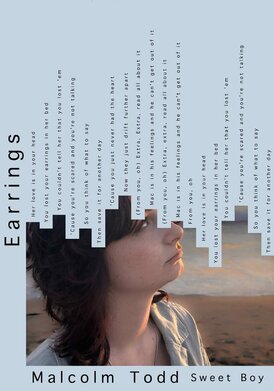
- Type the name of the Band, Singer or Author of the song/poem you picked in step 1

Step 26:
- Draw a second text box below the band/author name
- Pick a Different font
- Font size should be 36 or slightly smaller
- Type the name of the Album or Book that the song/poem is from
- This is NOT the name of the song
- Flatten Image
- This is NOT the name of the song
- Type the name of the Album or Book that the song/poem is from
- Font size should be 36 or slightly smaller
- Pick a Different font

Step 27:
- View
- Guides
- New Guide Layout
- Colums: 14
- Rows: 0
- Top and Bottom: 0
- Left: 3
- Right: 1.2
- Guides

Step 28:
- Image
- Image rotation
- 90 Clockwise
- Image rotation

Step 29:
- Draw a text box that Starts at the bottom of the photograph and ends near the top of the canvas

Step 30:
- Pick a font
- Font size 120 (you can make it bigger or smaller as needed)
- Type the name of the Song or Poem
- Leave a couple spaces between each word of the title
- Flatten Image
- Leave a couple spaces between each word of the title

Step 31:
- Draw a text box that fits in between the first set of lines

Step 32:
- Return to the lyrics from Step 1
- Highlight a line from the song/poem
- Right click to Copy the line
- Highlight a line from the song/poem

Step 32:
- Right click on the Text box
- Paste the lyrics
- If they are to big or small change the font size
- Paste the lyrics

Step 33:
- Click Control J (this will copy the text layer
- Select the Move Tool
- Move the text box copy to the lines below
- Select the Move Tool

Step 34:
- Return to the lyrics
- Highlight the next line
- Right click and copy
- Highlight the next line

Step 35:
- Highlight the text and backspace to delete the text
- Right click on the Text box
- Paste the new lyrics
- Right click on the Text box

Step 36:
- You will be repeating Steps 33-35 until every line has a lyric
- Control J
- Move text box down
- Copy and Paste new lyric
- Move text box down
- Control J

Step 37:
- When all of the lines have lyrics
- Flatten Image
- You are not done yet
- Flatten Image

Step 37:
- Image
- Image Rotation
- 90 Counter Clockwise
- Image Rotation

Step 38:
- View
- Extras uncheck

