


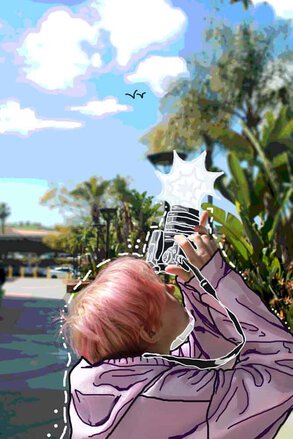
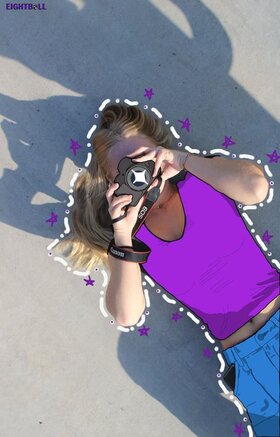

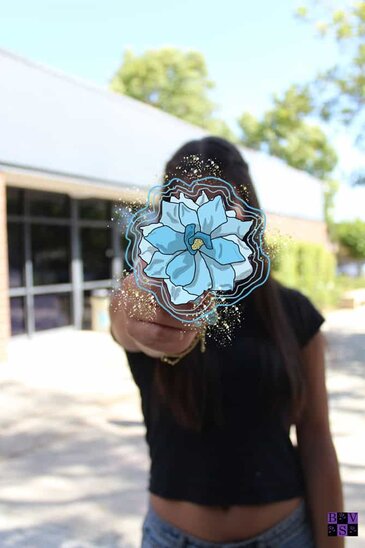


Objective
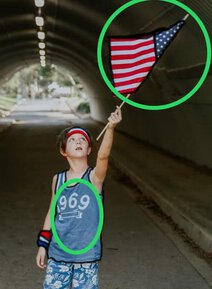
- Pick your favorite photograph you took this year with a person in it
- Cartoon a section of your photograph in Photoshop.
- Do NOT cartoon any part of skin.
- Only clothes and other objects a person is holding should be changed
- Do NOT cartoon any part of skin.
Step 1:
- Open your image in Photoshop
- Click on the + sign at the bottom on the layers pallet
- This will create a new layer.
- Name the layer Lines
- This will create a new layer.

Step 2:
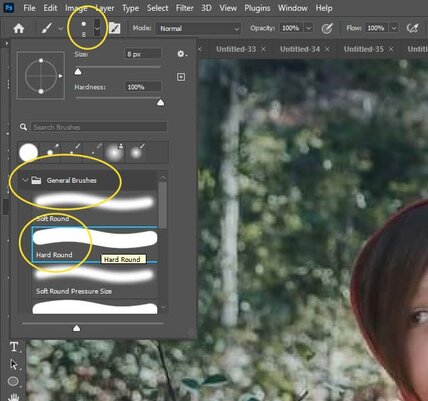
- Pick the brush tool
- Make sure the paint color is black
- Brush Size
- Brush between 6-10
- General Brushes
- Hard Round Brush
- General Brushes
- Brush between 6-10
- Brush Size
- Make sure the paint color is black
Step 3a:
- Make sure you are on the layer named Lines
- Decide what part of the clothes and Objects you want to cartoon
- You will NOT be outlining around the skin or hair
- Decide what part of the clothes and Objects you want to cartoon
Step 3b:
- Zoom in close so you can see the details of the clothing
- Draw lines around the clothing outside of the clothing and/or Objects
- Do NOT draw in the folds of the clothes. This will come later.

Step 4
- When you are done outlining all the clothing and objects, you will be checking to make sure you did not miss any areas
- If there are any unconnected lines the next step will not work
- Click off the eye on your background layer.
- You will now just see the outlined areas
- Click off the eye on your background layer.
- If there are any unconnected lines the next step will not work

Step 5:
- Find the areas you missed outlining
- Every section must be connected
- There can not be ANY spaces

Step 6:
- Click the eye on the background layer to see the photo again
- Click on the Lines Layer
- Finish drawing the areas you missed
- Click on the Lines Layer

Step 7:
- Click off the eye on your background layer again to check that all areas are connected
- Turn the eye back on when you are done checking

Step 8:
- Click on the + sign at the bottom on the layers pallet
- This will create another new layer.
- Name the layer Details
- This will create another new layer.
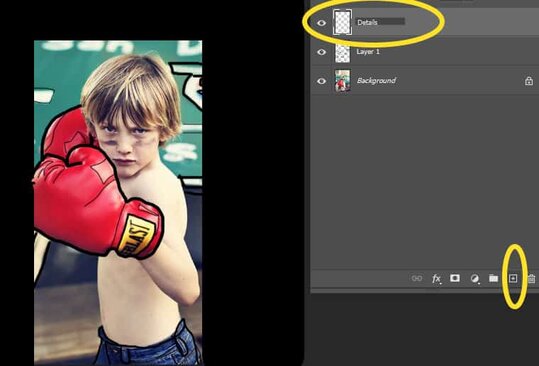
Step 9:
- Make sure you are on the Details layer
- Change your brush size between 1- 3
- The lines will be much thinner than your main outline
- Change your brush size between 1- 3
- Zoom in close
- Draw in the folds of the clothing/item
- Make sure you get the little details
- Draw in the folds of the clothing/item

Step 10:
- When you have finished drawing in all the details
- Click on the Lines Layer

Step 11:
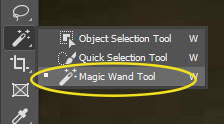
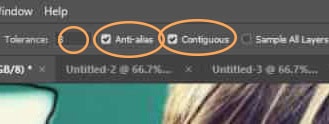
- Select the Magic Wand Tool
- If you can not find it, right click on the Quick Selection Tool
- Make sure Anti-Alias & Contiguousare checked
- Tolerance is at 15
- Make sure Anti-Alias & Contiguousare checked
- If you can not find it, right click on the Quick Selection Tool
Step 12:
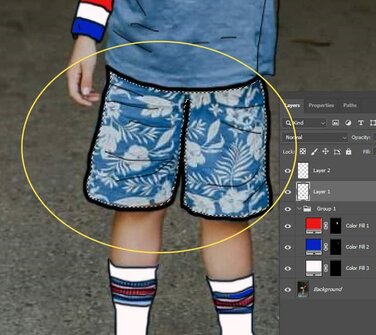
- We are now going to be changing small areas of color at a time.
- You are not changing the color everything in the photo at one time
- With the Magic Wand Tool
- Click the colored section of either the clothing or object you outlined
- This will select just that colored area (I did the boxing gloves)
- Click the colored section of either the clothing or object you outlined

Step 13:
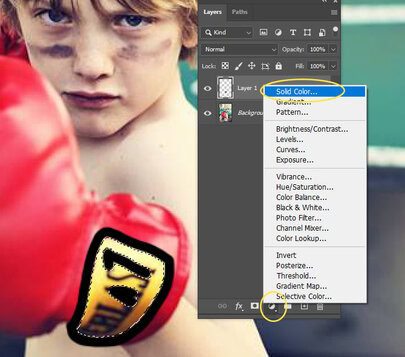
- On the Layers Pallet, click the black/white circle
- Pick Solid Color

Step 14:
- The Color Picker will show up
- Pick any color you want
- This color does NOT have to be the same color that it is in the photo
- Pick any color you want

Example:
- The shorts are Blue in the photo but I want them to be a different color. I picked Red.
- You can pick any color you want for any section of your photo

Step 15:
- You will now have 4 layers
- Click on the Lines Layer
- Pick the Magic Wand Tool
- Select another area of your photo you want to color in
- Pick the Magic Wand Tool

Step 16:
- On the Layers Pallet, click the black/white circle
- Pick Solid Color
- Choose the color you would like for this new section
- Pick Solid Color

Step 17a:
- Continue Steps 10-14 for the different clothing and object sections
- When you are finished coloring all sections you should have 3 or more colored layers, depending on your photo
- The more sections of color you do, the better the photo will turn out
- When you are finished coloring all sections you should have 3 or more colored layers, depending on your photo
Step 17b:
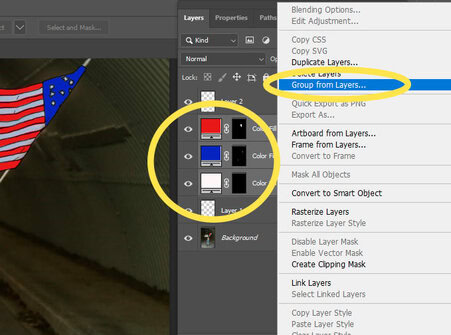
- Highlight all the Layers that are Color Filled layers
- To highlight all of them click on layer Color Fill 1
- Hold the Shift Key and click on the last Color Fill layer
- This will lighlight all the layers
- Hold the Shift Key and click on the last Color Fill layer
- To highlight all of them click on layer Color Fill 1

Step 18:
- When they are highlighted
- Right Click
- Group from Layers
- All the colors will now be in one folder called Group 1
- Group from Layers
- Right Click
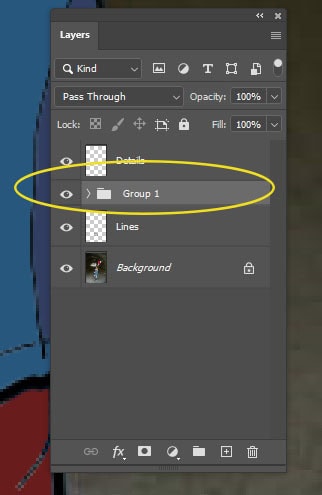
Step 19:
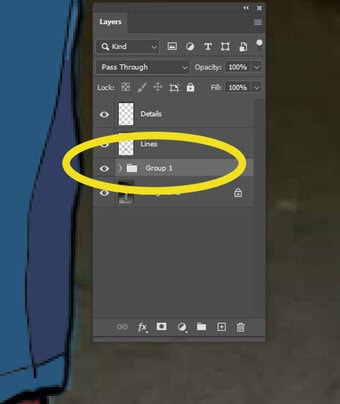
- Drag Group 1 Layer BELOW the Lines Layer
- Your layers should now be in the following order
- Background
- Group 1
- Lines
- Details
- Your layers should now be in the following order
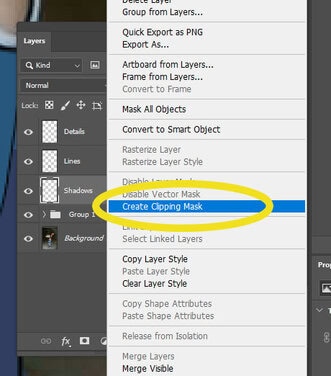
Step 19:
- Click on the Group 1 Layer
- Click on the + at the bottom of the Layers Pallet
- This will create a new layer.
- Name it Shadows
- The Shadows Layer will be Below Lines Layer and above the Group 1 Layer
- Name it Shadows
- This will create a new layer.
- Click on the + at the bottom of the Layers Pallet

Step 20:
- Right Click on the Shadows Layer
- Create Clipping Mask
Step 21:
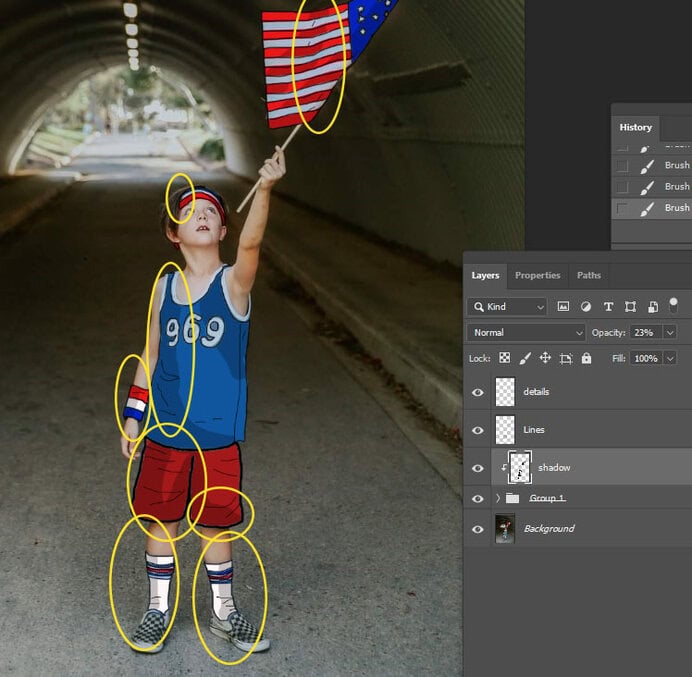
- Stay on Shadows Layer
- Change the opacity to 23-33%
- Choose a black paint brush
- Change the opacity to 23-33%
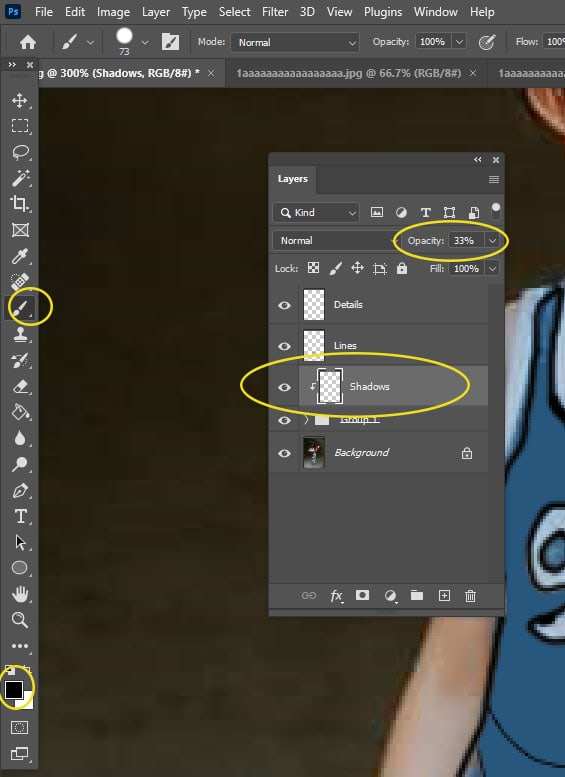
Step 22:
- Turn the Eye off on Group 1 Layer
- Notice where the Shadows fall on the object and clothing
- This is going to be were we paint on the shadows
- If you forget where to put the shadows you can turn the eye off and on again to see the original photo
- This is going to be were we paint on the shadows

Step 23:
- Turn back on the Eye on Group 1 Layer,
- Stay on the Shadows Layer
- Carefully paint in the shadow areas.
- Stay on the Shadows Layer
- You want this to look natural
- If the shadows are to dark pull down the opacity.
- If the shadows are to light pull up the opacity
- If the shadows are to dark pull down the opacity.
Step 24:
- Create a new layer and name it Extra

Step 25:
- Select the paint brush tool
- Pick the color you would like
- I suggest starting with white
- You may Change the color as you go or keep it all the same
- You can also use the shape tool to add premade shapes
- Have fun drawing on the image
- You can also use the shape tool to add premade shapes
- You may Change the color as you go or keep it all the same
- I suggest starting with white


