


Photoshop Challenge Peel Face
 Step 1:
- Pick a photograph of a headshot you took or one online
- Use the OBJECT Selection Tool
- Click on the person
- This should select just the person
- If this does not work use the Quick Selection tool

Step 2:
- Go to
- Select
- Inverse
- Select
- You will now see area outside of the person selected

Step 3:
- Right click on the Background Layer
- Duplicate Layer
- Name it Person


Step 4:
- On the Person Layer
- Click Delete
- Click off the Background Layer eye

Step 5:
- Go to Select
- Deselect

Step 6:
- Click on the plus sign at the bottom of the Layers Pallet
- This creates a new layer (Layer 1)

Step 7:
- Drag Layer 1 below Person Layer

Step 8:
- Click on Layer 1
- Select the Paint Bucket Tool
- Make sure the top color is Black
- Click anywhere in the background
- This will make your background black

Step 9:
- Click on Person Layer
- Image
- Adjustments
- Black and White
- Adjustments
- Image
- Move the sliders so that you start to get lots of contrast between the black and white


Step 10:
- Click on Person Layer
- Image
- Adjustments
- Levels
- Adjustments
- Image

Step 11:
- Move the sliders until you have a strong contrast between the black and white

Step 12:
- Click on the Person Layer
- Select the Lasso Tool

Step 13:
- Start at the top of the head
- Draw an oval
- Make sure it doesn’t go to far into the black area

Step 14:
- Hold the Shift Key
- If you do not hold the shift key your first oval will disappear
- Draw a second oval
- Be sure to leave space between the top oval and the second oval

Step 15:
- Continue to hold down the Shift Key
- Draw ovals OVER the areas you want to show up
- Example Eyes, Mouth
- Be sure to leave space between the ovals

Step 16:
- At the Bottom of the Layers Pallet
- Click the box
- This will add a mask
- Areas between the ovals will disappear
- This will add a mask
- Click the box

Step 17:
- Click on the plus at the bottom of Layers Pallet
- This will create a new layer

Step 18:
- Drag Layer 2
- BELOW the Person Layer

Step 19:
- Click on Layer 2
- Select the Gradient Tool
- Make sure the top bar is black and white

Step 20: You now need to decide which side of the face is darker and what side is lighter
- If the face is
- Lighter (Left) – Darker (Right)
- Go to Step 20a


- Go to Step 20a
- Lighter (Left) – Darker (Right)
- If the face is
- Darker (Left) to Lighter (Right)
- Go to Step 20b


- Go to Step 20b
- Darker (Left) to Lighter (Right)
- If the face is even in dark/light you may use either step 20a or 20b

Step 21a:
- Click on the Left side of the Face
- Draw a straight line to the Right Side of the Face
- This will make the background

Step 21a:
- Click on the Right side of the Face
- Draw a line to the Left Side of the Face

Step 22:
- Stay on Layer 2
- Click the Box at the bottom of layers pallet
- This will add a white mask

Step 23:
- Click
- Control i
- This will turn the mask black

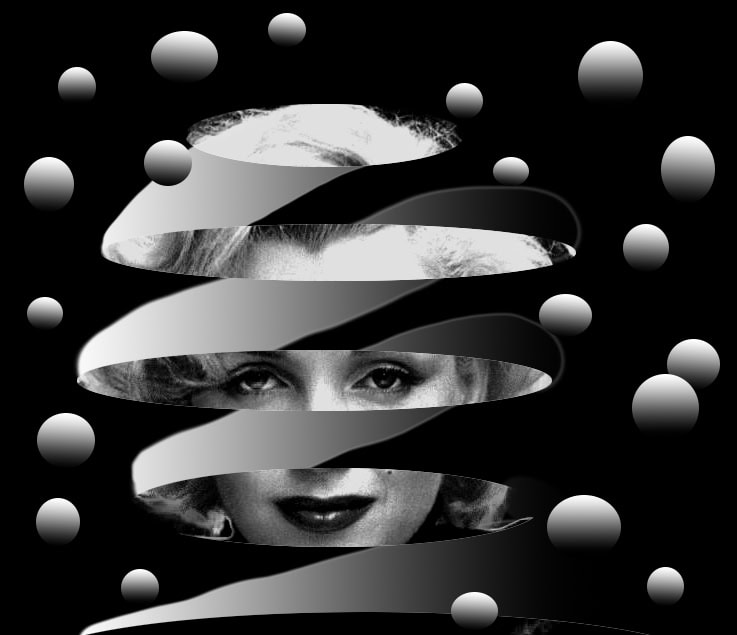
We are now going to be making our image look like an orange peel

Step 24:
- Click on the Black Mask
- Select the Paint Brush
- Make sure it is a white brush
- Make sure the Brush Hardness is at 100%

Step 25:
- Click on the top of the second oval
- Carefully paint toward the bottom of the first oval

Step 26:
- Click on the top left of the third oval
- Paint a diaganol
- Over the top of oval two
- If the lines don’t look perfect we will fix this later

Step 27:
- Click on the top left of the fourth oval
- Paint in a diaganol
- Over the top of oval three

Step 28:
- Continue you painting until you have gotten to the bottom of your image

Step 29:
- We are now going to clean up areas that doesn’t look right
- We want the edges to look clean and lined up
- Make sure you are still on Layer 2 Black Mask
- Stay on your paint brush tool
- Click X to flip the brush color to Black
- Paint out the areas you do not like
- Click X to flip the brush color to Black

Step 30:
- If you paint out to much
- Click X again
- This will flip your paint brush to white
- Paint back in the area you want
- This will flip your paint brush to white
- Click X again
- Continue until you are satisfied with your image

Step 31:
- Right click on the Person Layer
- Duplicate Layer

Step 32:
- Drag the Person Copy Layer
- Below the Person layer

Step 33:
- Click on Person Copy Layer
- Go to
- Image
- Adjustments
- Hue/Saturation
- Adjustments
- Image

Step 34:
- Move the Lightness slider to the end of the white

Step 35:
- Right Click on Layer 2
- Duplicate Layer

Step 36:
- Drag Layer 2 Copy
- Below Layer 2

Step 37:
- Click on Layer 2 Copy
- Go to
- Image
- Adjustments
- Hue/Saturation
- Move lightness to 55+ to +65
- Hue/Saturation
- Adjustments
- Image

Step 38:
- Flatten your image
Step 39:
- Choose the Circle Shape on the tool bar
- Fill is
- Black to White Gradient
- Stroke: White box line through it

Step 40:
- Start drawing small circle around the person

Step 41:
- Create 10 -20 circles
- Use different Sizes
- Flatten your image when you are done
