

Photography Section
Step 1:
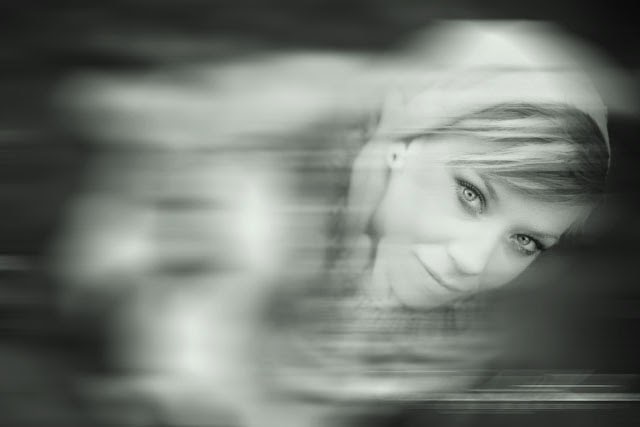
- Use the black backdrop in class to take the photo
- Set your camer to AV
- Pick a low aperture ( F/5 or lower)
- Take a closeup photo of a person
- Focus on the EYES. The eyes HAVE TO BE IN FOCUS
- You may also do a person wearing a mask

Photoshop Section
Step 1:
- Open Photo in Photoshop
- Go to
- Layer
- Duplicate Layer
- Name it Black and White
- Duplicate Layer
- Layer


Step 2:
- Make sure you are on the Black and White Layer
- Go to
- Image
- Adjustments
- Black and White
- Move the Sliders to edit photo
- Black and White
- Adjustments
- Image


Step 3:
- Go to
- Layer
- Duplicate Layer
- Name it Blur
- Duplicate Layer
- You will now have 3 layers
- Layer


Step 4:
- Be sure you are on the Blur Layer
- Go to
- Filter
- Blur
- Motion Blur
- Blur
- Filter
- Go to

Step 5:
- Angle: 0
- Distance between 250 and 350
- You want a strong blur effect

Step 6:
- Make sure you are still on the Blur Layer
- Add a Layer Mask (bottom of Layers Pallet, little box with circle in it)

Step 7:
- Select a Black Paint Brush
- Change brush to
- Flow 30%
- Change brush to

Step 8:
- Paint over the eyes and remove part of the blur effect
- Remove a few parts of the face and the hair
- Do NOT take off to much but if you do…….
- Flip your brush to White an paint the blur back in
- Do NOT take off to much but if you do…….
- Remove a few parts of the face and the hair


Step 9:
- Click on the little black/white circle at the bottom of the Layers Pallet
- Choose Photo Filter

Step 10:
- Click on the color box that pops up
- Pick ANY color you like
- Make sure the two white arrows stay at the top of the color bar
- Pick ANY color you like

Step 11:
- Click on the little black/white circle at the bottom of the Layers Pallet
- Choose Brightness/Contrast

Step 12:
- Increase Contrast
- Play with the Brightness to create the look you like but…..
- Don’t make it to dark or to light

Step 13:
- Add your Logo
- Flatten Image
