

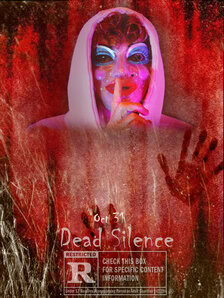
Scary Movie Poster


Part 1: The Photograph
- Photo must be taken VERTICALLY (up and down)


- AV: F/5.6
- Use the black backdrop
- Take a close up photograph of a 1 or more people from the sholders up
- They should be screaming, yelling or making a crazy face
- You may also have them wearing a mask
- You may also used a stuffed animal
- You may also have them wearing a mask
- They should be screaming, yelling or making a crazy face
- Take a close up photograph of a 1 or more people from the sholders up


Part 2: Photoshop
*******Start by Googling Scary Film Posters and look at Images. You are not coping what you see. You are using it for ideas and inspiration only.********
Step 1:
- Open the photo of the person in photoshop
- Open in ACR (control-shift-a)
- Contrast:
- +40 to +80
- Highlights:
- +5 to + 40
- Shadows:
- -20 to -85
- Other adjustments can be used to create the look you would like


When finish, click ok and open back into Photoshop
Step 2:
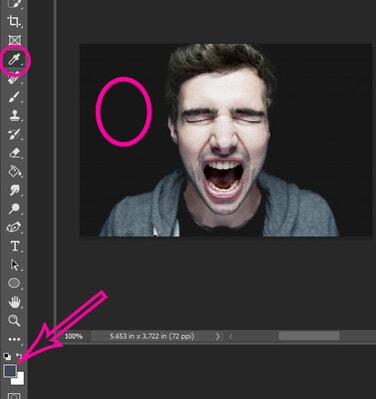
- Pick the Eye Dropper Tool
- Click on the background area of your photo
- This will now become the color on the top square
- We will be making a new file using this color
- This will now become the color on the top square
- Click on the background area of your photo

Step 3:
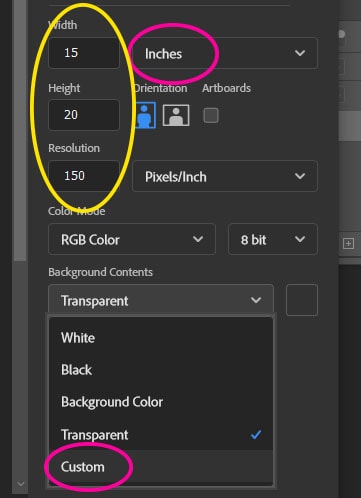
- Go to
- File- New
- Make sure you are on INCHES
- Width 15
- Height 20
- Resolution 300
- Background Contents
- Custom
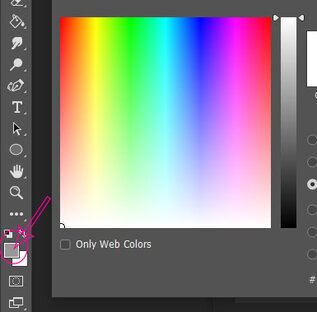
Step 4:
- A box with colors will show up
- Do NOT click in the Color box
- At the BOTTOM of the tools bar
- Click the top box
- This will now select the custom color
- Click the top box
Step 5:
- Click on the Move Tool
- Move the photograph onto the Black Canvas you just made

Step 6:
- Click Control T
- Move the person around until it fills most of the canvas
- Top Area
- Leave just a little space (this is where you will put the actors names)
- Bottom Area
- Leave More space than in the Top area (this is where you will put the Title of Movie)
- Flatten Image

Step 7:
- Pick the Eye Dropper Tool again
- Click on the black area of your photo to select the color
- This color will appear on the top box
- Click on the black area of your photo to select the color
Step 8:
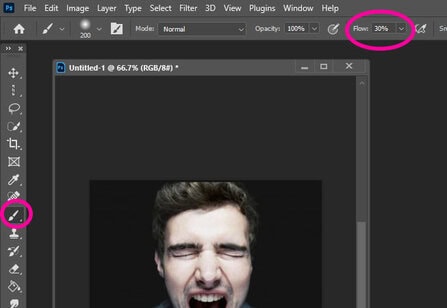
- Select the Paint Brush Tool
- Change the Flow 30%
- Make the brush big……..about the size of a Quarter
- Change the Flow 30%
Step 9:
- Paint over the bottom area of the person’s shirt
- You want it to look like a gradual fading of the black over the shirt
- You want the bottom and sides of the person to look like it is FADING into the background!
- NO HARD EDGES
- You want the bottom and sides of the person to look like it is FADING into the background!
- You want it to look like a gradual fading of the black over the shirt
Yes! NO!


Step 10:
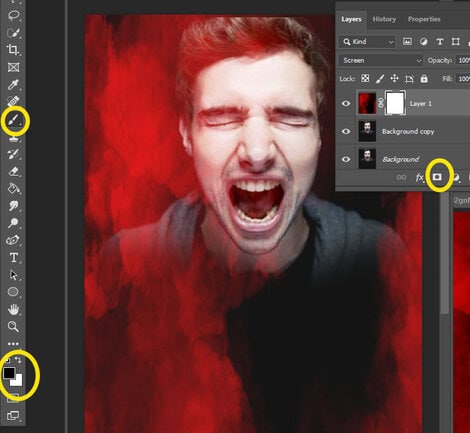
- Right click on the background layer
- Duplicate Layer

Step 11:
- Stay on the duplicated layer
- Click on Normal on the layers pallet
- Change to Softlight
- If you do not like Softlight you may try a different overlay
- Change to Softlight
- Click on Normal on the layers pallet


Texture Section
*******The texture section may not work will with your vision. See me if they do not work********
Step 12:
- Pick and save one of the textures below
- If you do not like these files, please find your own
- Open the file in photoshop after you save it
- If you do not like these files, please find your own


![]()


Step 13:
- File
- Place Embedded

Step 14:
- Locate and Select the file you saved
- Click Place

Step 15:
- Click Control T
- Hold the Shift key as you drag the image over the person
- Cover the whole photo
- Hold the Shift key as you drag the image over the person

Step 16:
- Stay on the new Layer you just added
- Go to top of the Layers Pallet
- Change Normal to Screen or Any of the Other Overlays
- Go to top of the Layers Pallet

Step 17:
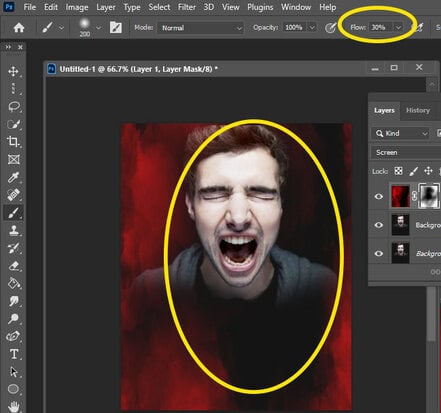
- Add a Mask to the texture layer (box at the bottom of layers)
- Select Paint Brush
- Black box on top
- White box on bottom
- Select Paint Brush
Step 18a:
- Make the Opacity 30-70%
- Paint off the areas you do not want the texture (ex. face)
- The more you paint over the person the more that will be removed
- Paint off the areas you do not want the texture (ex. face)
Step 18b:
- You can also Lower the Opacity of the texture if it’s to strong.
******If you do not like how it looks turn the Opacity to 0%-10% or delete the layer********
- Flatten the Layers

Step 19:
- Click on the black/white circle at the bottom of the layers pallet

Step 20:
- Choose Color Balance
- Move the sliders for
- Midtones
- Shawdows
- Highlights until it starts to achieve a different tint
- Do not go overboard with the color!!!!!!!!!!!!!!!!!!!!!!
- Flatten your image when done
- Do not go overboard with the color!!!!!!!!!!!!!!!!!!!!!!
- Highlights until it starts to achieve a different tint
- Shawdows
- Midtones
- Move the sliders for


- Pick and Save a files below
- Not everyfile will work with every project
- If you do not like my files you may find one of your own
- Not everyfile will work with every project


Step 22:
- You will be repeating steps 13-15.
- Go to File
- Place Embedded
- Locate file you saved
- Move to fit over poster
- Locate file you saved
- Place Embedded
- Go to File

Step 22:
- Make sure you are on the new layer you added
- Go to Layers Pallet top left
- Change Normal to any overlay you like
- Go to Layers Pallet top left


Step 23:
- At the Bottom of the layers pallet
- Add a mask (black/white square)
- Pick a black paint brush
- Paint out parts of the glass/fire/ect you do not want
******If you do not like how it looks turn the Opacity to 0%-10% or delete the layer********
- Flatten Image when done
Step 24:
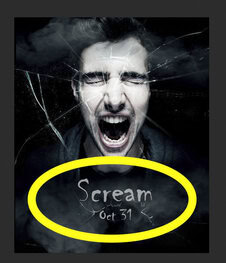
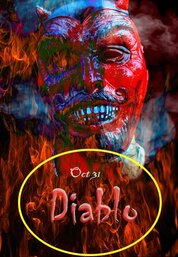
- Choose the Text Box
- Draw the text box under or above the person
- Pick a font
- Pick a Color for the font
- Lower the Opacity to between 25%-50%
- Pick a Color for the font
- Pick a font
- Draw the text box under or above the person
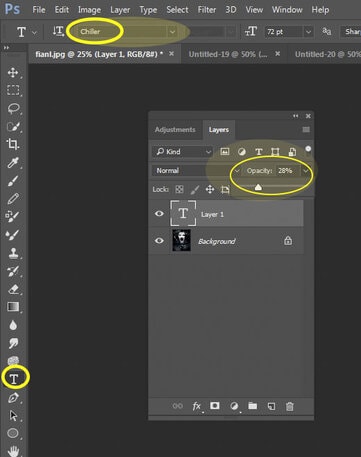
Step 25:
- Pick the name of your movie
- Type the Name
- Change the color and font as needed
- It looks good if you use two different fonts
- Change the color and font as needed
- Type the Name

Step 26:
- When you are done typing the name of the movie
- Click the fx at the bottom of the layers pallet
- Pick Drop Shadow
- Move the Distance sliders to change the shadow
- You may also move the other sliders to your liking
- Move the Distance sliders to change the shadow
- Pick Drop Shadow
- Click the fx at the bottom of the layers pallet


Step 27:
- Sectect the Text Box Tool again
- Draw the text box Above the title or Below the title (your choice)
- Pick ANY date the movie will open
- Pick ANY date the movie will open
- Draw the text box Above the title or Below the title (your choice)
Step 28:
- Pick a different Font from the movie title
- Make the date a SMALLER font size than the movie title
- On the top right of Layers Pallet
- Decreace the Opacity of the Font slightly
- On the top right of Layers Pallet
- Make the date a SMALLER font size than the movie title
Step 29:
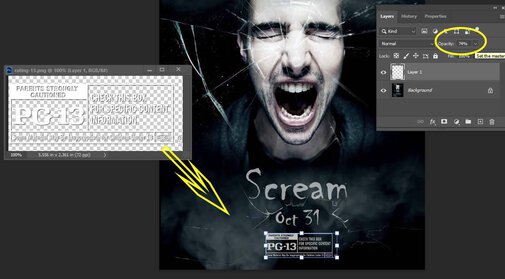
- Decide the movie rated
- Save file from below


Step 30:
- Go to File
- Place Embedded
- Pick the rating file
- Move the Ratings file UNDER the date
- Make sure the rating file is SMALLER than the date
- On the top right of Layers Pallet
- Decreace the Opacity so it matches the title/date
- On the top right of Layers Pallet
- Make sure the rating file is SMALLER than the date
- Move the Ratings file UNDER the date
- Pick the rating file
- Place Embedded
Step 31:
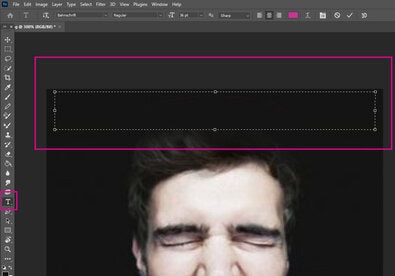
- Decide if you want the names of the actors or a tag line at the top of the poster
- Make a Text box at the top of the poster
Step 32:
- If you want the actors names you MUST have 3 different names.
- They can we made up names or real names. MUST be appropriate!!!!
- or
- They can we made up names or real names. MUST be appropriate!!!!
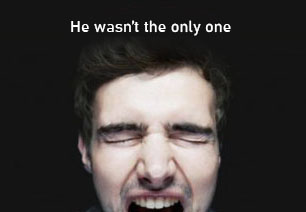
- Make up a tag line examples below
- Sentence that goes with the movie (He Wasn’t Alone. Don’t walk at night)
- Based On a True Story
- Best Scary Movie of the Year

Step 33:
- Flatten Image
- Do NOT put on Logo