

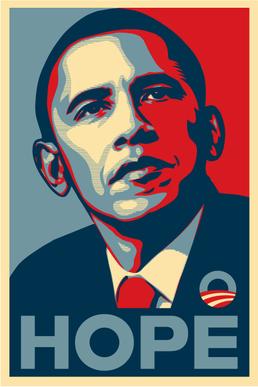
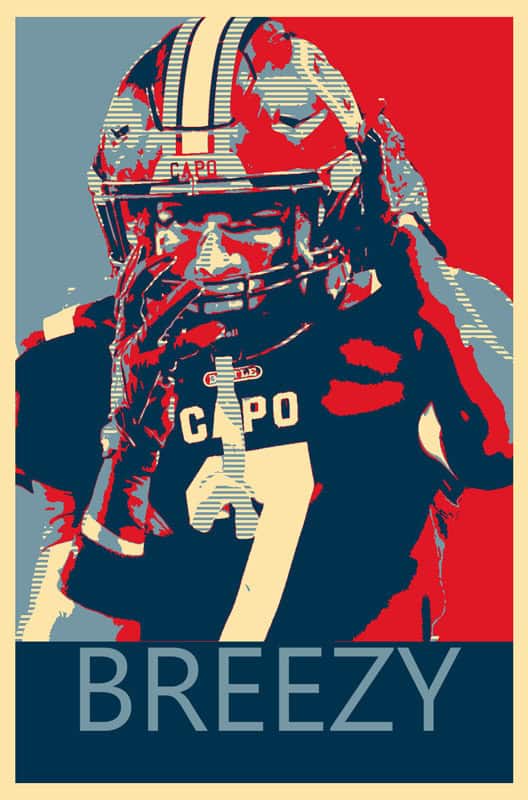
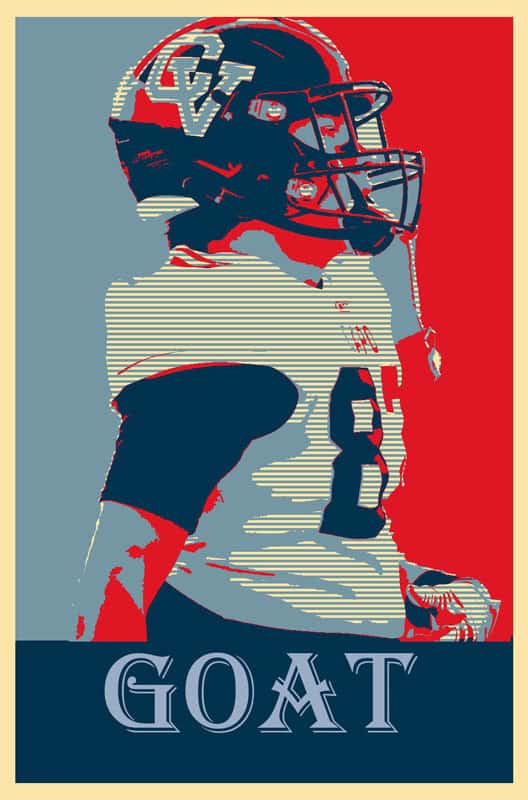
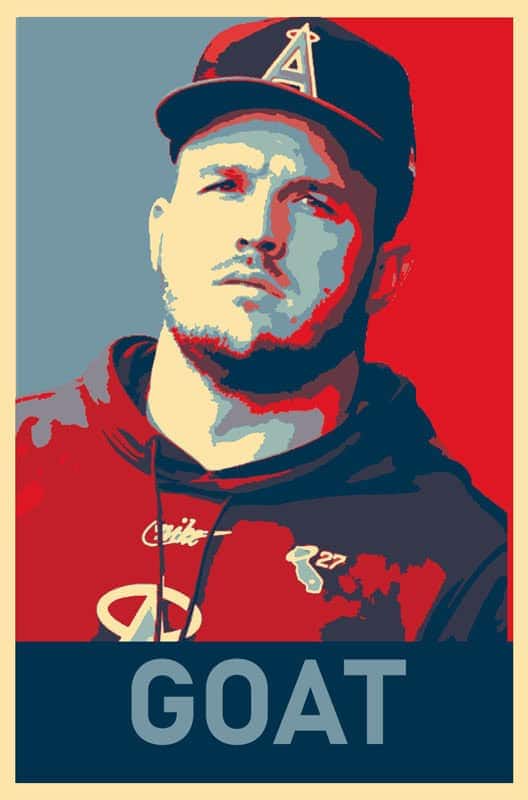
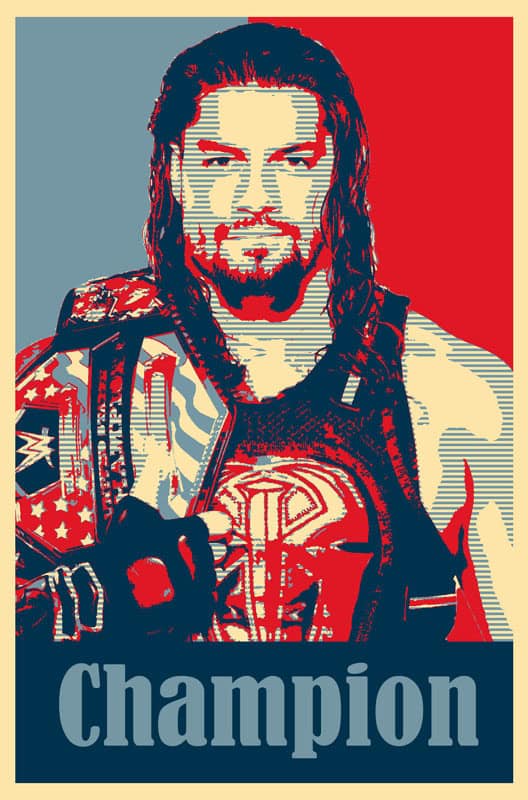
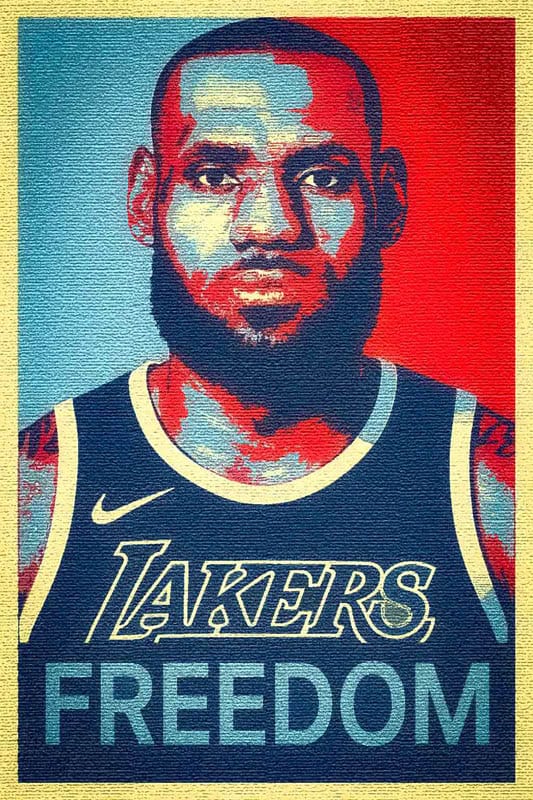
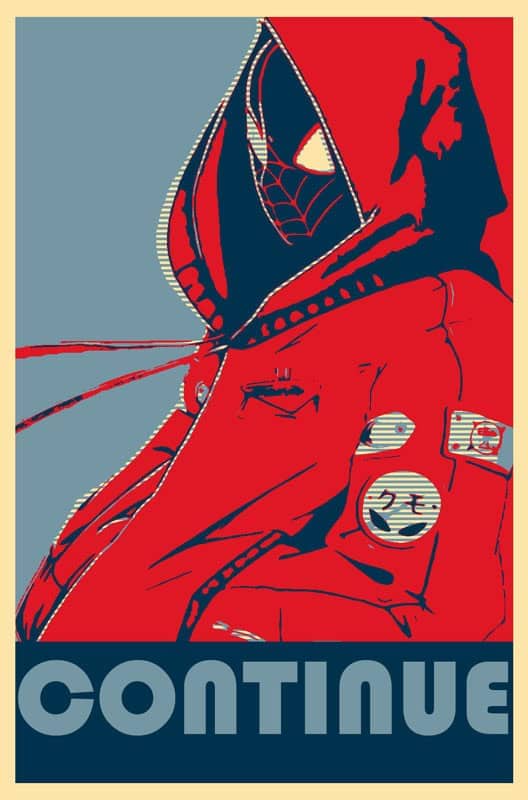
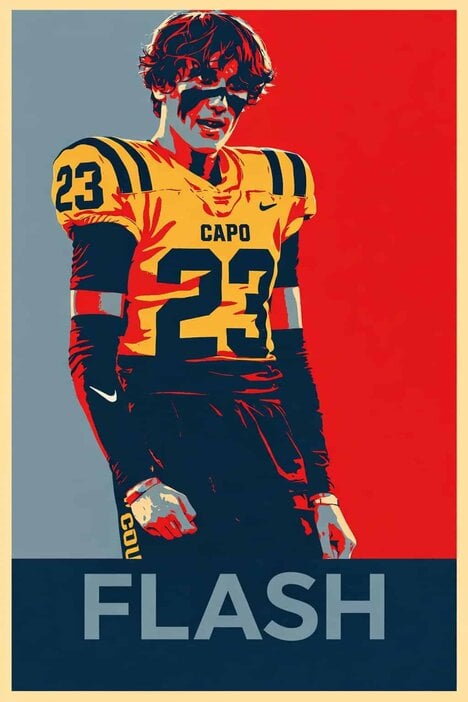
Shepard Fairy Hope Poster Inspired


____________________________________________________________________
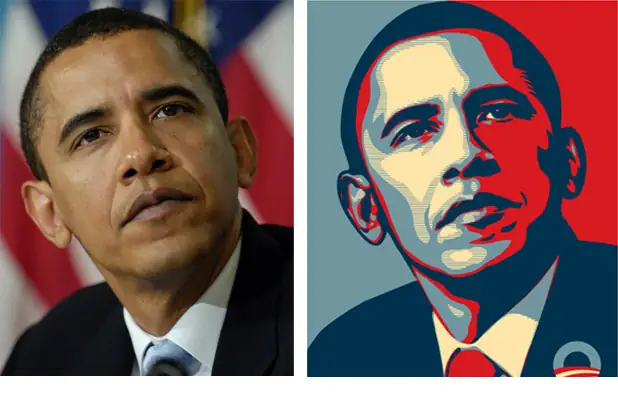
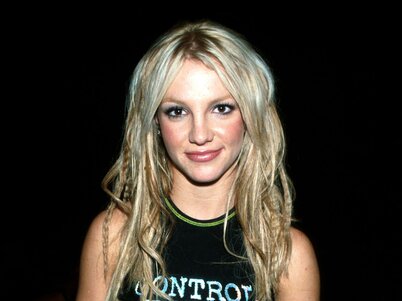
Part 1: Choosing the Photo for the poster
- Choose a HIGH RESOLUTION Photo of a person from the chest up
- Should be 1000 pixels or more
- NO full body
- This can be a personal photo or from online

_________________________________________________________________________________________
Part 2: The Person
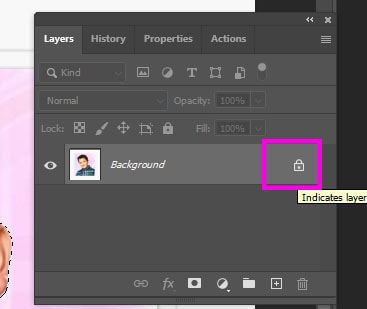
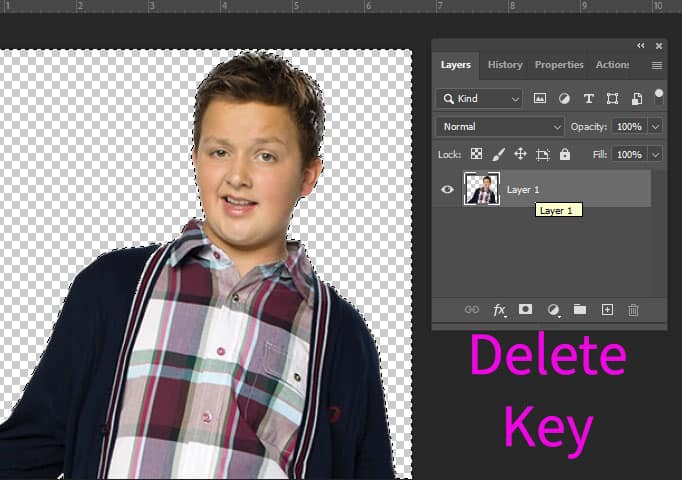
Step 1:
- Open the main subject file
- Go to the Background Layer
- Double click on the lock
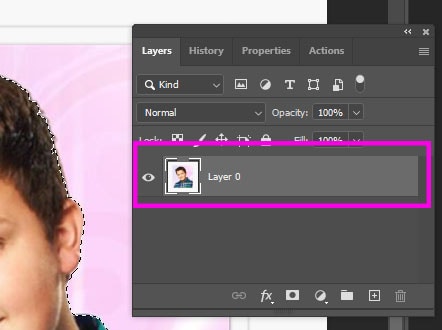
- It should now say Layer 0
- Double click on the lock
- Go to the Background Layer
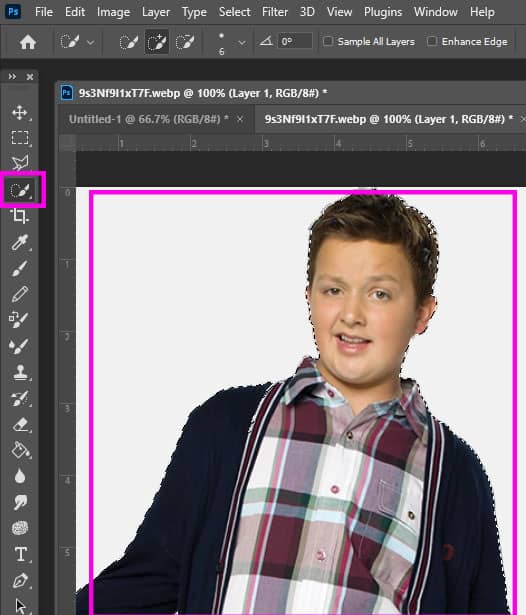
Step 2:
- Pick the Quick Selection Tool
- Select the entire subject
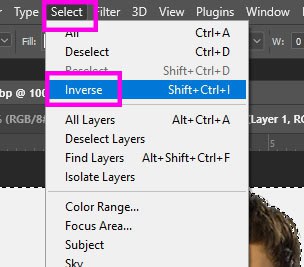
Step 3:
- When you are done selecting the image
- Go to Select
- Inverse
- Go to Select
Step 4:
- Click the Delete Key on Keyboard
- Background will be gone
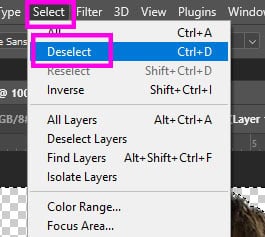
Step 5:
- Go to Select
- Deselect
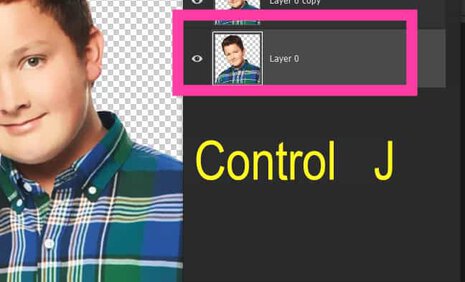
Step 6:
- Click Control J
- This will make a copy of the subject
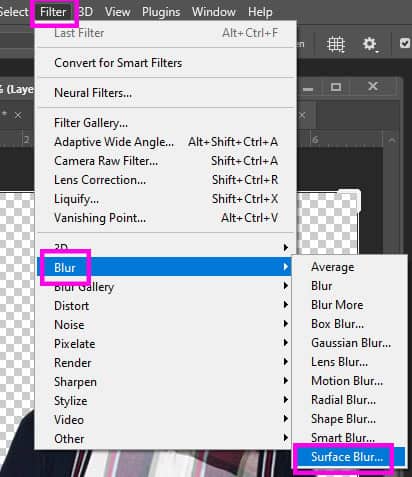
Step 7:
- Go to Filter
- Blur
- Surface Blur
- Blur
Step 8:
- Radius:10
- Threshold: 10

Step 9:
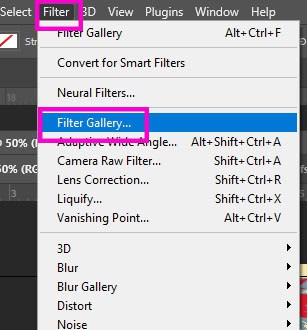
- Go to Filter
- Filter Gallery

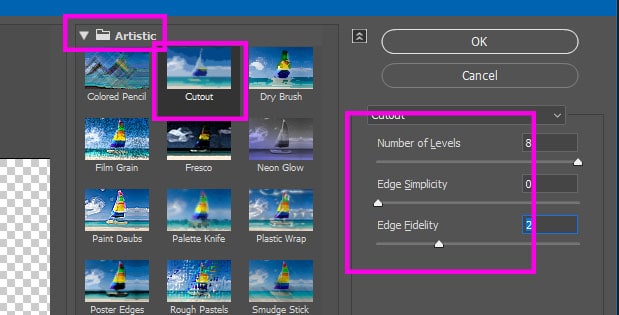
Step 10:
- Artistic
- Cutout
- Move with the sliders around until you get the look you want
- Be careful NOT want to lose the features of the persons face

Step 11
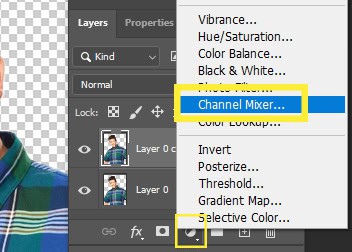
- Click on the Black/white circle at bottom of layers
- Pick Channel Mixer
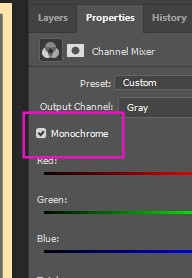
Step 12
- Click Monochrome ( little box above the color sliders)
- Project will turn black and white
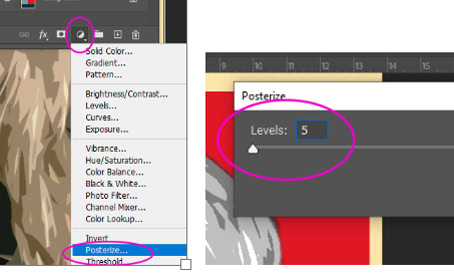
Step 13
- Click on the Black/white circle bottom of Layers Pallet
- Posterize
- Make Levels: 5
- Posterize
Step 14:
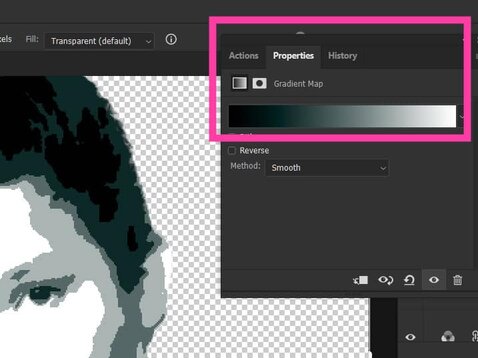
- Click on Black/White Circle at bottom of layers(Adjustments)
- Pick Gradient Map

Step 15:
- A LONG bar will show up under Properties
- It does not matter what the colors are
Step 16:
- Double Click on the Gradient Map bar
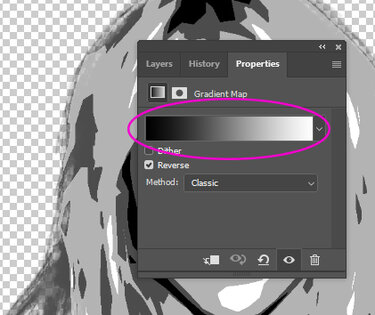
Step 17:
- A new long bar will pop up
- Click on the little box at the Botton Left of the graph
- Nothing will happen
- Click on the little box at the Botton Left of the graph
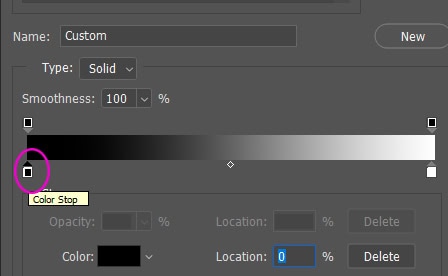
Step 18
- Click on the box that says Color
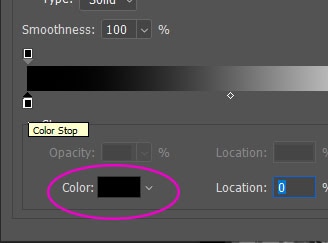
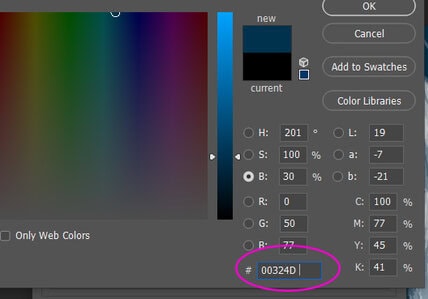
Step 19:
- At the bottom of the color box type
- 00324D
- Click OK
- 00324D
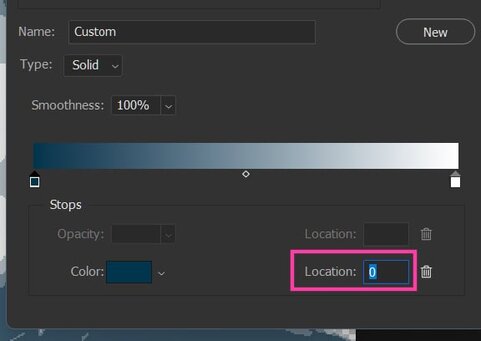
Step 20
- Location: O
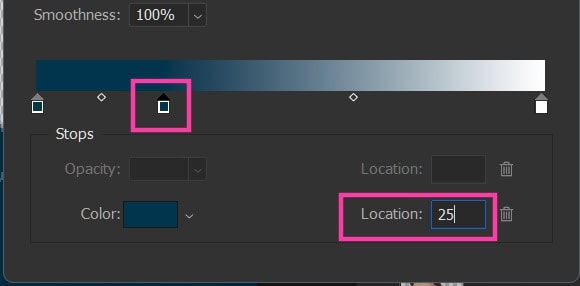
Step 21
- Click anywhere on the bottom of the color bar
- This creates a new box (It does not matter what the color is)
- Location: 25
- This creates a new box (It does not matter what the color is)
Step 22
- Click on Color
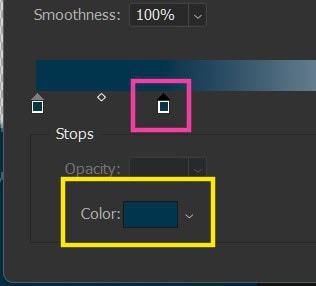
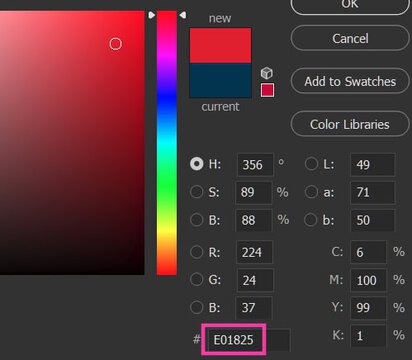
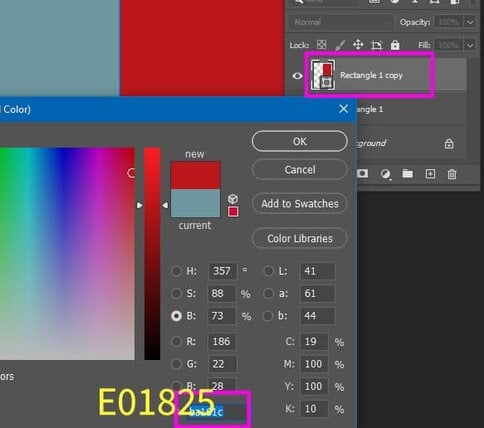
Step 23
- Type E01825
- Click OK
Step 24
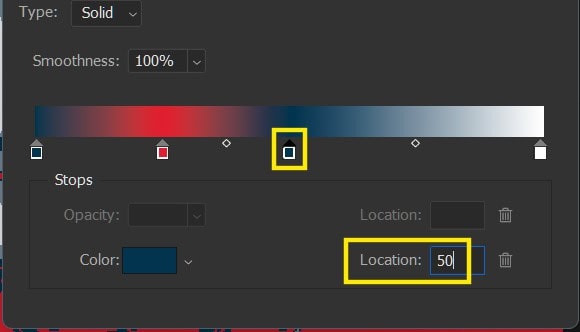
- Click anywhere to the Right of the 2nd box
- This will create a 3rd box
- Location: 50
- This will create a 3rd box
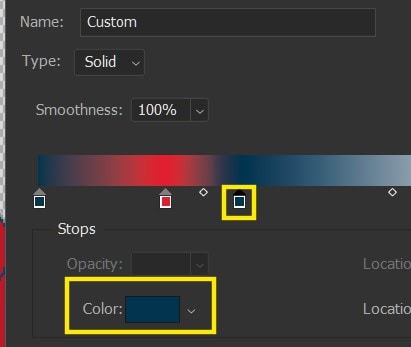
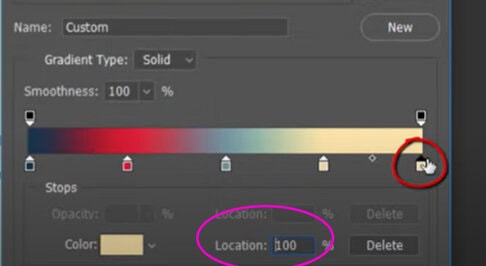
Step 25
- Click on Color
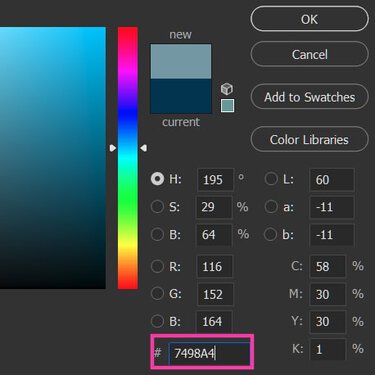
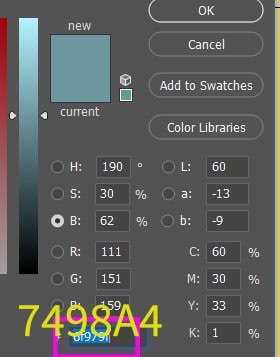
Step 26:
- Type 7498A4
- Click OK
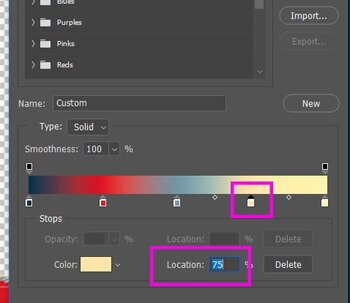
Step 27:
- Click anywhere to the right of the third box
- Location 75
- Click on Color
- Type FDE5A9
- Click on Color
- Location 75
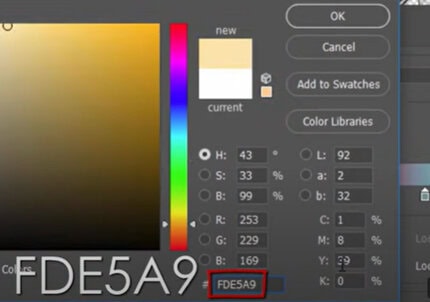
Step 28:
- Click on the bottom far Right box
- Location 100
- Click on Color
- Type FDF2C5
- Click on Color
- Location 100
(You should now have 5 boxes at the bottom going from Dark Blue- Red- Light Blue- Yellow- Light Yellow)
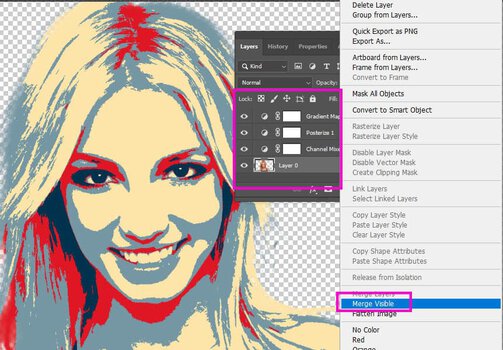
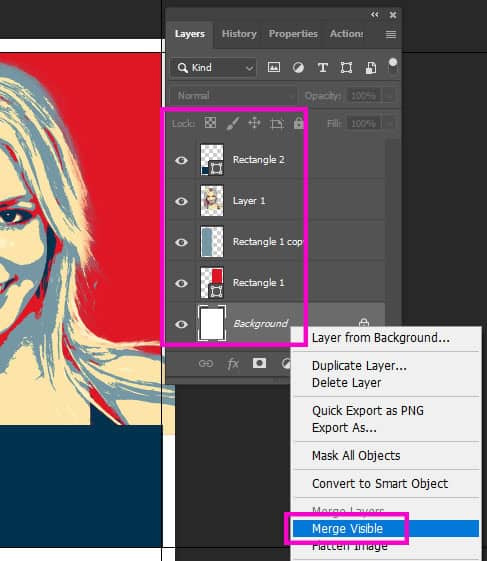
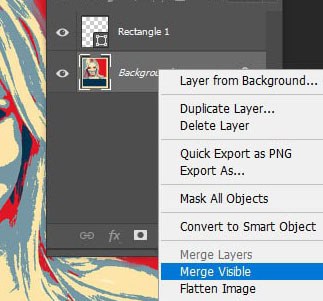
Step 31:
- Right Click anywhere on the Layers Pallet
- Merge Visible (Do NOT flatten)
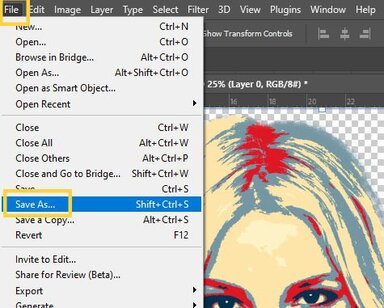
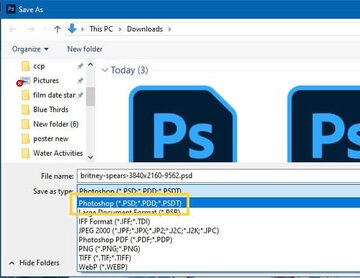
Step 32:
- Save the person now before continuing. You do not want to lose the work you did
- File
- Save as
- PSD Photoshop (do not save as any other kind of file)
- Save as
- File
_____________________________________________________________________________________
Part 3: Background
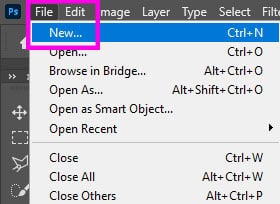
Step 1:
- Go to File
- New
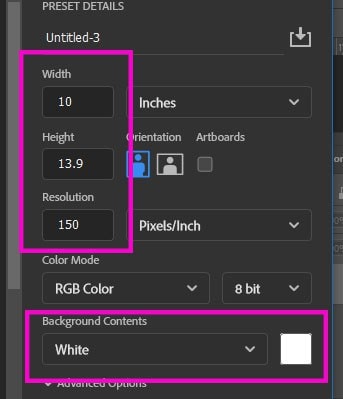
Step 2:
- Width: 10 Inches
- Height: 13.9 Inches
- Resolution: 150
- Background Contents: White
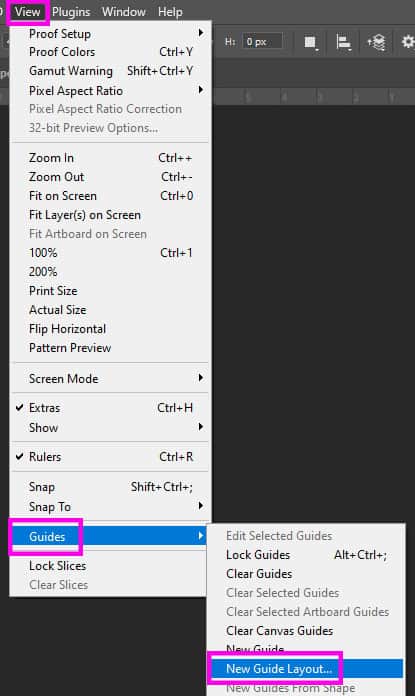
Step 3:
- Go to View
- Guides
- New Guide Layout
- Guides
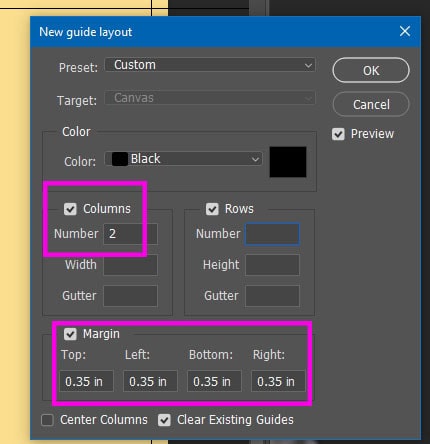
Step 4:
- Color
- Black
- Columns
- Number: 2
- Margin
- Top/Left/Bottom/Right: 0.35
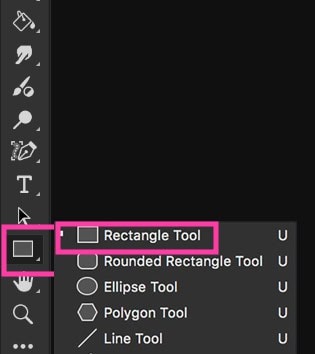
Step 5:
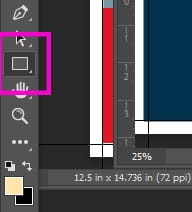
- Select the Rectangle Tool (bottom of Tools bar)
- If you can’t find it, right click on the shapes
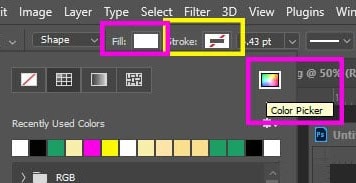
Step 7:
- Stroke
- White Box with Red Line
- Fill
- Click on the box (doesn’t matter the color)
- Click on the Color Picker Box
- Click on the box (doesn’t matter the color)
Step 8:
- When the new screen pops up, change the bottom number to
- 7498A4
- Click Ok
- 7498A4
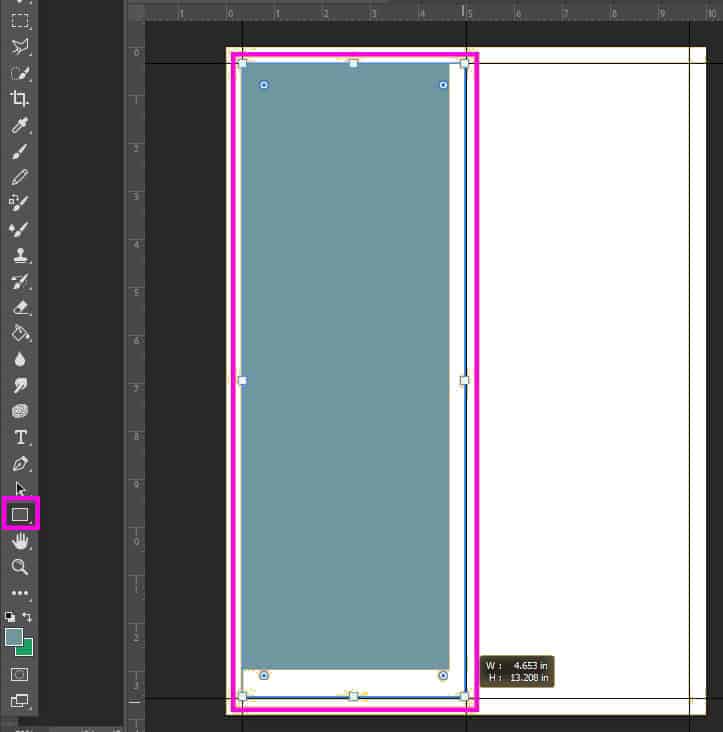
Step 9:
- Draw a Rectangle in the left side margins
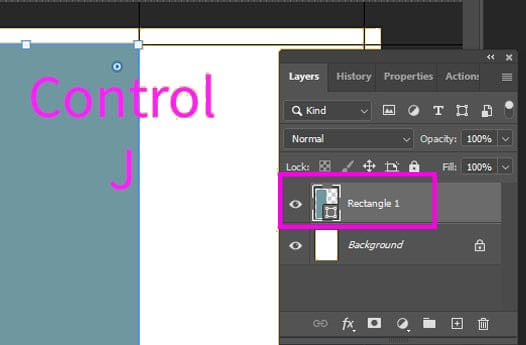
Step 10:
- Click Control J
- This will make a copy of the rectangle
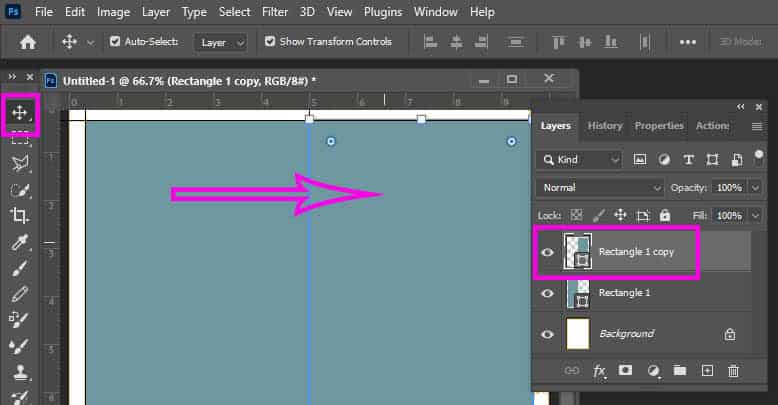
Step 11:
- Select the Move Tool
- Move the Rectangle copy to the right
- Fit in the right side of the margins
- Move the Rectangle copy to the right
Step 12:
- Double Click on Rectangle 1 Copy Layer
- When the new screen pops up, change the bottom number to
- E01825
- Click Ok
- E01825
Step 13:
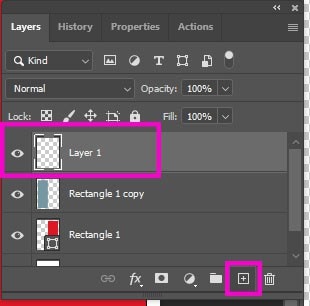
- Go to Layers Pallet
- Click on the + at the bottom
- This will create a new layer
- Click on the + at the bottom
Step 14:
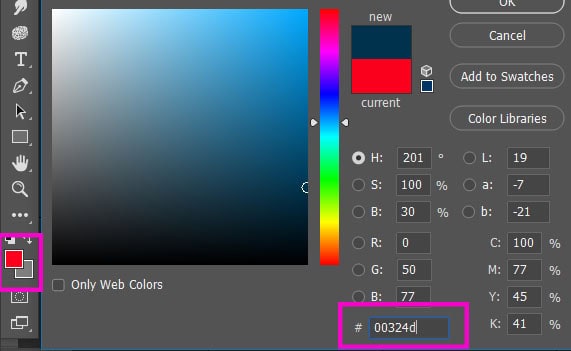
- Double Click on top colored square at bottom of tools bar
- When the screen pops up, change the bottom number to
- 00324D
- Click Ok
- 00324D
- When the screen pops up, change the bottom number to
Step 15:
- Select the Rectangle Tool again
- As you draw the box you will notice little number with the Width and Height will show up
- The Width should touch the inside edges of the margin (number doesn’t matter)
- The Height should be between 2.890 – 2.904
- The Width should touch the inside edges of the margin (number doesn’t matter)
- As you draw the box you will notice little number with the Width and Height will show up

Step 16:
- Save the Background now before continuing. You do not want to lose the work you did
- File
- Save as
- PSD Photoshop (do not save as any other kind of file)
- Save as
- File
______________________________________________________________________________________
Part 4: Putting it Together
Step 1:
- Open the Background file and Person file
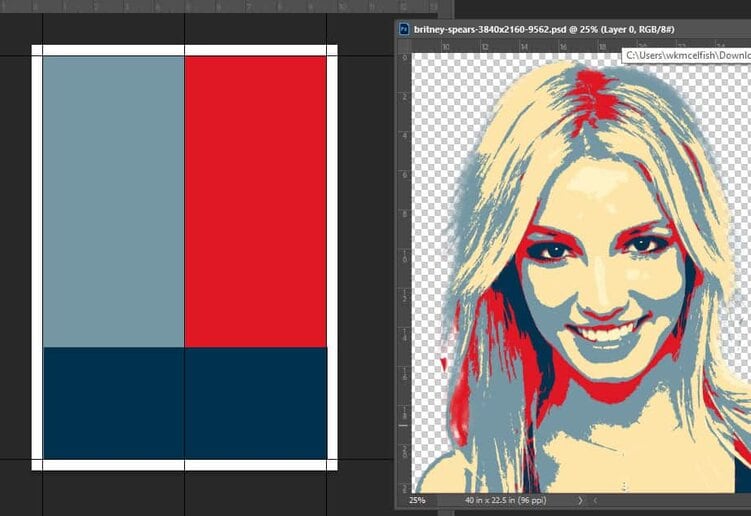
Step 2:
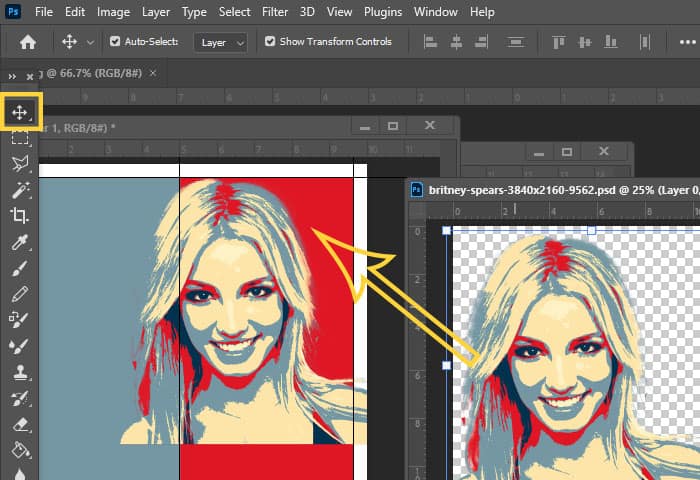
- Select the Move Tool
- Click on the Person image
- Move Person onto the Backgroud
- Click on the Person image
Step 3:
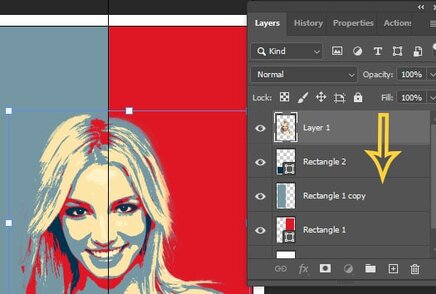
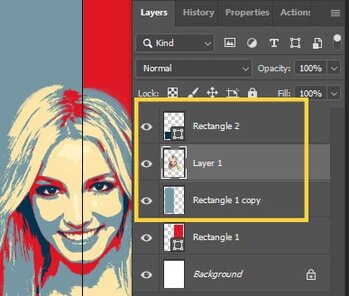
- Go to Layers Pallet
- Click on the Person Layer (should be at the top of Layers)
- Drag it inbetween Rectangle 2 layer (dark blue) & Rectangle 1 Copy Layer (Light Blue)
- Click on the Person Layer (should be at the top of Layers)
Step 3:
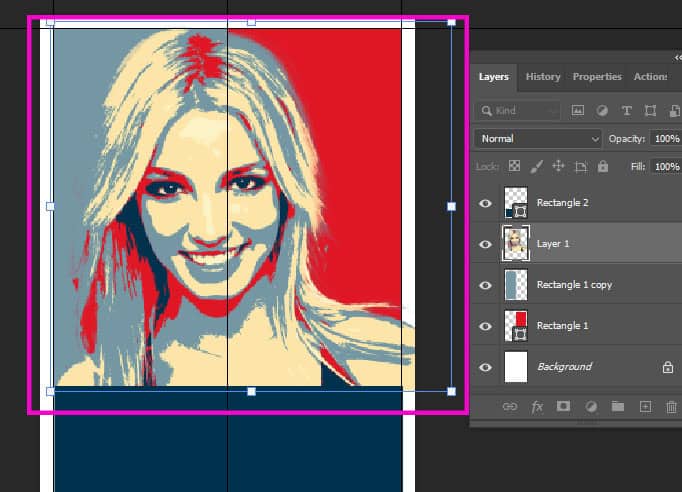
- Click Control T
- Make the image touch the top and edges of the canvas
- Don’t worry if it goes into the white area. We will fix that in the next step
- Make the image touch the top and edges of the canvas
Step 4:
- Right click on the Layers Pallet
- Merge Visible
Step 5:
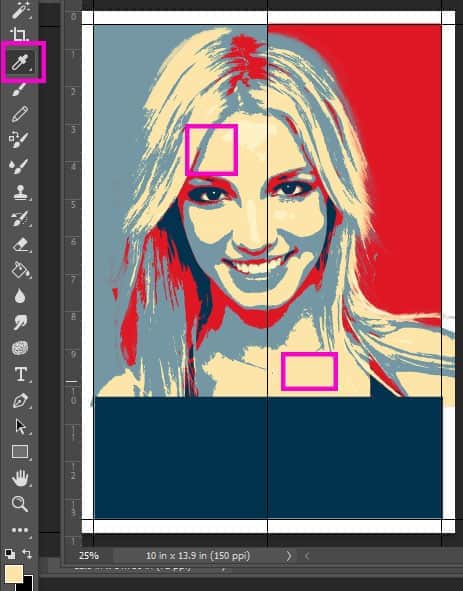
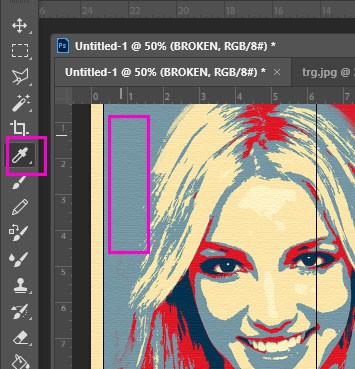
- Select the Eye Dropper Tool
- Click anywhere in the Yellow area
Step 6:
- Select the Rectangle Tool
Step 7:
- Fill: White box with Red slash
- Stroke: Yellow Color just selected
- 25 pt

Step 8:
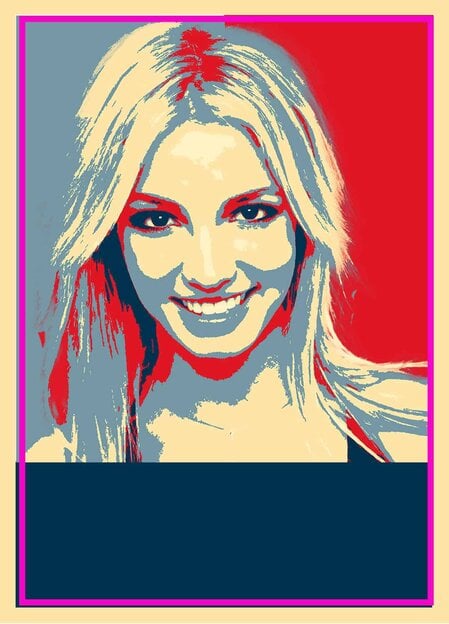
- Draw a box that covers JUST the white area of the poster
Step 9a:
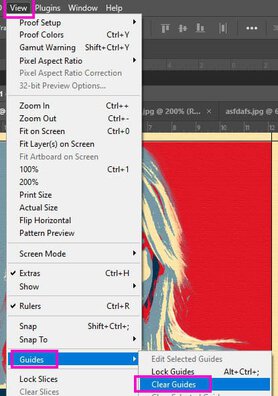
- Go to View
- Guides
- Clear Guides
- Black guide lines will now be gone
- Clear Guides
- Guides
Step 9b:
- Right click on Layers
- Merge Visible
Step 10:
- Go to
- Filter
- Filter Gallery
- Filter
Step 11:
- Texture
- Texturizer
- Scaling: 75%
- Relief: 2
- Texturizer

Step 12:
- Select the Eye Dropper Tool
- Click anywhere in the Light Blue Color
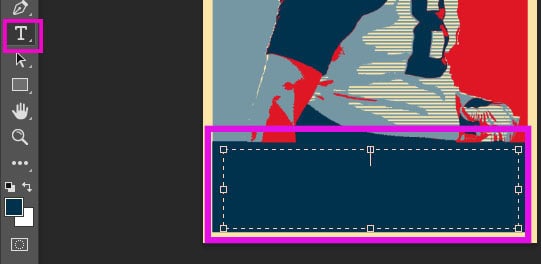
Step 13:
- Select the Text Box
- Draw a Text box that fills up the entire Dark Blue area
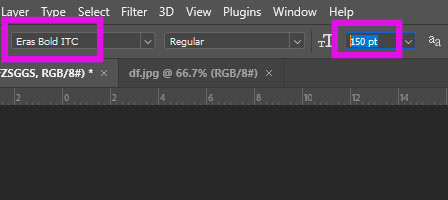
Step 14:
- Go to the top of Photoshop
- Change Font to:
- Eras Bold ITC
- Font size between 150-200 (depending how long your word is)
- Eras Bold ITC
- Change Font to:
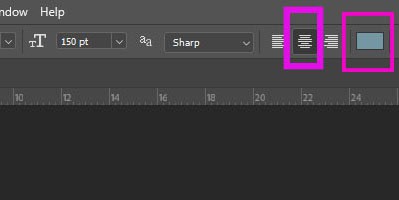
Step 14:
- To the Right of the font size
- Click 2nd box of lines
- Color Box: Light Blue you selected
- Click 2nd box of lines
Step 15:
- Put the Cap Lock on
- Type a word that relates to the person
- You may NOT use the word HOPE. You must pick something else!
- The word MUST be appropriate
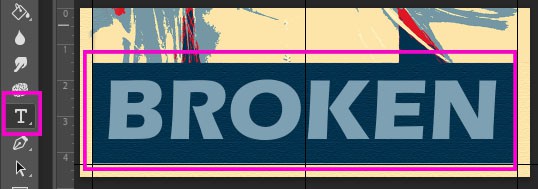
- When Finished Flatten Image and Save
