

Part 1: Photography Section
- Take a photo of person
- Do not move yourself, the camera or settings
- Have person run out of the photo
- Take a second photo in the same spot

Part 2: Photoshop
Step 1
- Open both photos in photoshop
- Select the Move Tool
- Move the PERSON photo ontop of the Non-Person photo
- Select the Move Tool

Step 2:
- Go to Layers Pallet
- Click on Layer 1
- Holding down the Shift key
- Click on Background layer
- Both layers will be highlighted
- Click on Background layer
- Holding down the Shift key
- Click on Layer 1

Step 3:
- Go to
- Edit
- Auto Align Layers
- Edit

Step 4:
- Pick Auto
- Click OK
- Pick Auto

Step 5:
- Click on Layer 1
- Decrease the Opacity to make your peson become see-through

Step 6:
- Select the Crop Tool
- Cut off any extra area
- Click Enter
- Flatten Image
- Click Enter
- Cut off any extra area

Step 7:
- Open Photo in ACR (Ctrl-Shift-A)
- Change the Profile to
- Monochrome
Step 8:
- Go to Lighting
- Move the sliders to create the look you want
- Exposure
- Contrast
- Highlights
- Shadows
- Whites
- Blacks
- Clarity
- Move the sliders to create the look you want

Step 9a:
- Go to Optics
- Move the Vignette slider left
- Between -50 to -100 (it’s up to you how much your little you use)
- Move the Vignette slider left

Step 9b:
- Pick if you want your photo SLIGHTLY look green/blue/brown instead of black and white
- Click open Curve
- Click on the Red, Blue or Green Circle
- Move the middle circle up SLIGHTLY to make the photo with a tint of color
- Click on the Red, Blue or Green Circle
- Click open Curve


Step 10:
- Save one of the Film Grain images from below to the computer


Step 11:
- Go to File
- Place Embedded

Step 12:
- Locate and Select the film grain file you saved
- Click Place

Step 13:
- Streach the Film Grain file until it fits over the ghost photo
- Click and hold the Shift key as you streach the file to fit the entire file over the ghost

Step 14:
- On the Layers Pallet
- Click where it says Normal

Step 15:
- Change Normal to
- Overlay, Lighter Color or Soft Light or any of the other overlays.
- Each photo will look different with each overlay
- Overlay, Lighter Color or Soft Light or any of the other overlays.

Step 16:
- If the texture is to strong
- Go to the texture Layer
- Make the Opacity lower
- Go to the texture Layer

Step 17:
- Add Logo
- Flatten Image

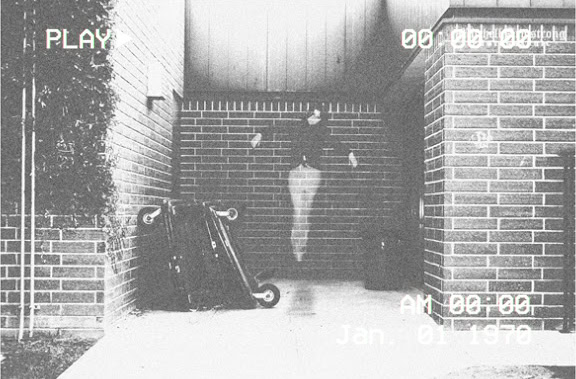
Examples


