


Ripped Paper Or Poloroid Photoshop Challenge
Step 1a:
- Open your image in Photoshop
- It MUST be Edited before starting this project

Step 1b:
- Pick one from below
- 2 papers from 1-4
- or
- 1 paper from 5-6
- or
- Polaroid Paper 7-8
- 2 papers from 1-4
Paper 1

Paper 2

Paper 3

Paper 4

Paper 5

Paper 6

Polaroid 7

Polaroid 8

Step 2:
- File
- Place Embedded
- Choose a paper you saved
- Place Embedded

Step 3a:
- Click Control T
- Move the ends of the paper until it touches the edge of the photo
- Tilting the paper tear ALWAYS looks better than a straight tear
- The paper will look pixelated until you click Enter
- Tilting the paper tear ALWAYS looks better than a straight tear
- Move the ends of the paper until it touches the edge of the photo

Step 3b:
- If you picked the curled edge paper or polaroid you will not need to add a second stip and can skip to Step 5

Step 4:
- File
- Place Embedded
- Choose the second paper strip
- Place Embedded
- Click Control T
- Move the ends of the paper until it touches the edge of the photo
- Tilting the paper tear ALWAYS looks better than a straight tear
- The paper will look pixelated until you click Enter
- Tilting the paper tear ALWAYS looks better than a straight tear
- Move the ends of the paper until it touches the edge of the photo

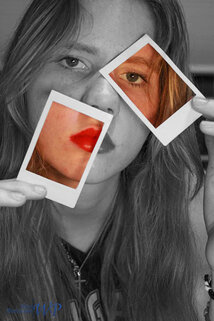
Step 5:
- Move the Paper around until you are focused on one section of the image that you want to remain colored
- If it is a person you want to focus on the eyes

Step 6:
- Click on Background Layer
- Click the circle at bottom of layers
- Choose Black and White
- Click the circle at bottom of layers

Step 7:
- Make sure you are now on the Black and White
- Pick the Lasso Tool

Step 8:
- Draw over all the areas of the Paper
- Make sure the line you draw is Completely connected.
- If there are any openings in the line the next steps will not work
- Make sure the line you draw is Completely connected.

Step 9a:
- Click on the white mask (box) on the black and white layer
- Click Control i
- The section will now be in color
- Click Control i

- If you would like this section to be black and white and the outside colored, go to Step 9b and Step 9c
- Otherwise skip to Step 10

Step 9b:
- Click on the white mask (box) on the black and white layer
- Go to Select
- Inverse
- Outside of the paper will now be selected
- Inverse
- Go to Select

Step 9c:
- Click Control i
- The section will now be in black and white and the background in color

Step 10
- Add any editing you may need in ACR (camera raw)
- You want the image to look polished
- Flatten Image when finished