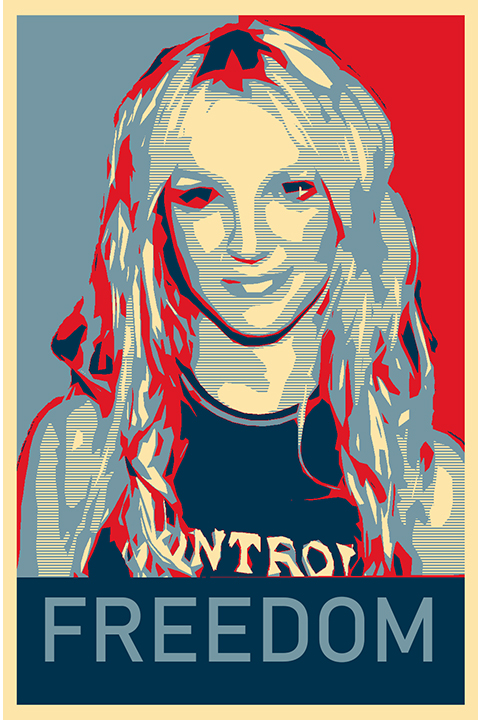
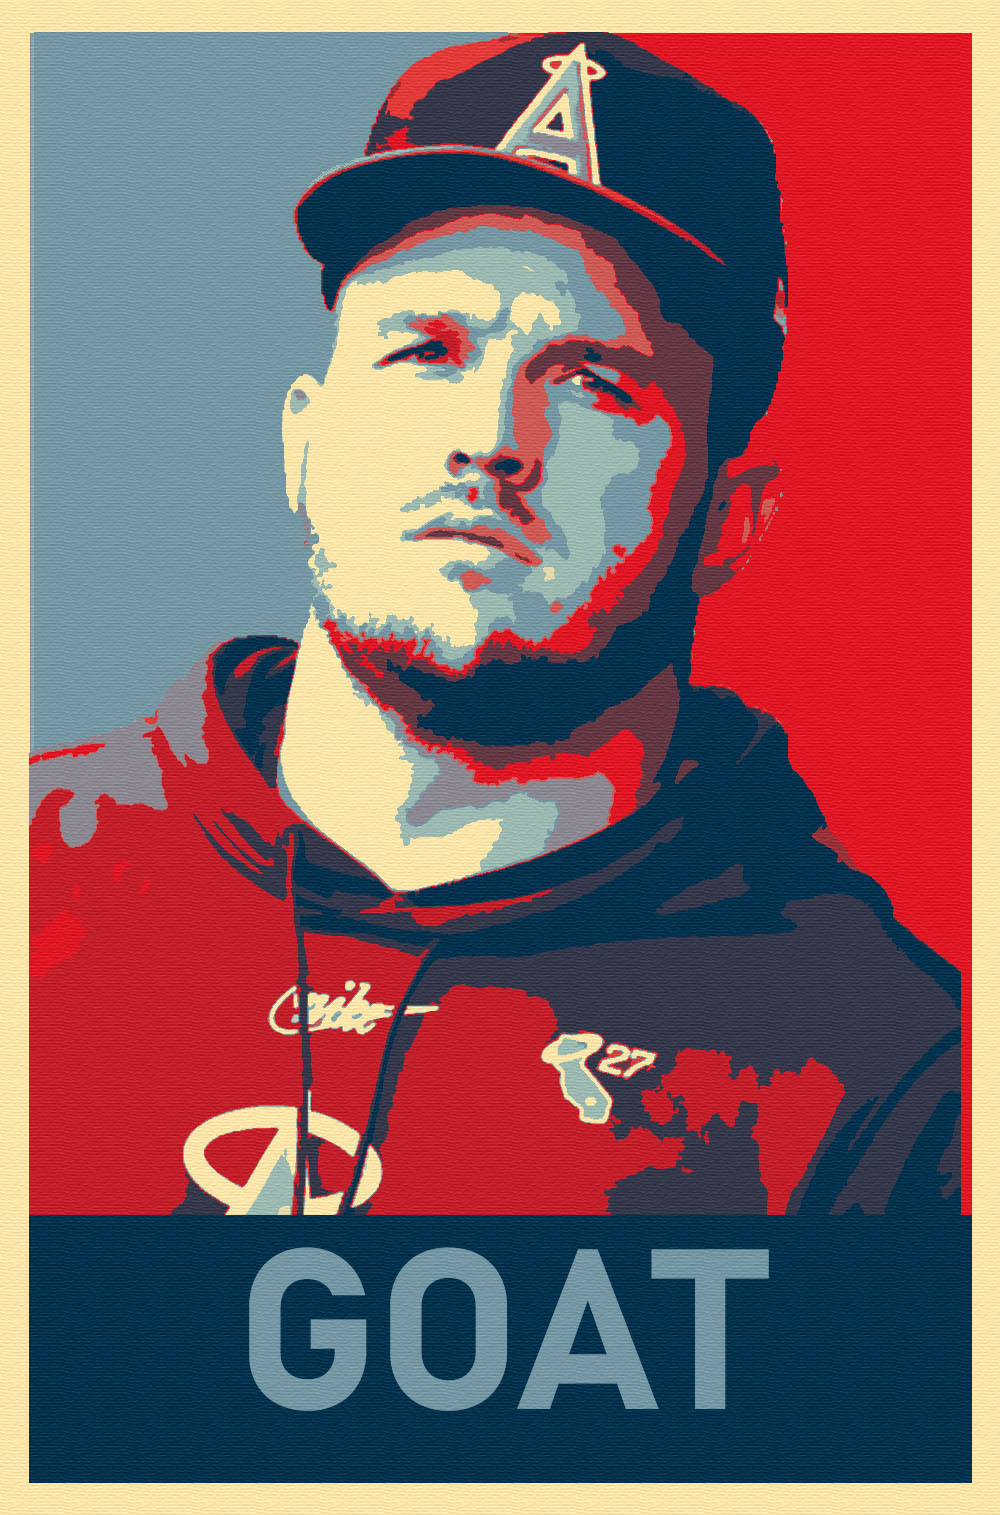
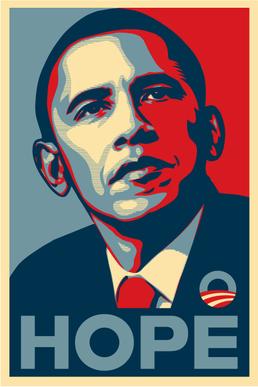
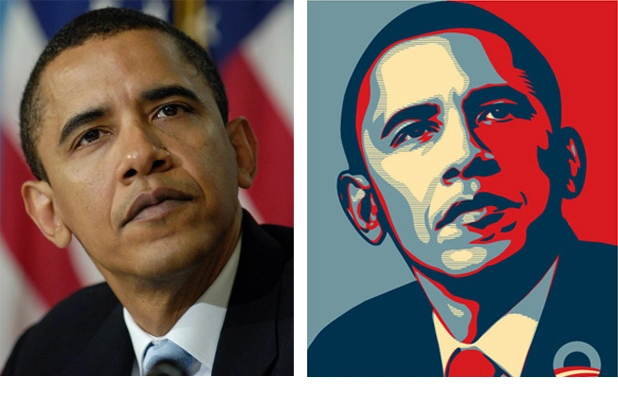
Shepard Fairy Hope Poster Inspired
Step 1
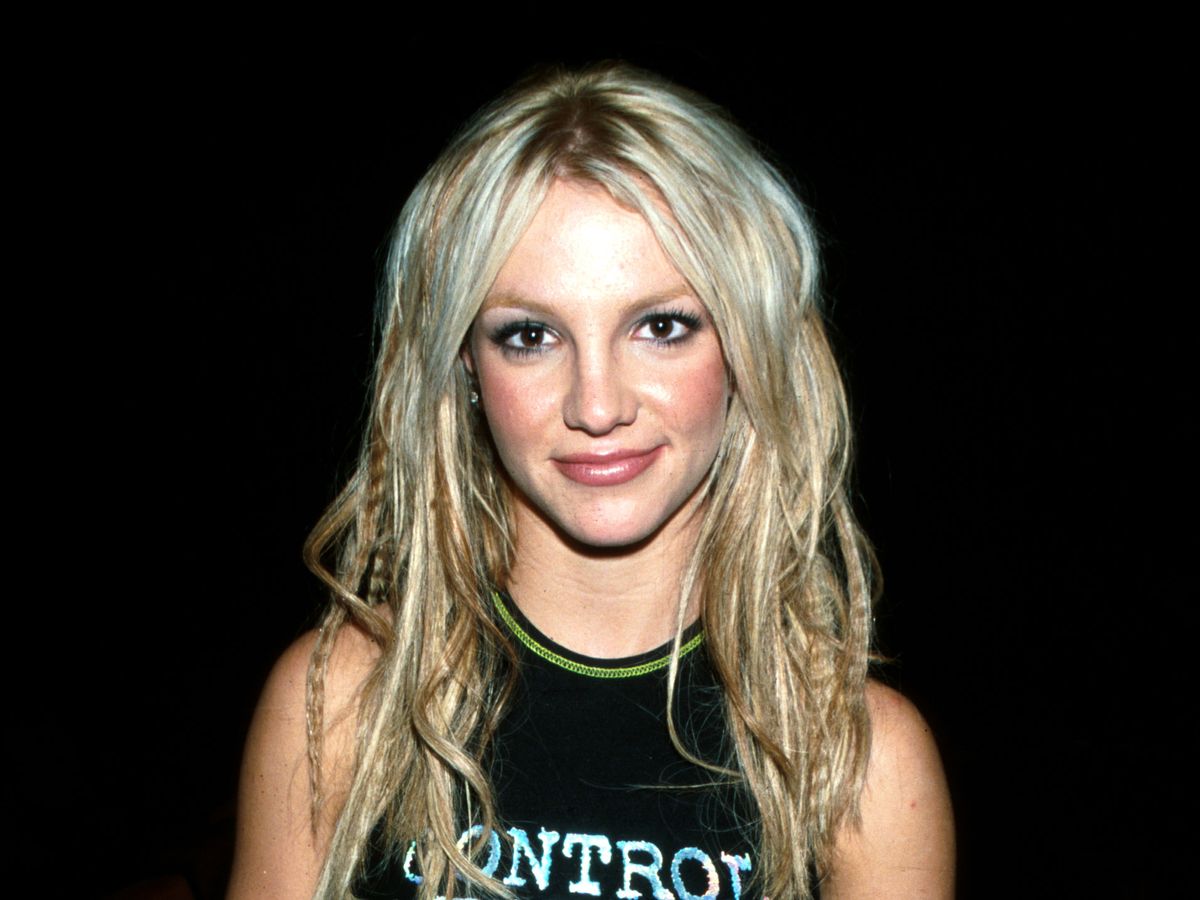
- Choose a HIGH RESOLUTION Photo of a person from the chest up. NO full body
- This can be a personal photo you took or from online
Step 2
- If you are in my class, go to Canvas- Files- Shephard Fairy-Hope Poster
- Download template
Step 3
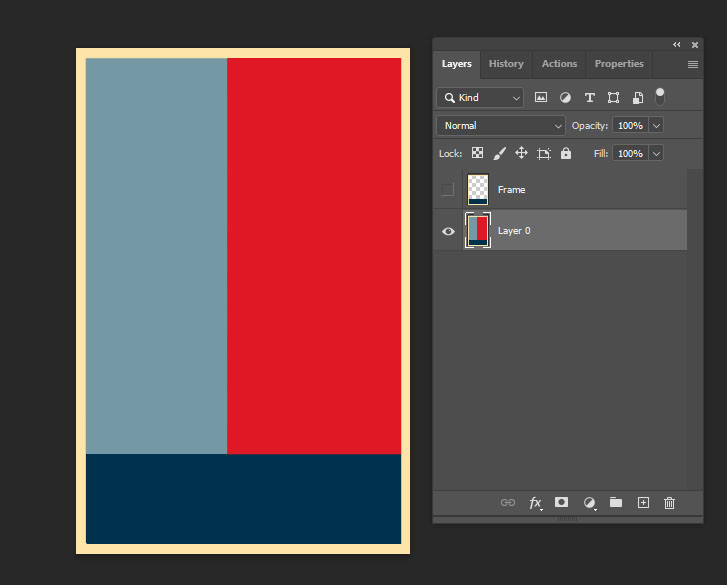
- Open the Hope Poster Template file in Photoshop
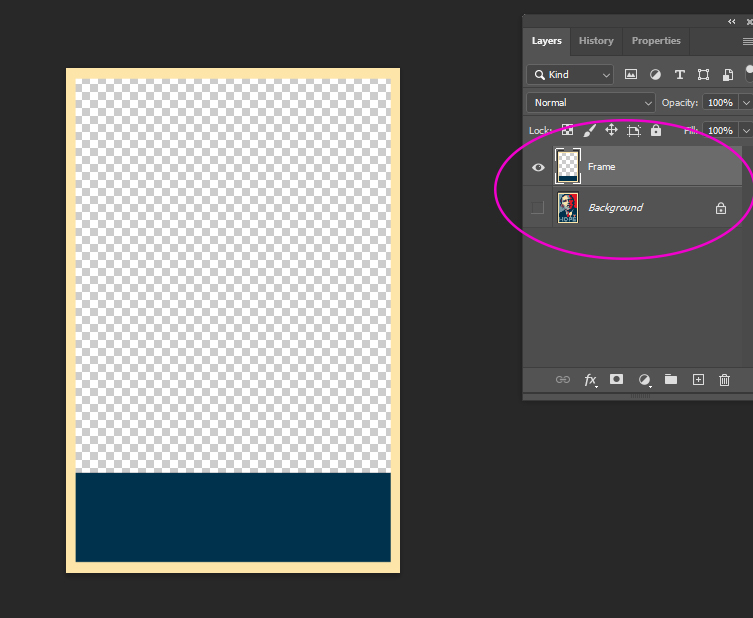
- You will have two layers when you open it
- Background and Frame
- Make sure that both layers have the eye on
- Background and Frame
- You will have two layers when you open it
Step 4
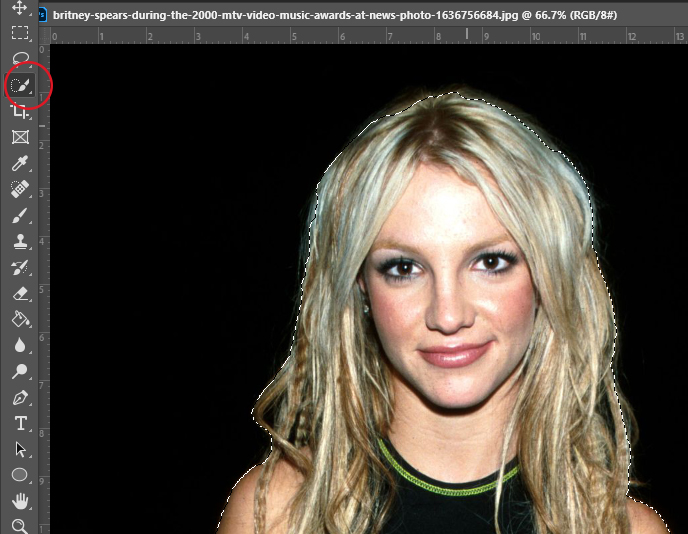
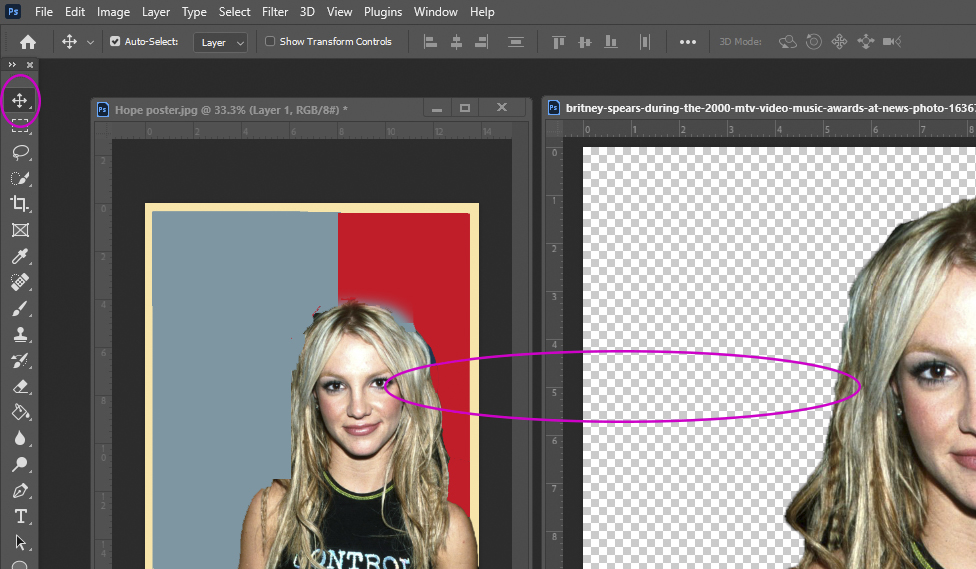
- Open the person photo
- Quick Select around the whole person
Step 5
- On the Layers Pallet
- Click on the White box with a Circle (Mask)
- This will delete the background around the person
- Click on the White box with a Circle (Mask)

Step 6
- Move person photo unto the Obama Hope Template
- Close the person file from photoshop
Step 7
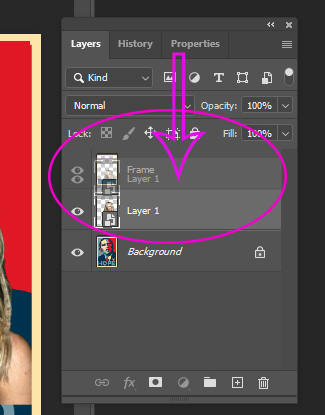
- Click on the Person Layer
- Move it under the Frame Layer
- Person Layer will now be the 2ND layer
- Move it under the Frame Layer
Step 8
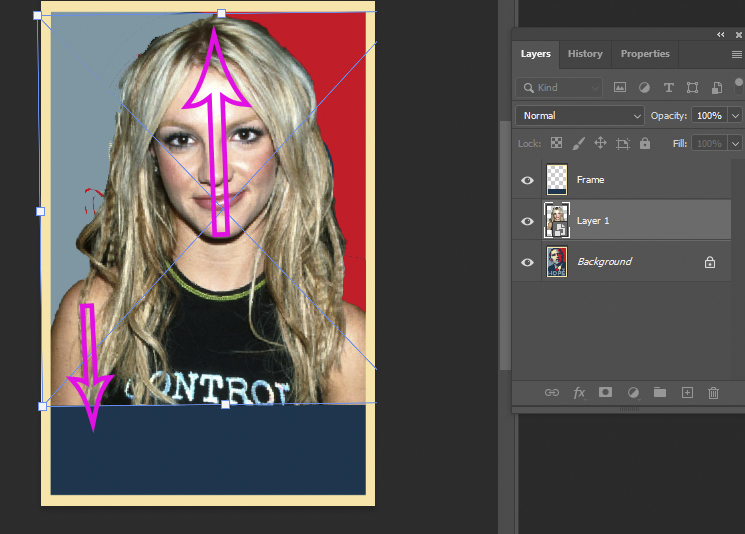
- Click Control T
- Make person fit on the poster
- The Head of the person needs to touch the top or go under the yellow bar
- Bottom of the Photo MUST go slightly under where the Dark Blue box starts
- It does not matter if the sholders touch the sides or go under the yellow line
- Bottom of the Photo MUST go slightly under where the Dark Blue box starts
- The Head of the person needs to touch the top or go under the yellow bar
- Make person fit on the poster
Step 9
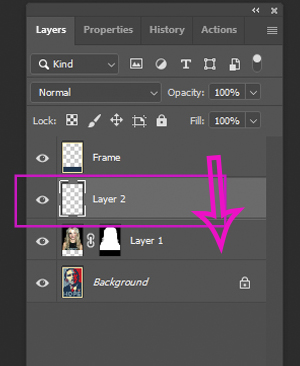
- Click on the Background Layer
- Click on the Box with the +
- This will create a new layer (Layer 2)
- Move Layer 2 BELOW the person layer
- This will create a new layer (Layer 2)
- Click on the Box with the +

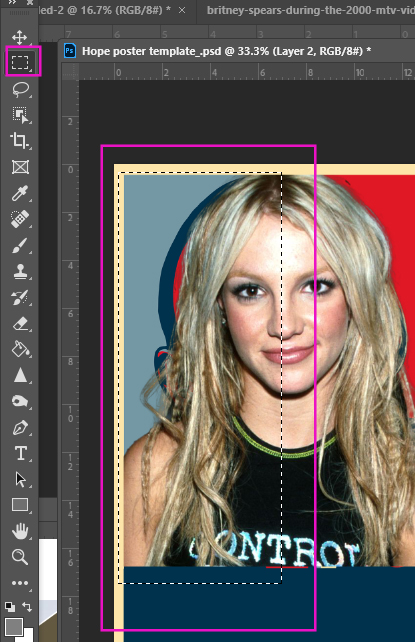
Step 10
- Click on the Rectangle Marquee Tool (second from top in tools bar)
- Click on colors at the bottom of the tools bar
- Make sure the two boxes are black and white!
- Click on colors at the bottom of the tools bar

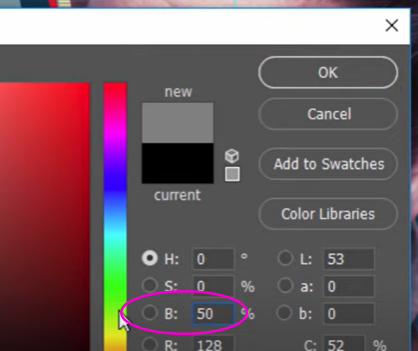
Step 11
- Double click on the top black color
- The Color Picker will open
- Change the B: to 50
- Do not change anything else
- Change the B: to 50
- The Color Picker will open
Step 12
- Pick the Rectangle Marquee Tool
- Draw a rectangle over the left side of the photo
- Stop where the red and blue background meet
- Draw a rectangle over the left side of the photo
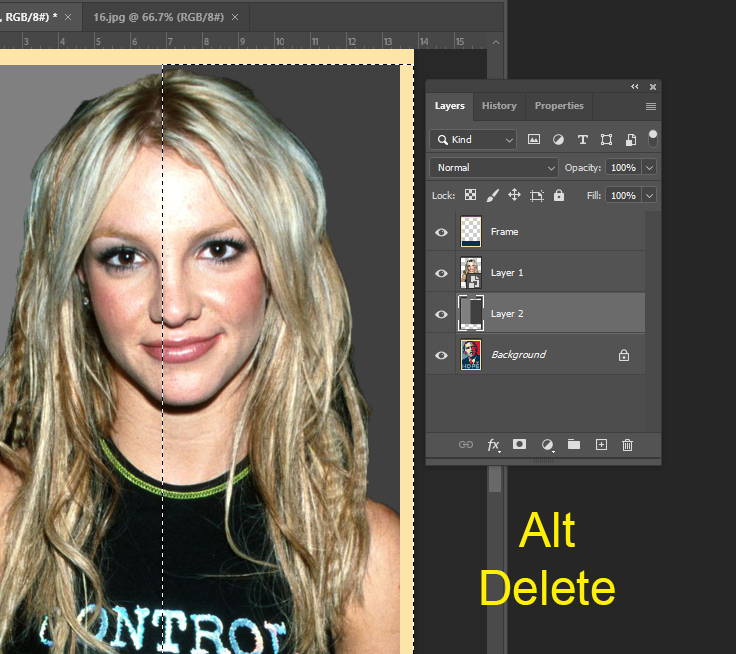
Step 13
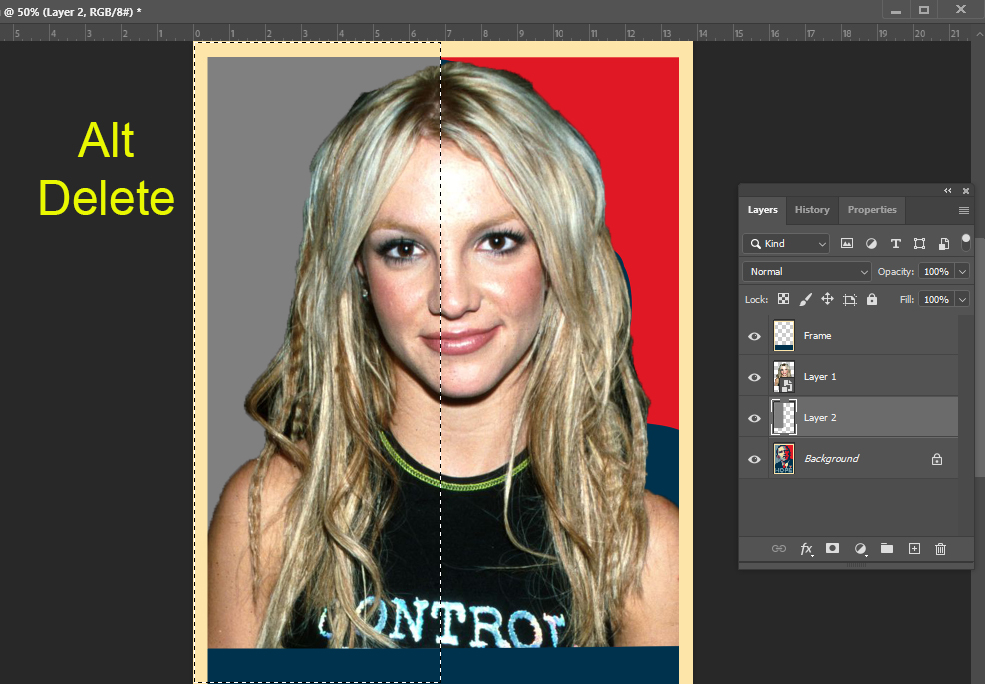
- Click
- Alt Delete at the same time
- This will turn the area behind the person Grey
- Alt Delete at the same time
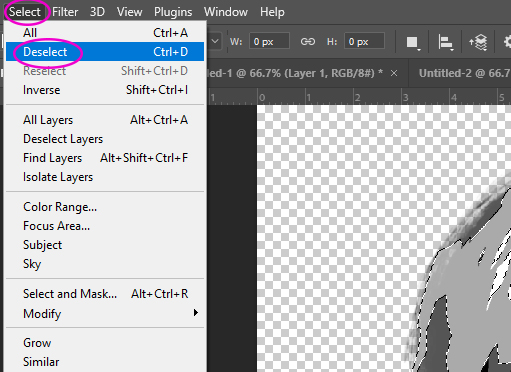
Step 14
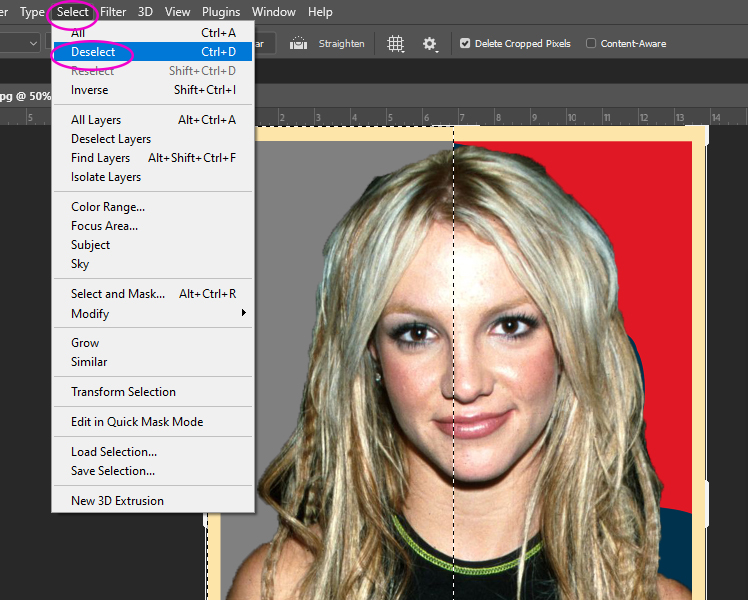
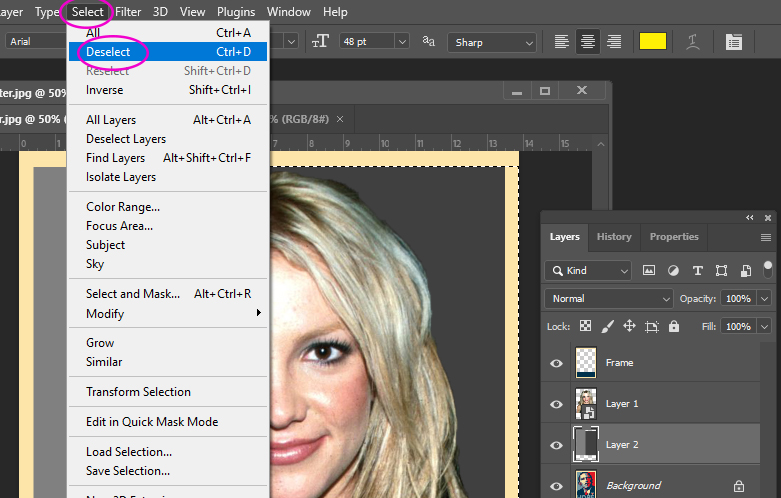
- Go to
- Select
- Deselect
- Select
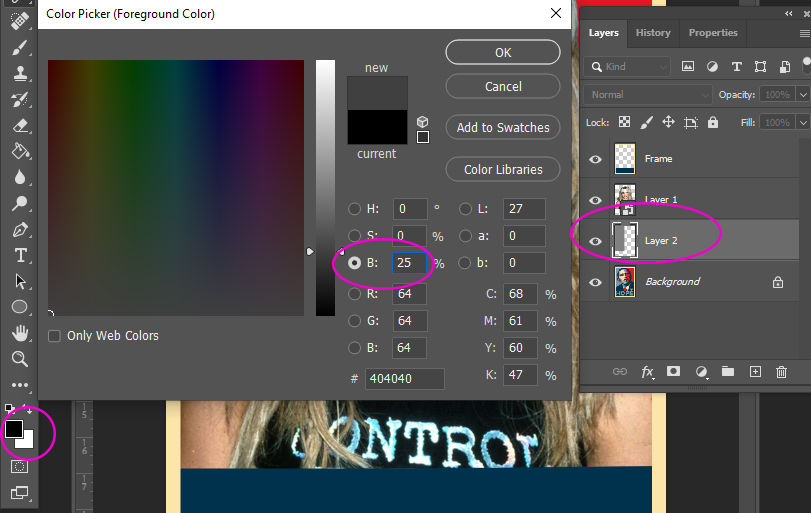
Step 15
- Double click on the Black and White color boxes
- Color Picker will open
- Change B: to 25
- Color Picker will open
Step 16
- With the Rectangle Marquee Tool
- Draw over the RIGHT side of the photo
- Start where the red and Grey line meet
- Draw over the RIGHT side of the photo

Step 17
- Click
- Alt Delete at the same time
- This will turn the area behind the person Grey
- Alt Delete at the same time
Step 18
- Go to
- Select
- Deselect
- Select
Step 19
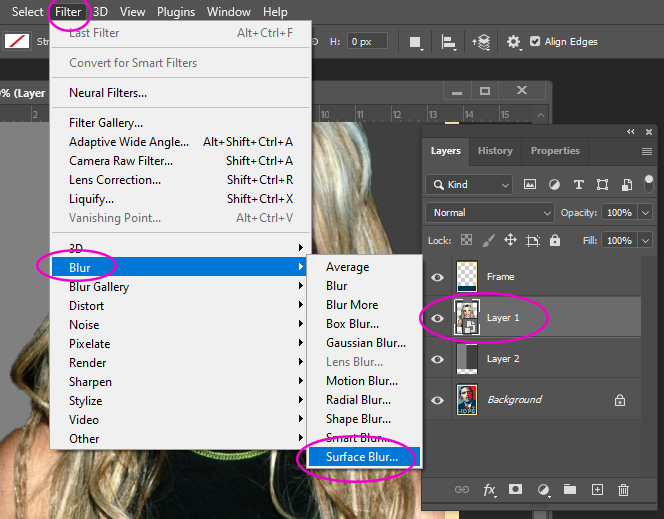
- Click on the Person Layer (Layer 1)
- Go to
- Filter
- Blur
- Surface Blur
- Blur
- Filter
- Go to
Step 20
- Radius:10
- Threshold: 10
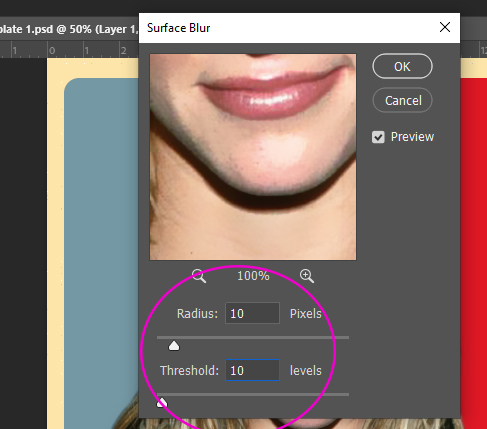
Step 21
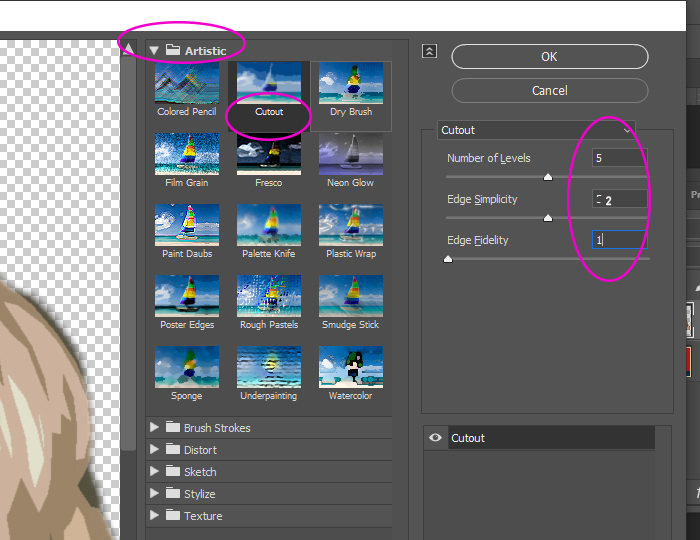
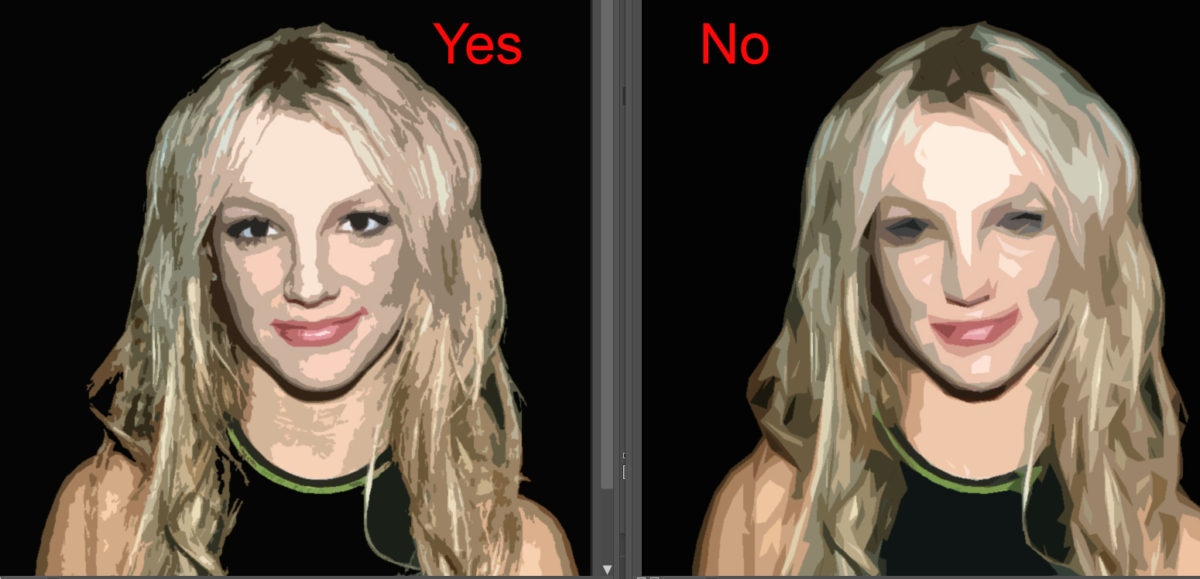
- With this step you do NOT want to lose the features of the persons face. Play with the sliders until you get the look you want.
- Go to
- Filter
- Filter Gallery
- Artistic
- Cutout
- Artistic
- Filter Gallery
- Filter
Step 22
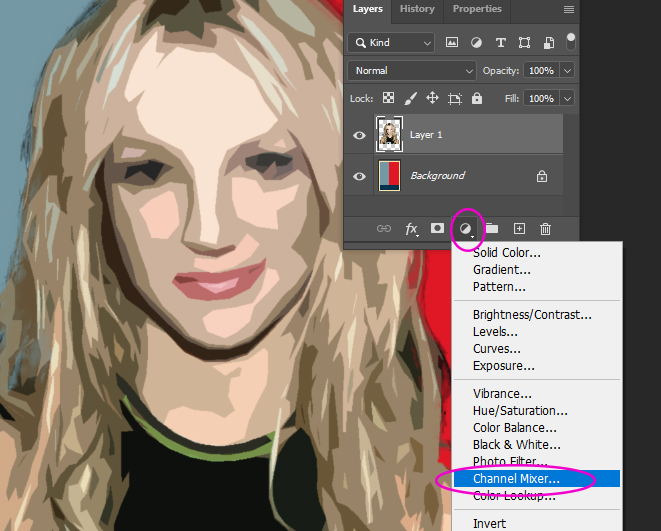
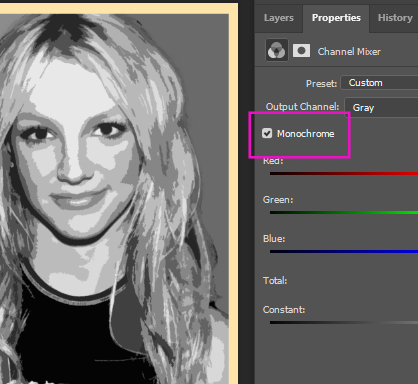
- Click on the Black/white circle at bottom of layers
- Pick Channel Mixer
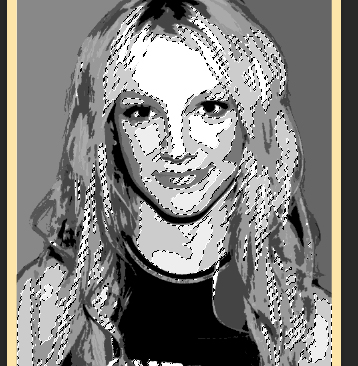
Step 23
- Click Monochrome ( little box above the color sliders)
- Project will turn black and white
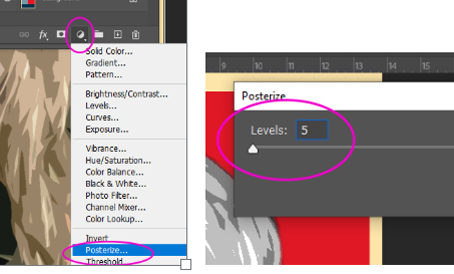
Step 24
- Make sure you are still on Person layer (layer 1)
- Click on the Black/white circle bottom of Layers Pallet
- Posterize
- Make Levels: 5
- Posterize
- Click on the Black/white circle bottom of Layers Pallet
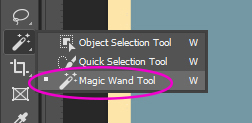
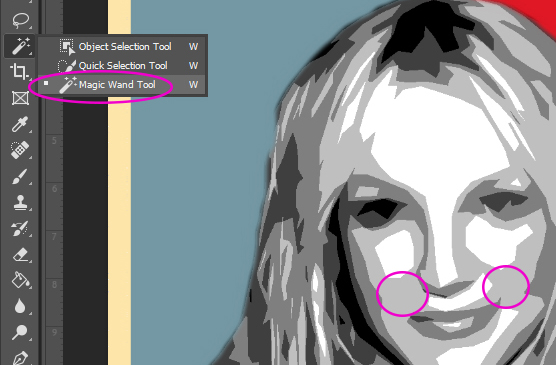
Step 25
- Must still be on Layer 1 (person layer)
- Click the Magic Wand Tool
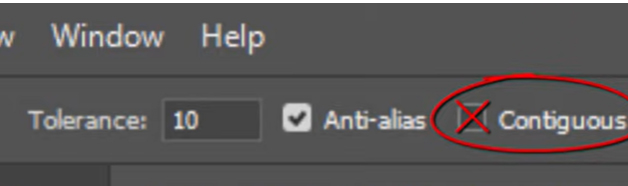
- Anti-alias is checked
- Contiguous is unchecked
- Anti-alias is checked
- Click the Magic Wand Tool
Step 26
- With the Magic Wand Tool
- Click on the 2nd Lightest Grey color on the person’s face
- You will see these areas selected with marking ants
- Click on the 2nd Lightest Grey color on the person’s face
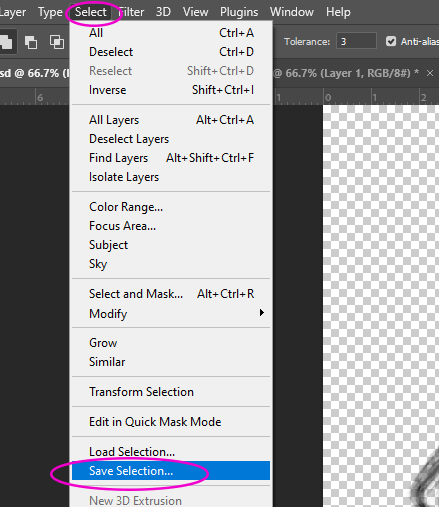
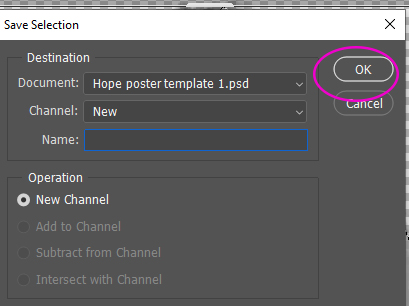
Step 27
- Go to
- Select
- Save Selections
- Click OK
- Save Selections
- Select
Step 28
- Go to
- Select
- Deselect
- Ourline will be gone
- Deselect
- Select
Step 29
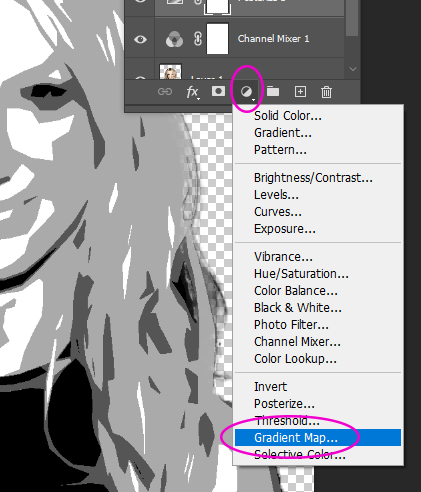
- Click on Black/White Circle at bottom of layers(Adjustments)
- Pick Gradient Map
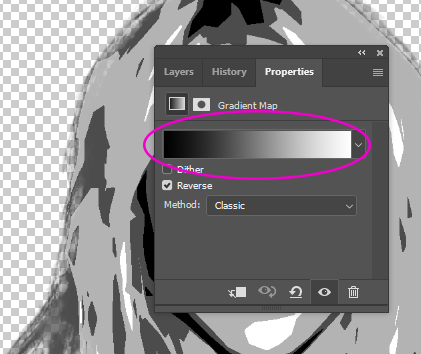
Step 30
- A LONG Black and white bar will show up under Properties
- (If your Gradient Map does NOT go from Black to White like the example do not worry about it.)
Step 31
- Double Click on the Gradient Map bar
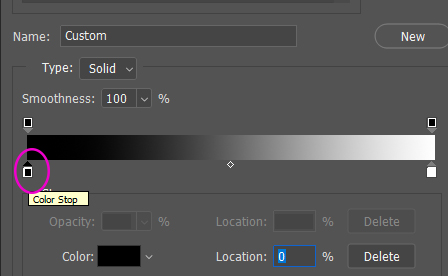
Step 32
- A new bar will pop up
- Click on the little box at the botton left of the graph
- Nothing will happen
- Click on the little box at the botton left of the graph
Step 33
- Click on
- Color
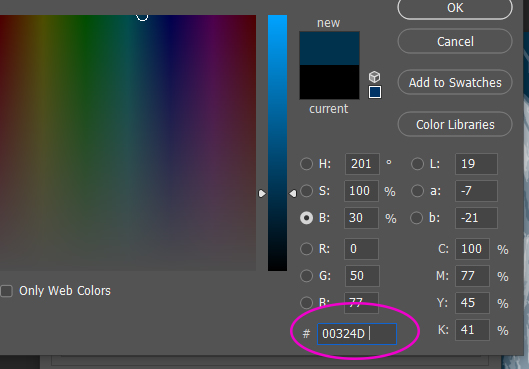
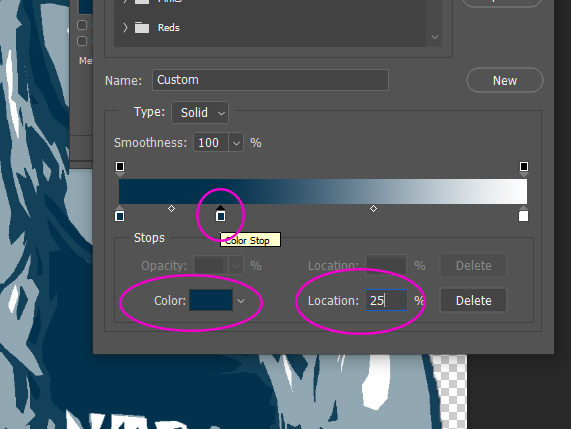
Step 34
- At the bottom of the color box type
- 00324D
- Click OK
- 00324D
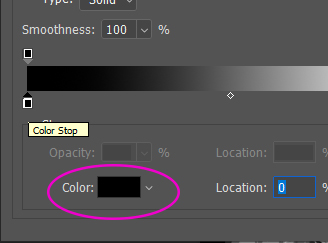
Step 35
- Location O
Step 36
- Click anywhere on the bottom of the color bar
- This will create a new box
- It does not matter what color this is right now
- This will create a new box
Step 37
- Click on the Color
- Type e01825 for the color choice
- Click OK
- Type e01825 for the color choice
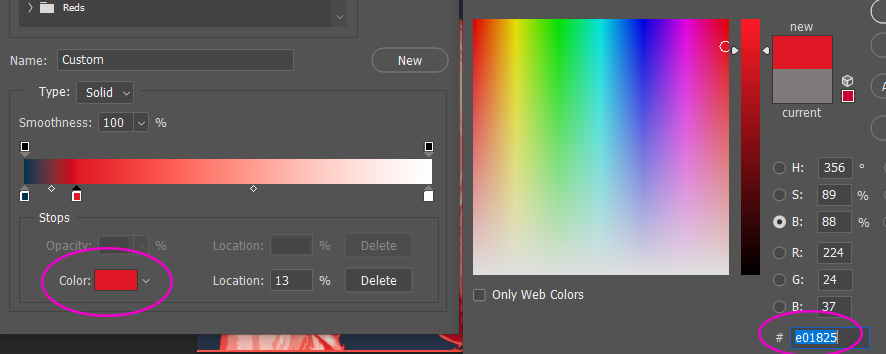
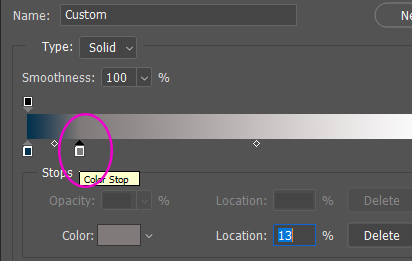
Step 38
- Location 25
Step 39
- Click anywhere to the right of the second box
- This will create a 3rd box
- Click on Color
- Type 7498A4
- Location 50
- Type 7498A4
- Click on Color
- This will create a 3rd box

Step 40
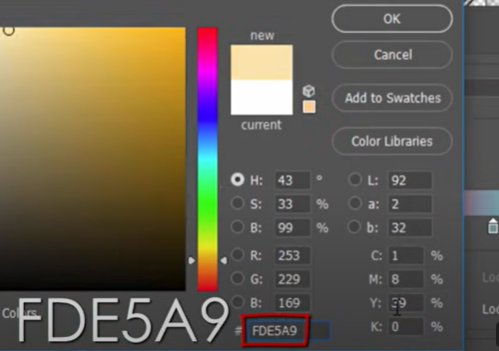
- Click anywhere to the right of the third box
- Click on Color
- Type FDE5A9
- Location 75
- Type FDE5A9
- Click on Color
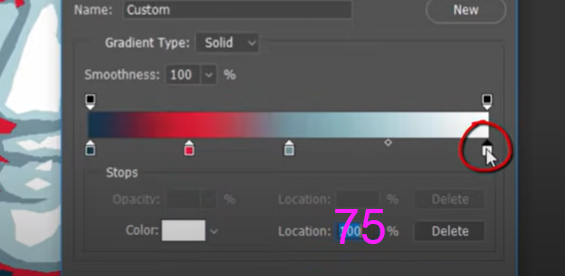
Step 41
- Click on the bottom White box ( far Right)
- Click on Color
- Type FDE5A9
- Location 100
- Type FDE5A9
- Click on Color
(You should now have 5 boxes at the bottom going from Dark Blue- Red- Light Blue- Yellow- Yellow)

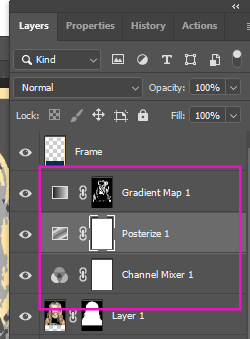
Step 42
- Go to Layers Pallet
- Make sure the three adjustments are in the following order on the layers palete!!!!!
- Gradient Map 1
- Posterize 1
- Channel Mixer 1
- Make sure the three adjustments are in the following order on the layers palete!!!!!
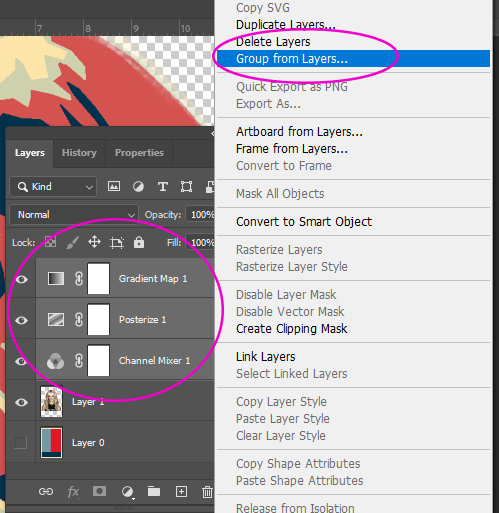
Step 43
- Highlight the three adjustment layers
- (Hold Shift Key and Click on each layer to select all of them)
- Once they are all highlighted
- Right Click
- Group from Layers
- Click OK
- Group from Layers
- Right Click
- Once they are all highlighted
- (Hold Shift Key and Click on each layer to select all of them)
_____________________________________________________
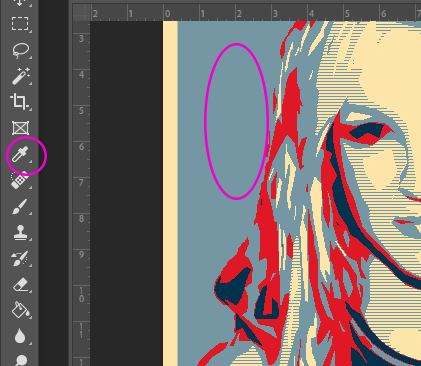
Step 44
- Pick the Eye Dropper Tool
- Click on light Blue background
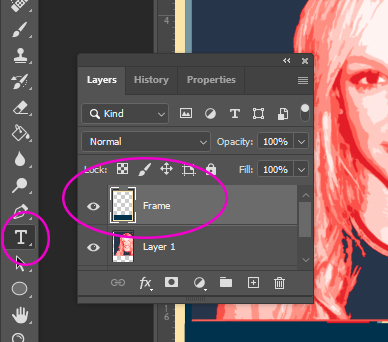
Step 45
- Click on Frame Layer (top layer)
- Click on the T (text box)
Step 46
- Draw a Text box that fills up the entire Dark Blue area
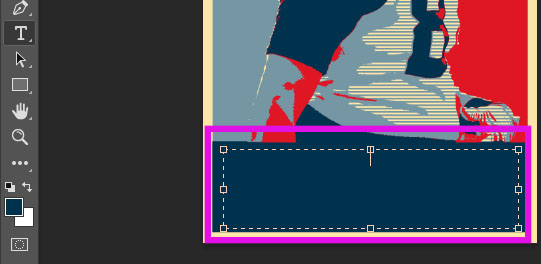
Step 47
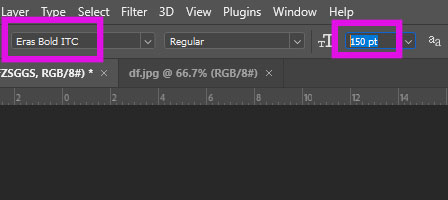
- Font
- Eras Bold ITC
- Font size between 150-200 (depending how long your word is)
- Eras Bold ITC
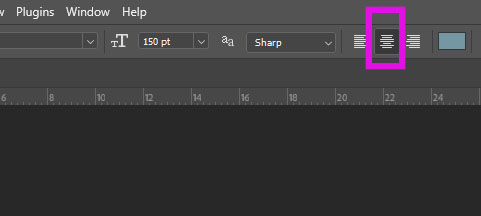
Step 48
- To the Right of the font size
- Click 2nd box of lines
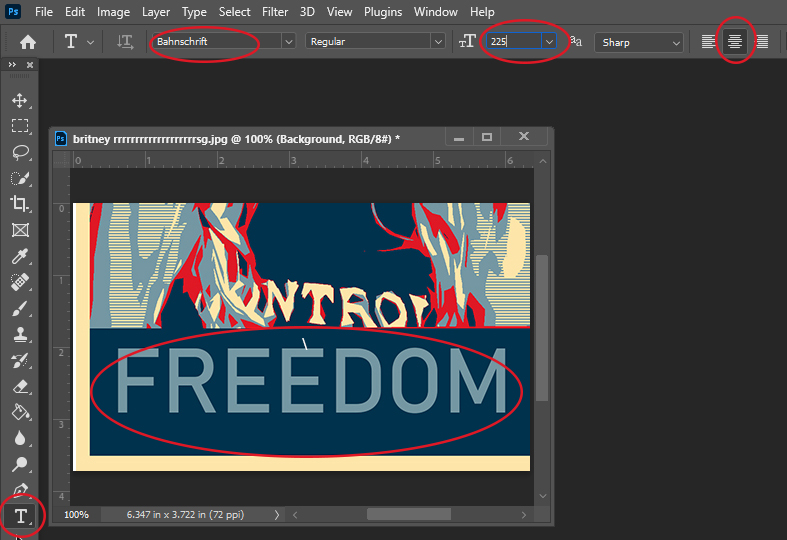
Step 49
- Put the Cap Lock on
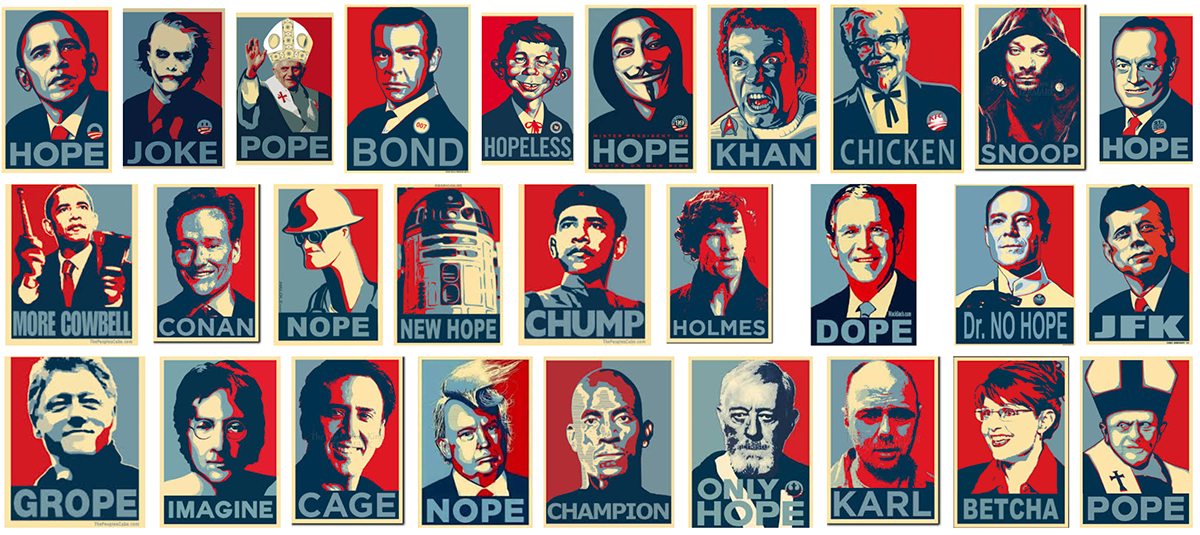
- Type in a word that relates to the person (see examples at the top of the assignment)
- You may NOT use the word HOPE. You must pick something else!
- Flatten Image
- You are NOT done YET. Read step 50!!!!!!!!!!!!!!!!
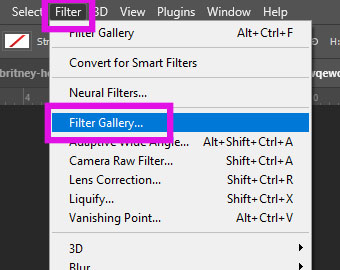
Step 50
- Go to
- Filter- Filter Gallery
- Texture
- Texturizer
- Scaling 50%
- Relief 2 – 3 (depending on how much texture you would like)
- Scaling 50%
- Texturizer
- Texture
- Filter- Filter Gallery
- STOP! You will have to save your photo a different way!
- Flatten Image
- Go to:
- File
- Save a copy
- Choose JPEG
- Save a copy
- File